Data Catalog is deprecated and will be discontinued on January 30, 2026. You can still complete this lab if you want to.
For steps to transition your Data Catalog users, workloads, and content to Dataplex Universal Catalog, see Transition from Data Catalog to Dataplex Universal Catalog (https://cloud.google.com/dataplex/docs/transition-to-dataplex-catalog).
GSP814

Overview
Dataplex Universal Catalog is an intelligent data fabric that enables organizations to centrally discover, manage, monitor, and govern their data across data lakes, data warehouses, and data marts to power analytics at scale.
Data Catalog is a fully managed, scalable metadata management service within Dataplex Universal Catalog. It offers a simple and easy-to-use search interface for data discovery, a flexible and powerful cataloging system for capturing both technical and business metadata, and a strong security and compliance foundation with Cloud Data Loss Prevention (part of Sensitive Data Protection) and Identity and Access Management (IAM) integrations.
Using Data Catalog
Using Data Catalog within Dataplex Universal Catalog, you can search for assets to which you have access, and you can tag data assets to support discovery and access control. Tags allow you to attach custom metadata fields to specific data assets for easy identification and retrieval (such as tagging certain assets as containing protected or sensitive data); you can also create reusable tag templates to rapidly assign the same tags to different data assets.
What you'll learn
In this lab, you learn how to:
- Enable the Data Catalog API.
- Configure Dataplex Universal Catalog connectors for PostgreSQL and MySQL.
- Search for PostgreSQL and MySQL entries in Data Catalog within Dataplex Universal Catalog.
Prerequisites
Note: Before starting this lab, log out of your personal or corporate gmail account, or run this lab in Incognito. This prevents sign-in confusion while the lab is running.
Setup and requirements
Before you click the Start Lab button
Read these instructions. Labs are timed and you cannot pause them. The timer, which starts when you click Start Lab, shows how long Google Cloud resources are made available to you.
This hands-on lab lets you do the lab activities in a real cloud environment, not in a simulation or demo environment. It does so by giving you new, temporary credentials you use to sign in and access Google Cloud for the duration of the lab.
To complete this lab, you need:
- Access to a standard internet browser (Chrome browser recommended).
Note: Use an Incognito (recommended) or private browser window to run this lab. This prevents conflicts between your personal account and the student account, which may cause extra charges incurred to your personal account.
- Time to complete the lab—remember, once you start, you cannot pause a lab.
Note: Use only the student account for this lab. If you use a different Google Cloud account, you may incur charges to that account.
How to start your lab and sign in to the Google Cloud console
-
Click the Start Lab button. If you need to pay for the lab, a dialog opens for you to select your payment method.
On the left is the Lab Details pane with the following:
- The Open Google Cloud console button
- Time remaining
- The temporary credentials that you must use for this lab
- Other information, if needed, to step through this lab
-
Click Open Google Cloud console (or right-click and select Open Link in Incognito Window if you are running the Chrome browser).
The lab spins up resources, and then opens another tab that shows the Sign in page.
Tip: Arrange the tabs in separate windows, side-by-side.
Note: If you see the Choose an account dialog, click Use Another Account.
-
If necessary, copy the Username below and paste it into the Sign in dialog.
{{{user_0.username | "Username"}}}
You can also find the Username in the Lab Details pane.
-
Click Next.
-
Copy the Password below and paste it into the Welcome dialog.
{{{user_0.password | "Password"}}}
You can also find the Password in the Lab Details pane.
-
Click Next.
Important: You must use the credentials the lab provides you. Do not use your Google Cloud account credentials.
Note: Using your own Google Cloud account for this lab may incur extra charges.
-
Click through the subsequent pages:
- Accept the terms and conditions.
- Do not add recovery options or two-factor authentication (because this is a temporary account).
- Do not sign up for free trials.
After a few moments, the Google Cloud console opens in this tab.
Note: To access Google Cloud products and services, click the Navigation menu or type the service or product name in the Search field.

Activate Cloud Shell
Cloud Shell is a virtual machine that is loaded with development tools. It offers a persistent 5GB home directory and runs on the Google Cloud. Cloud Shell provides command-line access to your Google Cloud resources.
-
Click Activate Cloud Shell  at the top of the Google Cloud console.
-
Click through the following windows:
- Continue through the Cloud Shell information window.
- Authorize Cloud Shell to use your credentials to make Google Cloud API calls.
When you are connected, you are already authenticated, and the project is set to your Project_ID, . The output contains a line that declares the Project_ID for this session:
Your Cloud Platform project in this session is set to {{{project_0.project_id | "PROJECT_ID"}}}
gcloud is the command-line tool for Google Cloud. It comes pre-installed on Cloud Shell and supports tab-completion.
- (Optional) You can list the active account name with this command:
gcloud auth list
- Click Authorize.
Output:
ACTIVE: *
ACCOUNT: {{{user_0.username | "ACCOUNT"}}}
To set the active account, run:
$ gcloud config set account `ACCOUNT`
- (Optional) You can list the project ID with this command:
gcloud config list project
Output:
[core]
project = {{{project_0.project_id | "PROJECT_ID"}}}
Note: For full documentation of gcloud, in Google Cloud, refer to the gcloud CLI overview guide.
Task 1. Enable the Data Catalog API
-
In the Google Cloud console, click on the Navigation menu ( ) > APIs & Services > Library.
-
In the search bar, enter Data Catalog, and select the Google Cloud Data Catalog API.
-
Click Enable.
Note: If you run into an "Action Failed" error after trying to enable the Data Catalog API, try the following steps: click close, refresh your browser tab, then click Enable again.
Click Check my progress to verify the objective.
Enable the Data Catalog API
Task 2. Connect PostgreSQL to Dataplex Universal Catalog
Create a variable for Project ID
- In Cloud Shell, run the following command to set your Project ID as an environment variable:
export PROJECT_ID=$(gcloud config get-value project)
Create the PostgreSQL Database
- Run the following command to clone the Github repository:
gsutil cp gs://spls/gsp814/cloudsql-postgresql-tooling.zip .
unzip cloudsql-postgresql-tooling.zip
- Next, change your current working directory to the cloned repo directory:
cd cloudsql-postgresql-tooling/infrastructure/terraform
- Run the following commands to change the region and zone from
us-central1 and us-central1-a to your default assigned region and zone:
export REGION={{{project_0.default_region|REGION}}}
sed -i "s/us-central1/$REGION/g" variables.tf
export ZONE={{{project_0.default_zone|ZONE}}}
sed -i "s/$REGION-a/$ZONE/g" variables.tf
- Next, execute the
init-db.sh script:
cd ~/cloudsql-postgresql-tooling
bash init-db.sh
This will create your PostgreSQL instance and populate it with a random schema. This can take around 10 to 15 minutes to complete.
Note:
If you get an Error: Failed to load "tfplan" as a plan file, re-run the init-db script.
Soon after you should receive the following output:
CREATE TABLE factory_warehouse69945.home17e97c57 ( house57588 DATE, paragraph64180 SMALLINT, ip_address61569 JSONB, date_time44962 REAL, food19478 JSONB, state8925 VARCHAR(25), cpf75444 REAL, date_time96090 SMALLINT, reason7955 CHAR(5), phone_number96292 INT, size97593 DATE, date_time609 CHAR(5), location70431 DATE )
COMPLETED
Click Check my progress to verify the objective.
Create the PostgreSQL Database
Set up the Service Account
- Create a Service Account:
gcloud iam service-accounts create postgresql2dc-credentials \
--display-name "Service Account for PostgreSQL to Data Catalog connector" \
--project $PROJECT_ID
- Next, create and download the Service Account Key:
gcloud iam service-accounts keys create "postgresql2dc-credentials.json" \
--iam-account "postgresql2dc-credentials@$PROJECT_ID.iam.gserviceaccount.com"
- Next, add Data Catalog admin role to the Service Account:
gcloud projects add-iam-policy-binding $PROJECT_ID \
--member "serviceAccount:postgresql2dc-credentials@$PROJECT_ID.iam.gserviceaccount.com" \
--quiet \
--project $PROJECT_ID \
--role "roles/datacatalog.admin"
Click Check my progress to verify the objective.
Create a Service Account for PostgreSQL
Execute PostgreSQL to Dataplex Universal Catalog connector
You can build the PostgreSQL connector yourself by going to this GitHub repository.
To facilitate its usage, this lab uses a docker image.
The variables needed were output by the Terraform config.
- Change directories into the location of the Terraform scripts:
cd infrastructure/terraform/
- Grab the environment variables:
public_ip_address=$(terraform output -raw public_ip_address)
username=$(terraform output -raw username)
password=$(terraform output -raw password)
database=$(terraform output -raw db_name)
- Change back to the root directory for the example code:
cd ~/cloudsql-postgresql-tooling
- Execute the connector:
docker run --rm --tty -v \
"$PWD":/data mesmacosta/postgresql2datacatalog:stable \
--datacatalog-project-id=$PROJECT_ID \
--datacatalog-location-id=$REGION \
--postgresql-host=$public_ip_address \
--postgresql-user=$username \
--postgresql-pass=$password \
--postgresql-database=$database
Soon after you should receive the following output:
============End postgresql-to-datacatalog============
Click Check my progress to verify the objective.
Execute PostgreSQL to Data Catalog connector
Check the results of the script
-
Navigate to Dataplex Universal Catalog in the Google Cloud console by clicking on the Navigation menu () > View all products > Analytics > Dataplex Universal Catalog.
-
Click on Catalog then Aspect types & Tag Templates.
You should see the following postgresql Tag Templates:

- Click on Entry groups.
You should see the following postgresql Entry Group:

- Now click on the
postgresql Entry Group. Your console should resemble the following:
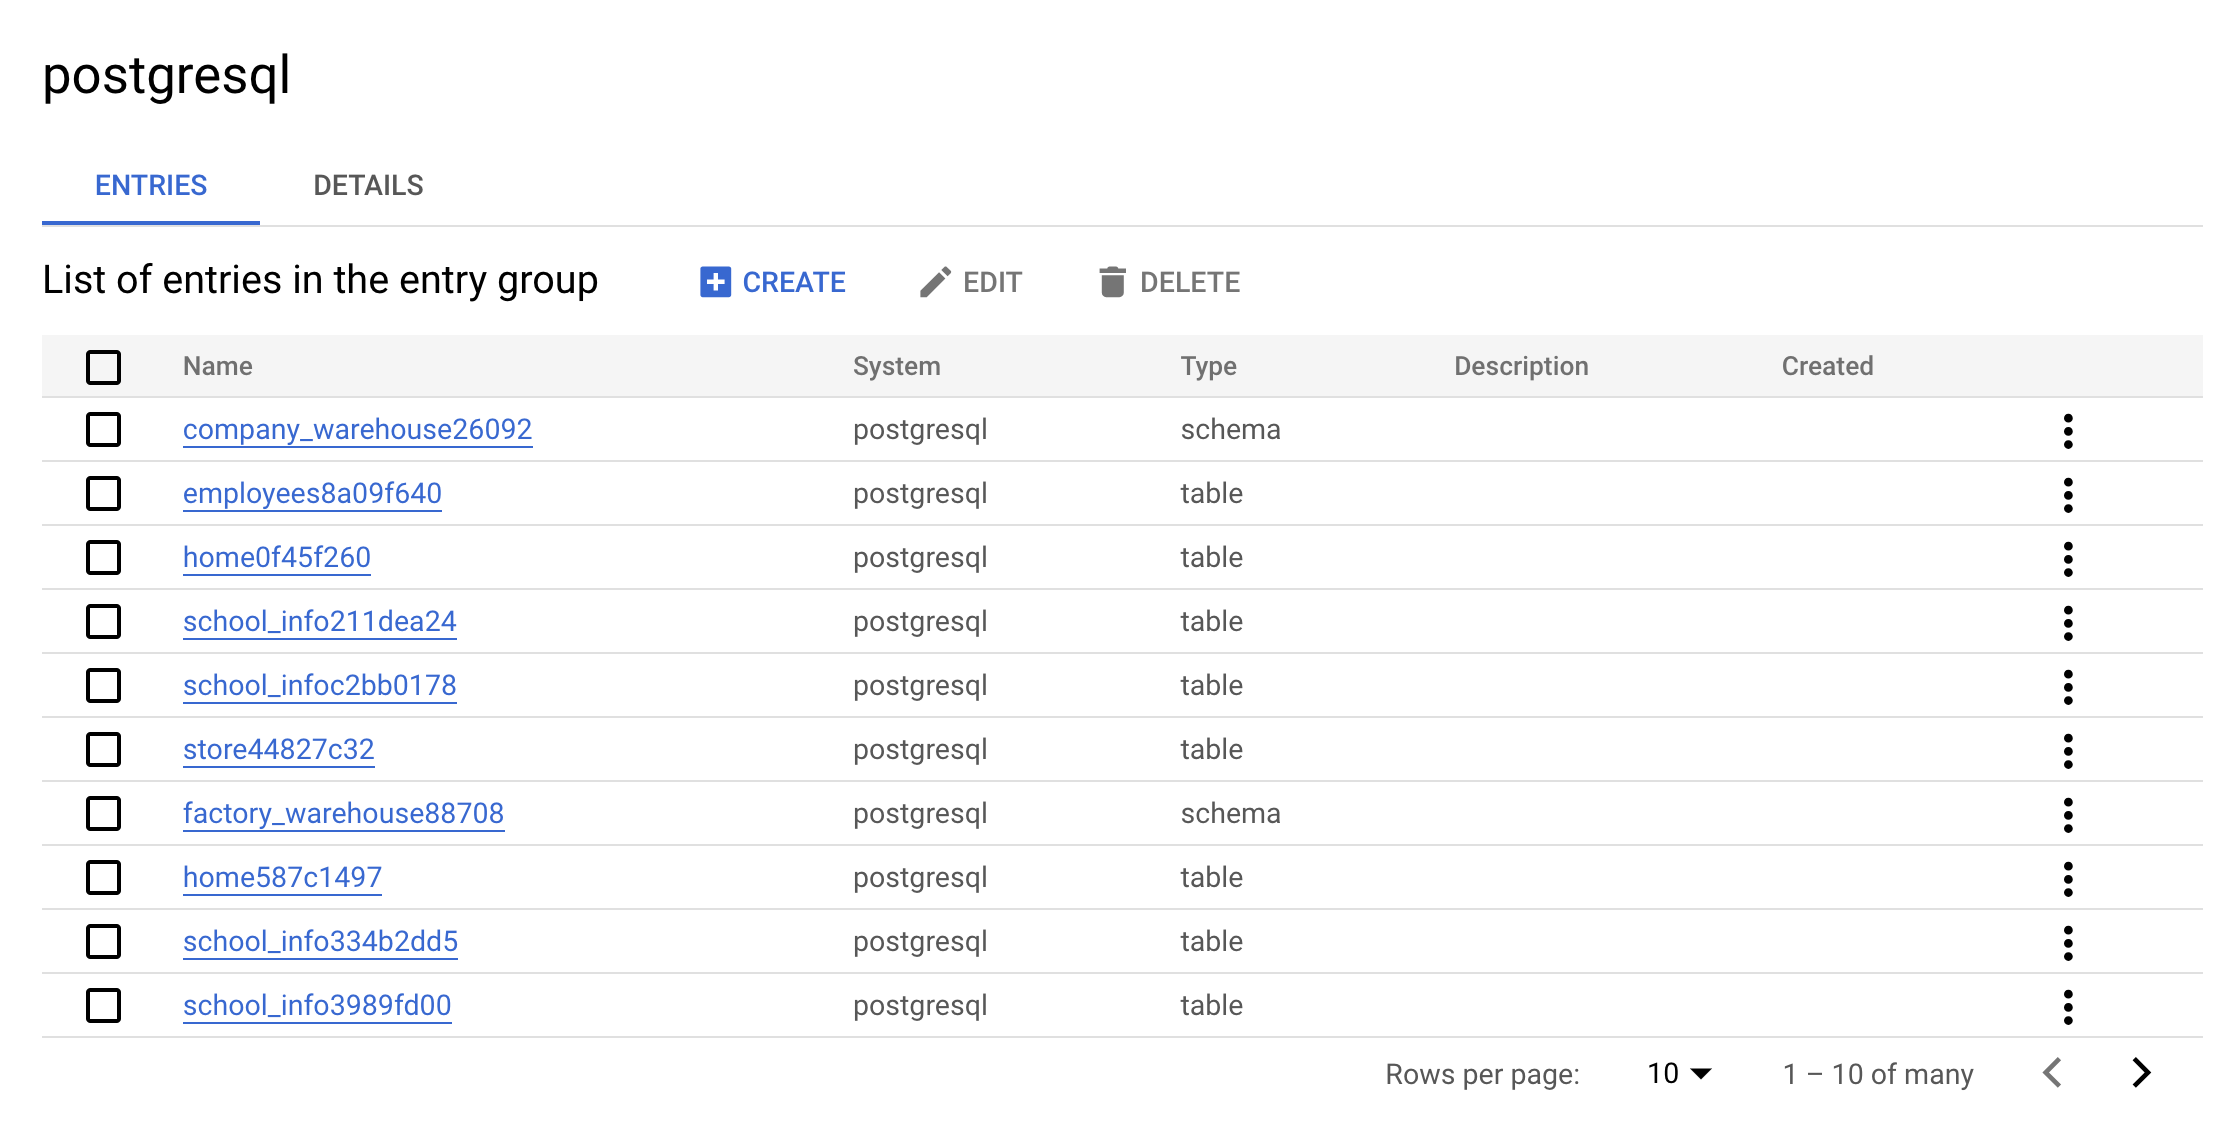
This is the real value of an Entry Group — you can see all entries that belong to postgresql using the UI.
- Click on one of the
warehouse entries. Look at the Custom entry details and tags:
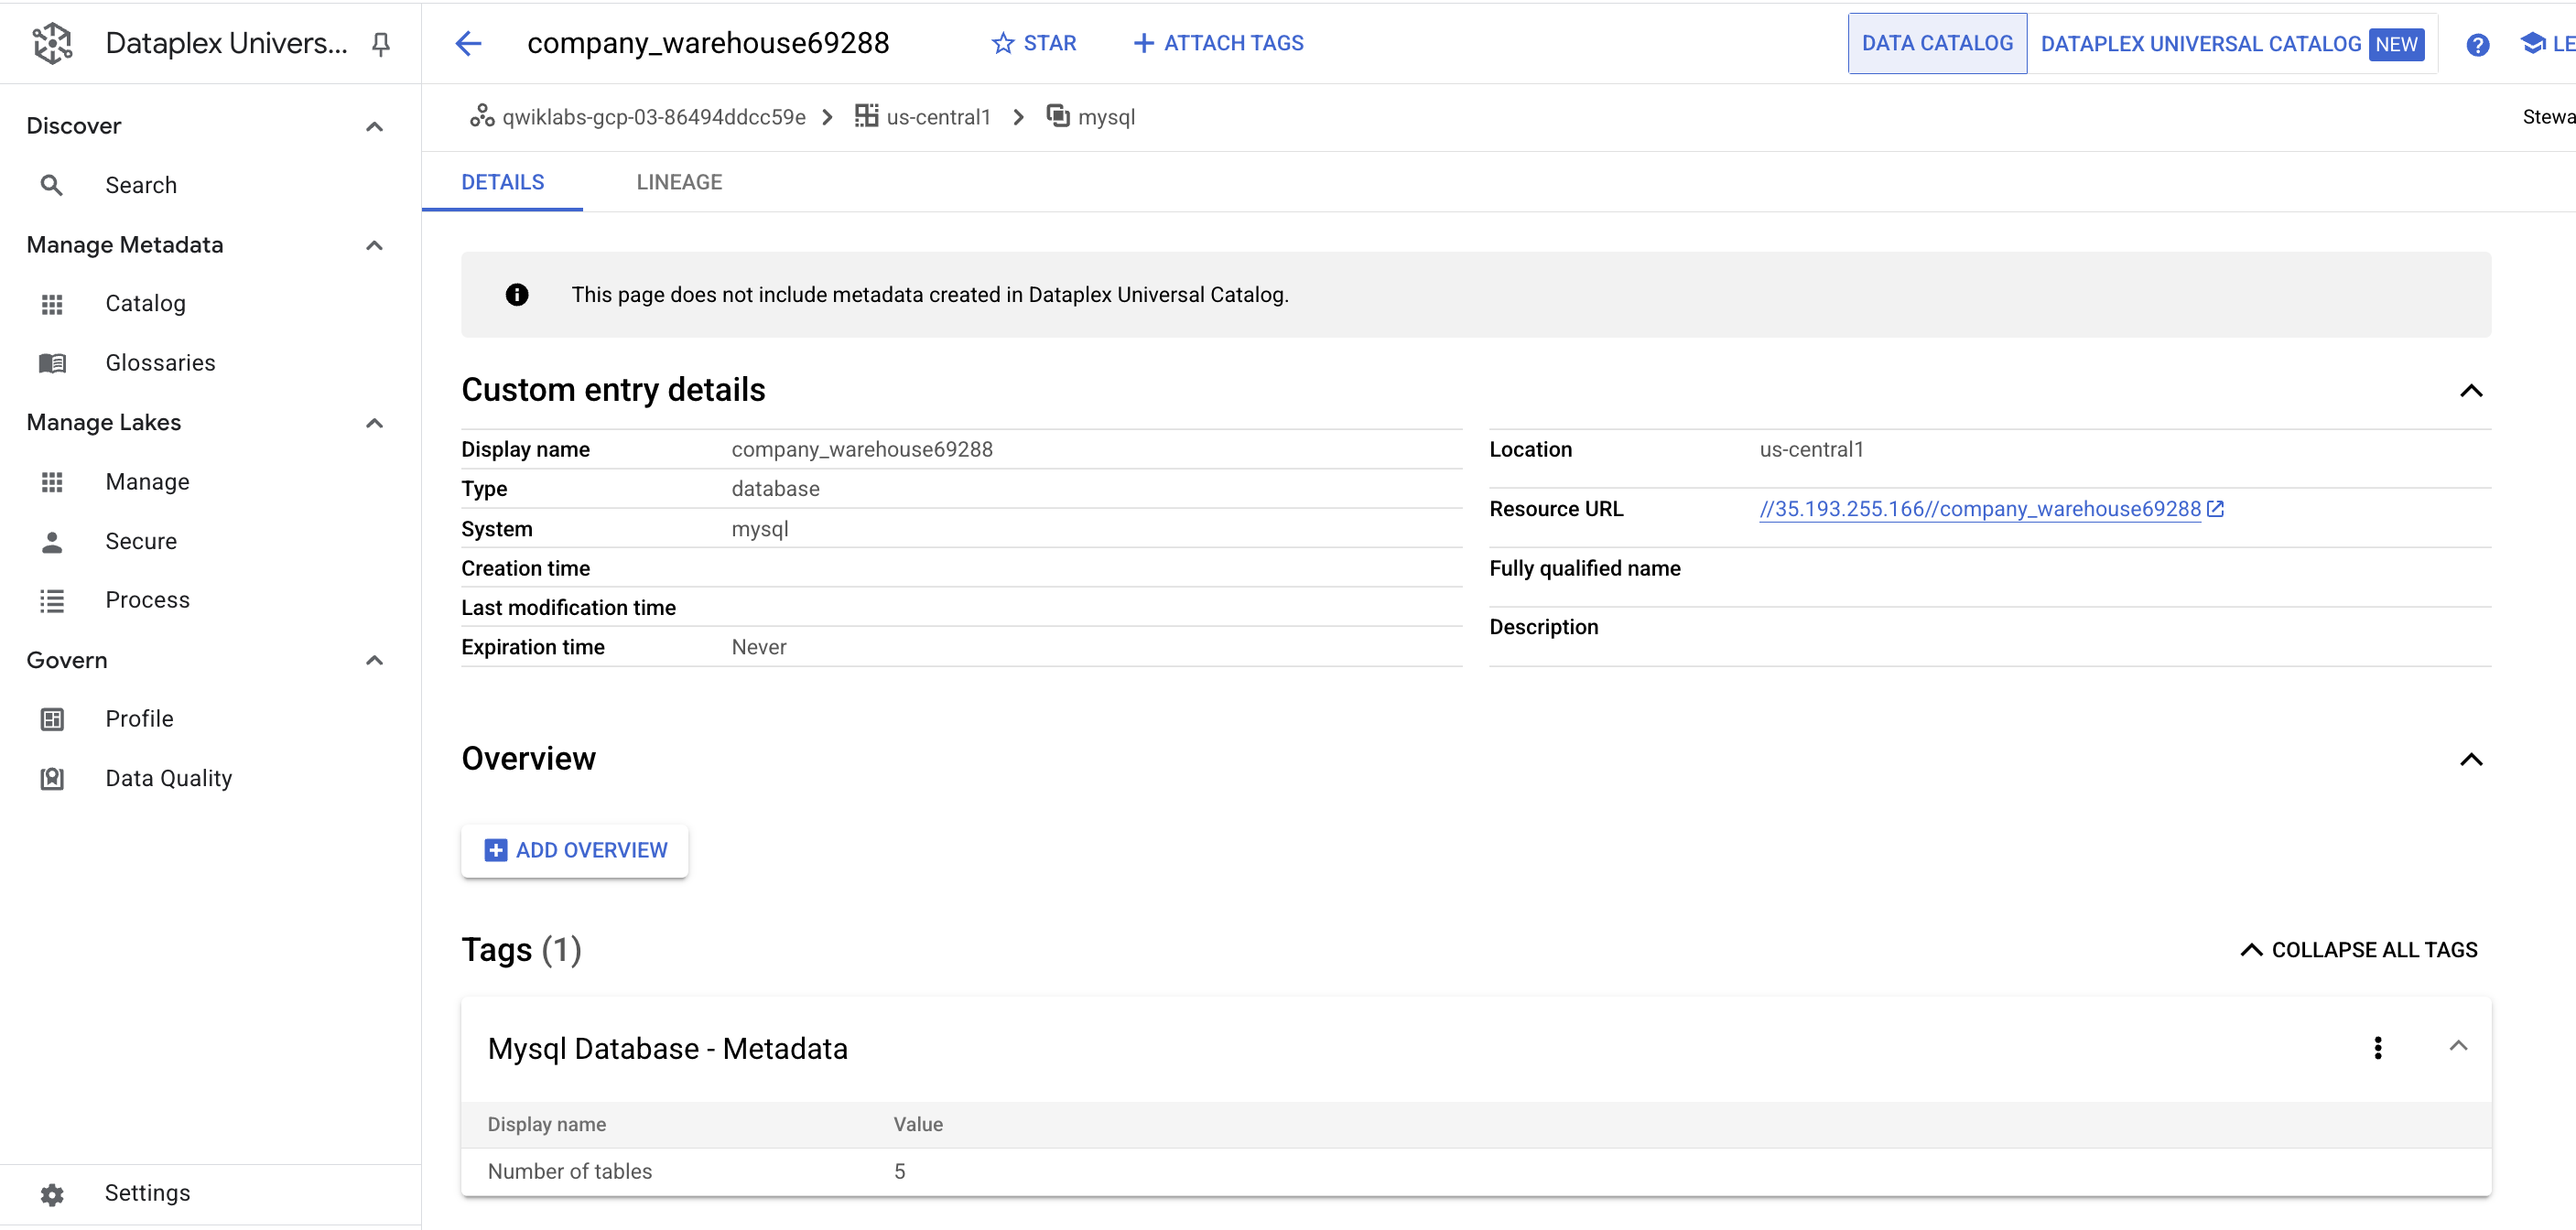
This is the real value the connector adds—it allows you to have the metadata searchable in Dataplex Universal Catalog.
Clean up
- To delete the created resources, run the following command to delete the PostgreSQL metadata:
./cleanup-db.sh
- Now execute the cleaner container:
docker run --rm --tty -v \
"$PWD":/data mesmacosta/postgresql-datacatalog-cleaner:stable \
--datacatalog-project-ids=$PROJECT_ID \
--rdbms-type=postgresql \
--table-container-type=schema
- Finally, delete the PostgreSQL database:
./delete-db.sh
-
From the Dataplex Universal Catalog menu, under Discover, click on the Search page.
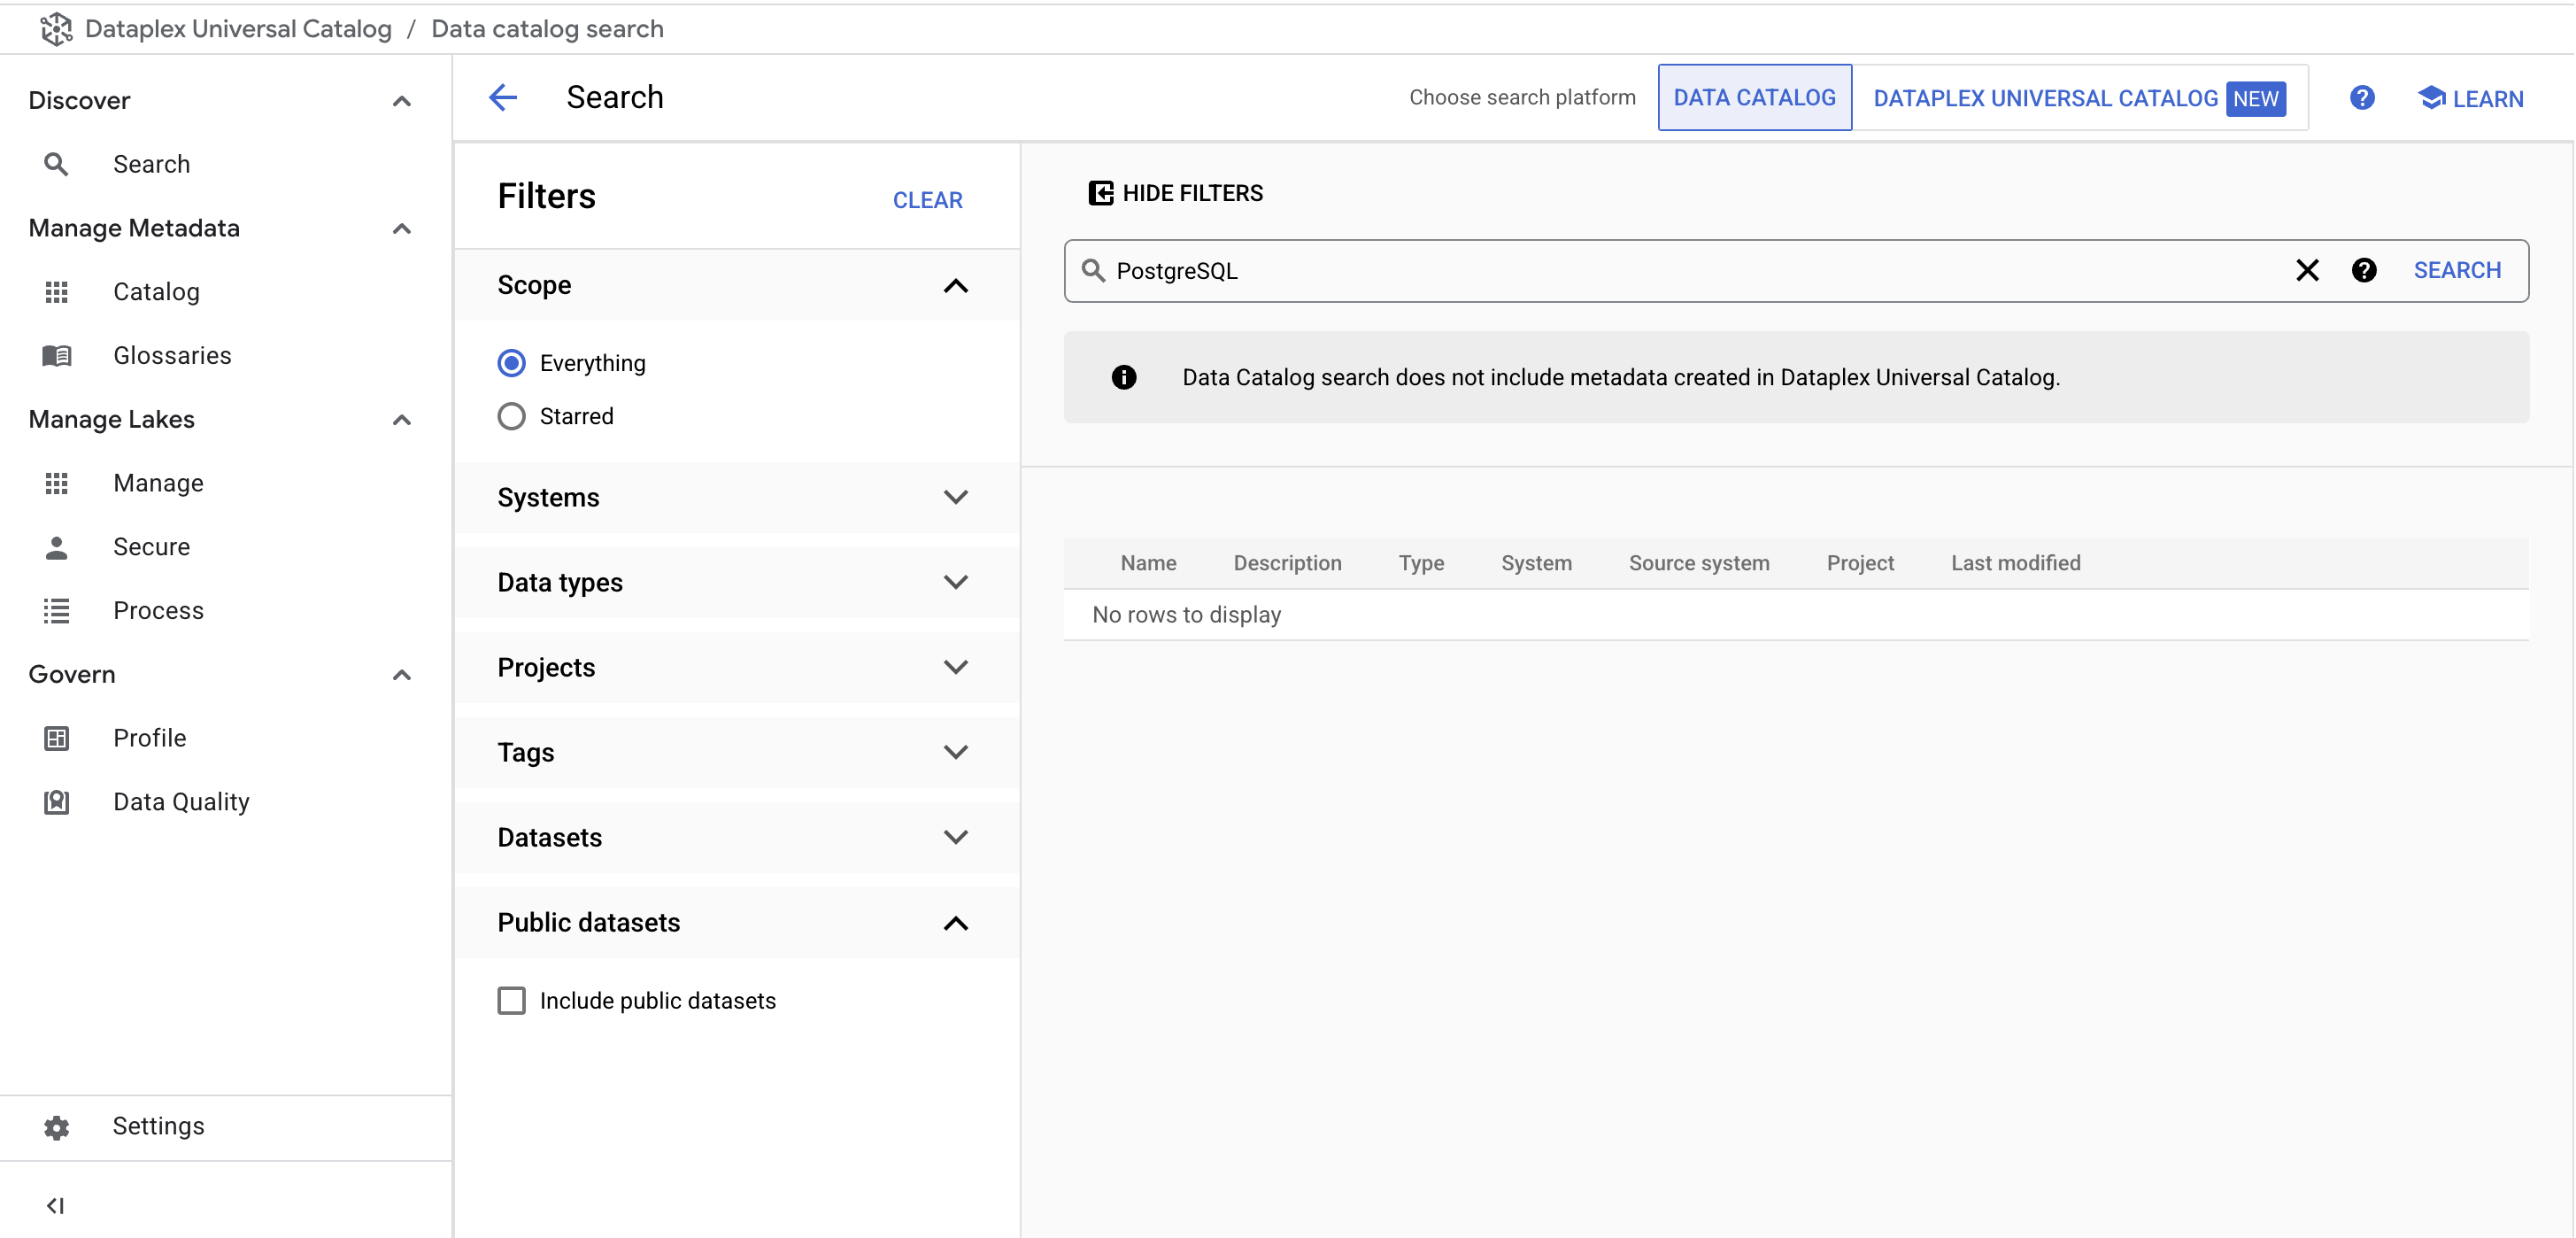
-
In the search bar, enter PostgreSQL and click Search.
You no longer see the PostgreSQL Tag Templates in the results:
Ensure you see the following output in Cloud Shell before you move on:
Cloud SQL Instance deleted
COMPLETED
Next, you learn how to do the same thing with a MySQL instance.
Task 3. Connect MySQL to Dataplex Universal Catalog
Create the MySQL database
- Run the following command in Cloud Shell to return to your home directory:
cd
- Run the following command to download the scripts to create and populate your MySQL instance:
gsutil cp gs://spls/gsp814/cloudsql-mysql-tooling.zip .
unzip cloudsql-mysql-tooling.zip
- Now change your current working directory to the cloned repo directory:
cd cloudsql-mysql-tooling/infrastructure/terraform
- Run the following commands to change the region and zone from
us-central1 and us-central1-a to your default assigned region and zone:
export REGION={{{project_0.default_region|REGION}}}
sed -i "s/us-central1/$REGION/g" variables.tf
export ZONE={{{project_0.default_zone|ZONE}}}
sed -i "s/$REGION-a/$ZONE/g" variables.tf
- Next execute the
init-db.sh script:
cd ~/cloudsql-mysql-tooling
bash init-db.sh
This creates your MySQL instance and populate it with a random schema. After a few minutes, you should receive the following output:
CREATE TABLE factory_warehouse14342.persons88a5ebc4 ( address9634 TEXT, cpf12934 FLOAT, food88799 BOOL, food4761 LONGTEXT, credit_card44049 FLOAT, city8417 TINYINT, name76076 DATETIME, address19458 TIME, reason49953 DATETIME )
COMPLETED
Note:
If you get an Error: Failed to load "tfplan" as a plan file, re-run the init-db script.
Click Check my progress to verify the objective.
Create the MySQL Database
Set up the Service Account
- Run the following to create a Service Account:
gcloud iam service-accounts create mysql2dc-credentials \
--display-name "Service Account for MySQL to Data Catalog connector" \
--project $PROJECT_ID
- Next, create and download the Service Account Key:
gcloud iam service-accounts keys create "mysql2dc-credentials.json" \
--iam-account "mysql2dc-credentials@$PROJECT_ID.iam.gserviceaccount.com"
- Next add Data Catalog admin role to the Service Account:
gcloud projects add-iam-policy-binding $PROJECT_ID \
--member "serviceAccount:mysql2dc-credentials@$PROJECT_ID.iam.gserviceaccount.com" \
--quiet \
--project $PROJECT_ID \
--role "roles/datacatalog.admin"
Click Check my progress to verify the objective.
Create a Service Account for MySQL
Execute MySQL to Dataplex Universal Catalog connector
You can build the MySQL connector yourself by going to this GitHub repository.
To facilitate its usage, this lab uses a docker image.
The variables needed were output by the Terraform config.
- Change directories into the location of the Terraform scripts:
cd infrastructure/terraform/
- Grab the environment variables:
public_ip_address=$(terraform output -raw public_ip_address)
username=$(terraform output -raw username)
password=$(terraform output -raw password)
database=$(terraform output -raw db_name)
- Change back to the root directory for the example code:
cd ~/cloudsql-mysql-tooling
- Execute the connector:
docker run --rm --tty -v \
"$PWD":/data mesmacosta/mysql2datacatalog:stable \
--datacatalog-project-id=$PROJECT_ID \
--datacatalog-location-id=$REGION \
--mysql-host=$public_ip_address \
--mysql-user=$username \
--mysql-pass=$password \
--mysql-database=$database
Soon after you should receive the following output:
============End mysql-to-datacatalog============
Click Check my progress to verify the objective.
Execute MySQL to Data Catalog connector
Check the results of the script
-
Navigate to Dataplex Universal Catalog in the Google Cloud console by clicking on the Navigation menu () > View all products > Analytics > Dataplex Universal Catalog.
-
Click on Catalog then Aspect types & Tag Templates.
You should see the following mysql Tag Templates:

- Click on Entry groups.
You should see the following mysql Entry Group:

- Now click on the
mysql Entry Group. Your console should resemble the following:
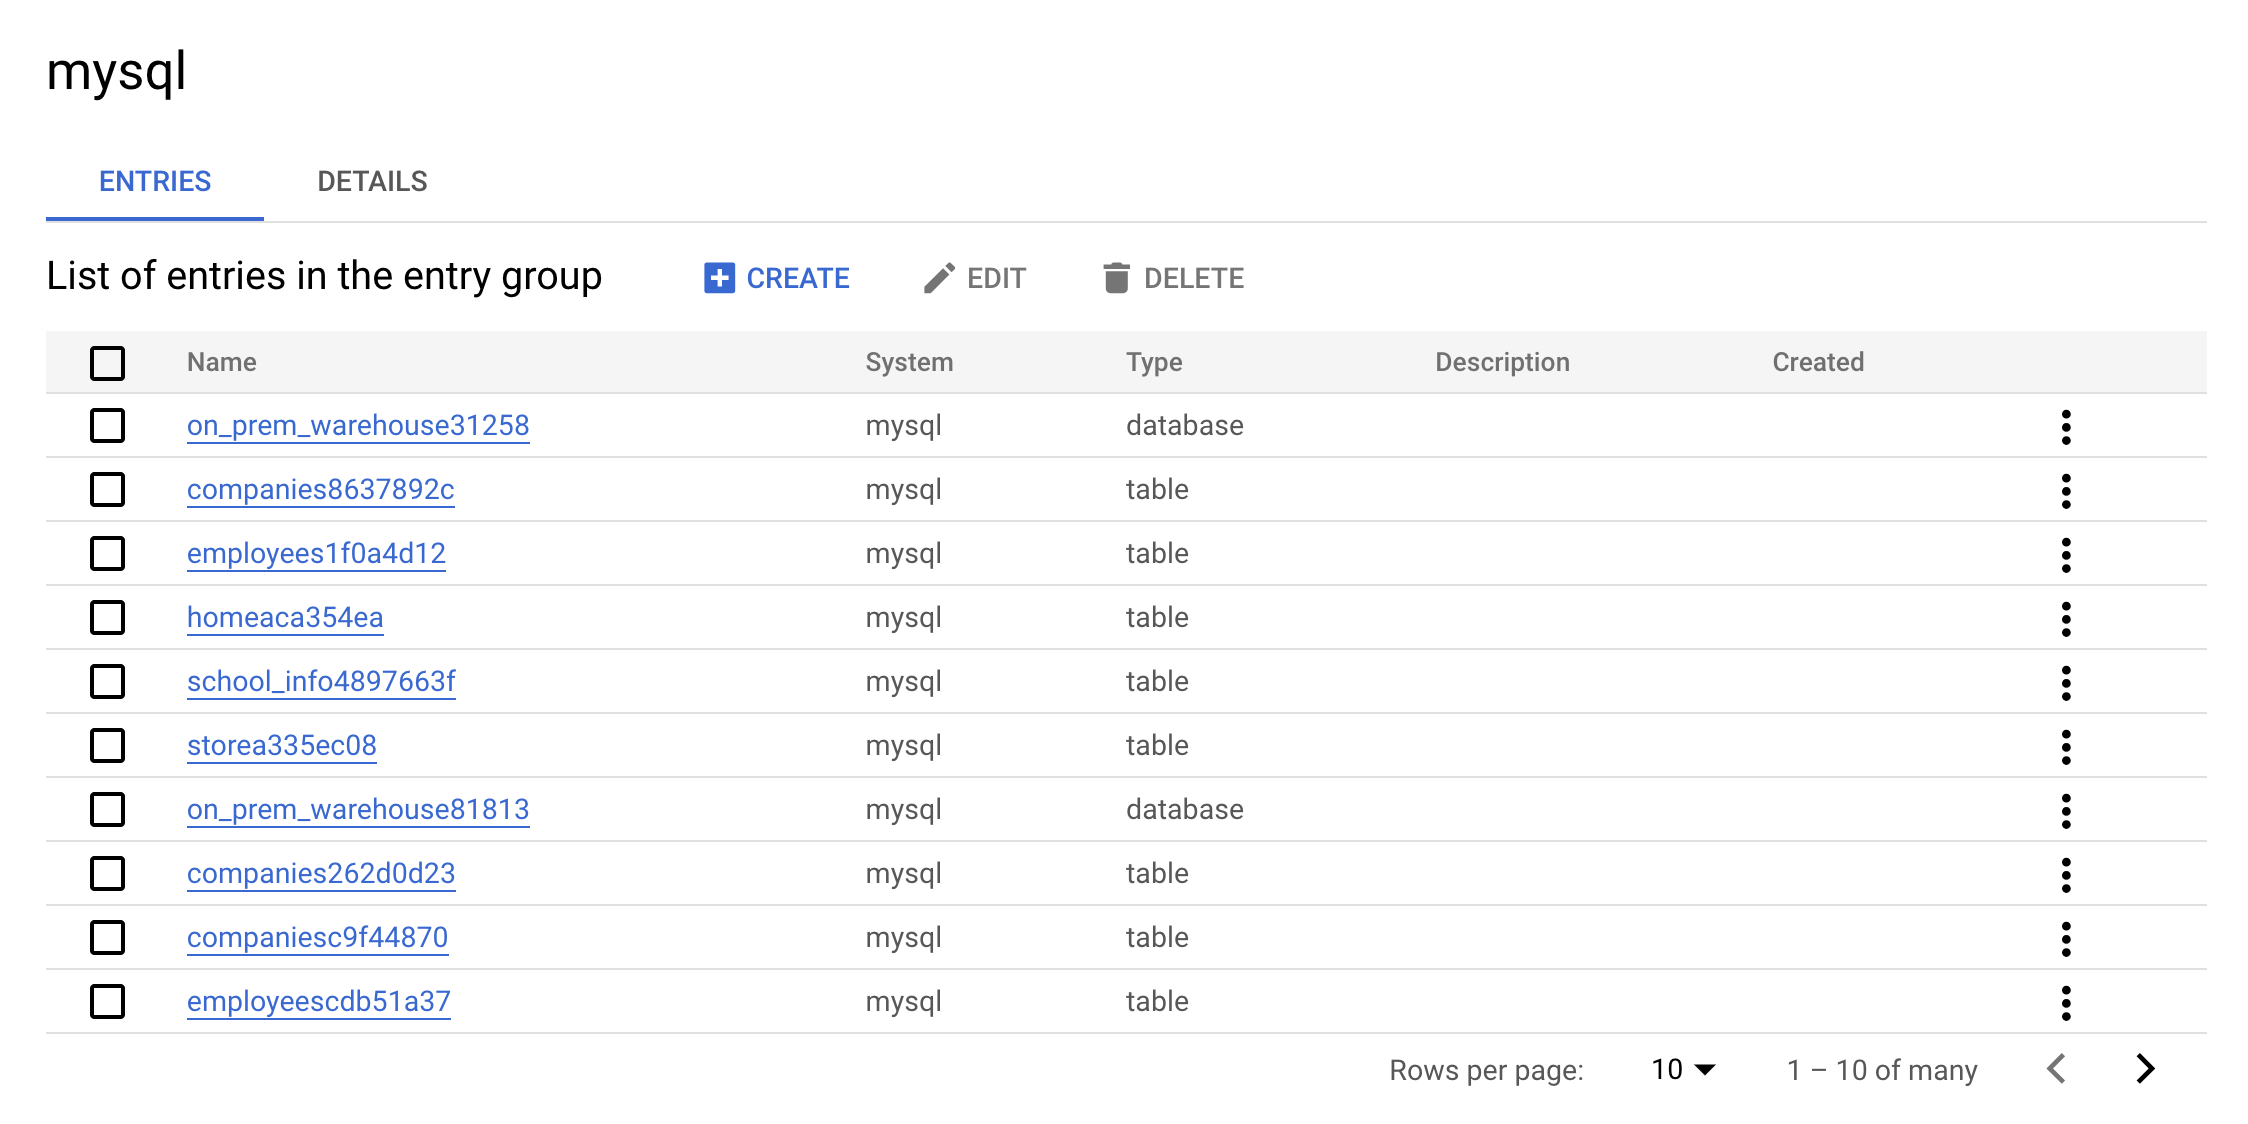
This is the real value of an Entry Group — you can see all entries that belong to MySQL using the UI.
- Click on one of the
warehouse entries. Look at the Custom entry details and tags.
This is the real value the connector adds — it allows you to have the metadata searchable in Dataplex Universal Catalog.
Clean up
- To delete the created resources, run the following command to delete the MySQL metadata:
./cleanup-db.sh
- Now execute the cleaner container:
docker run --rm --tty -v \
"$PWD":/data mesmacosta/mysql-datacatalog-cleaner:stable \
--datacatalog-project-ids=$PROJECT_ID \
--rdbms-type=mysql \
--table-container-type=database
- Finally, delete the PostgreSQL database:
./delete-db.sh
Ensure you see the following output in Cloud Shell before you move on:
Cloud SQL Instance deleted
COMPLETED
-
From the Dataplex Universal Catalog menu, under Discover, click on the Search page.
-
In the search bar, enter MySQL and click Search.
You no longer see the MySQL Tag Templates in the results.
Congratulations!
In this lab, you learned how to build and execute PostgreSQL and MySQL to Dataplex Universal Catalog connectors. You also learned how to search for PostgreSQL and MySQL entries in Data Catalog within Dataplex Universal Catalog. You can now use this knowledge to build your own connectors.
Next steps / Learn more
Google Cloud training and certification
...helps you make the most of Google Cloud technologies. Our classes include technical skills and best practices to help you get up to speed quickly and continue your learning journey. We offer fundamental to advanced level training, with on-demand, live, and virtual options to suit your busy schedule. Certifications help you validate and prove your skill and expertise in Google Cloud technologies.
Manual Last Updated May 26, 2025
Lab Last Tested May 26, 2025
Copyright 2025 Google LLC. All rights reserved. Google and the Google logo are trademarks of Google LLC. All other company and product names may be trademarks of the respective companies with which they are associated.


