arrow_back

Automating and Customizing Reports in Looker Studio Pro

로그인 가입
700개 이상의 실습 및 과정 이용하기

Automating and Customizing Reports in Looker Studio Pro

실습 1시간 universal_currency_alt 크레딧 5개 show_chart 입문
info 이 실습에는 학습을 지원하는 AI 도구가 통합되어 있을 수 있습니다.
700개 이상의 실습 및 과정 이용하기

Note

This lab is an optional item in the Looker Studio Pro Essentials course.

This lab environment is currently under development and may exhibit occasional unexpected behavior. While we are actively working to improve its reliability, you may encounter instances where the product interface differs slightly from the lab instructions. Should this occur, please try the following:

  • Refresh the page.
  • Log out and log back in.
  • Start a new lab environment.

A demo video is provided at the end of the lab to further familiarize you with the Looker Studio Pro features. We appreciate your understanding as we work to enhance this lab experience.

Overview

Looker Studio Pro is the premium version of Looker Studio. This lab is intended for Looker Studio users to learn and practice scheduling reports with Pro subscription. Building insightful data reports in Looker Studio is not in the scope of this lab.

Objectives

In this lab, you learn how to perform the following tasks:

  • Purchase a Pro subscription in Looker Studio and assign a license to a user.
  • Build a simple report and create scheduled report deliveries.
  • Apply filters in scheduled reports.
  • Create a personal report link.

Setup

For each lab, you get a new Google Cloud project and set of resources for a fixed time at no cost.

  1. Sign in to Qwiklabs using an incognito window.

  2. Note the lab's access time (for example, 1:15:00), and make sure you can finish within that time.
    There is no pause feature. You can restart if needed, but you have to start at the beginning.

  3. When ready, click Start lab.

  4. Note your lab credentials (Username and Password). You will use them to sign in to the Google Cloud Console.

  5. Click Open Google Console.

  6. Click Use another account and copy/paste credentials for this lab into the prompts.
    If you use other credentials, you'll receive errors or incur charges.

  7. Accept the terms and skip the recovery resource page.

This lab has two sets of user credentials. Use username1 to log in first and follow lab instructions.

Looker Studio setup

Once you've logged in to the Google Cloud console, open lookerstudio.google.com in a new tab. You should be automatically logged in with your lab's username, but, if not, log out and sign in with the lab credentials in username 1: .

Task 1. Purchase a Pro subscription

Before you start to perform the tasks in this lab in Looker Studio Pro, you will need to purchase a Pro subscription.

  1. In the top right corner, click on the gear icon besides your profile icon. On the new dialog window, select Pro subscription from the left side navigation. gear_icon
  2. In the Get Looker Studio Pro screen, enter the project_id: in Google Cloud Project. Wait until all the checking steps are completed with a green tick. Click Next.
  3. In the Add people and groups , add user 2’s email address: Click Next.
  4. Review the overview information of your Pro subscription and click Buy.
  5. Wait until the loading icon disappears and a banner pops up. Then you can close the Get Looker Studio Pro screen. congrats
  6. If the Looker Studio instance did not automatically refresh, please refresh the webpage. You will see “Looker Studio” changes to “Looker Studio Pro” on the top of the screen.

Now you have purchased a Pro subscription in Looker Studio, which allows you to access Looker Studio Pro features.

Click Check my progress to verify the objective. Purchase a Pro subscription

Task 2. Create a simple Looker Studio report

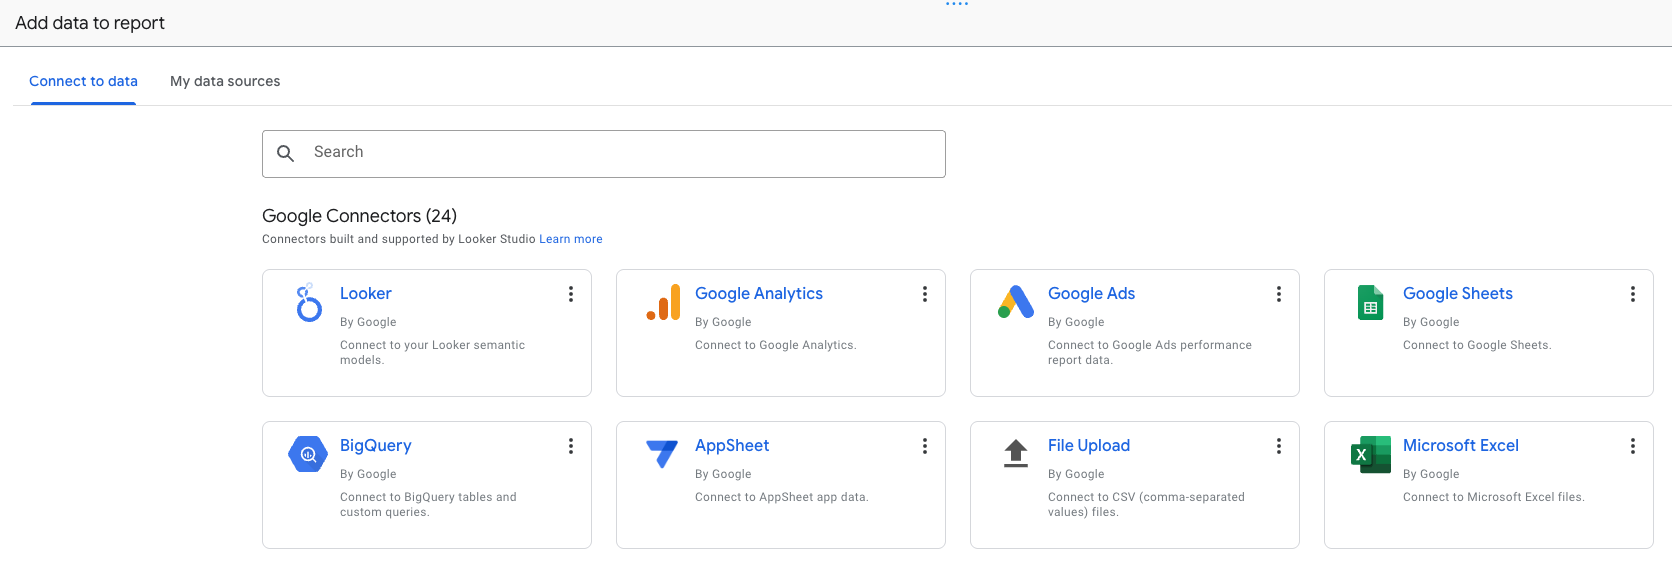
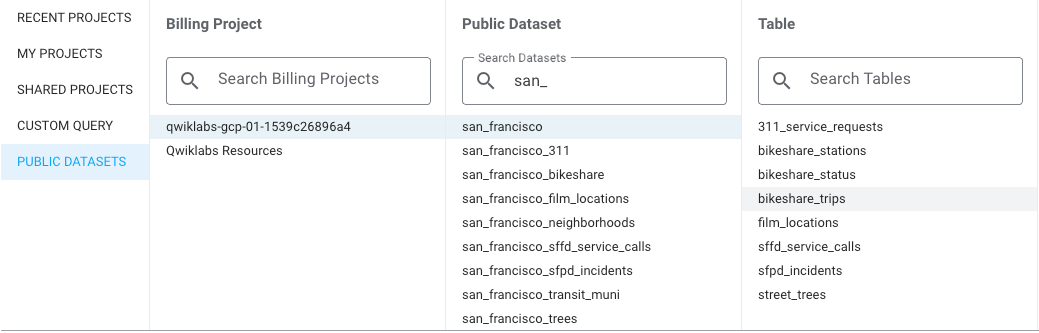
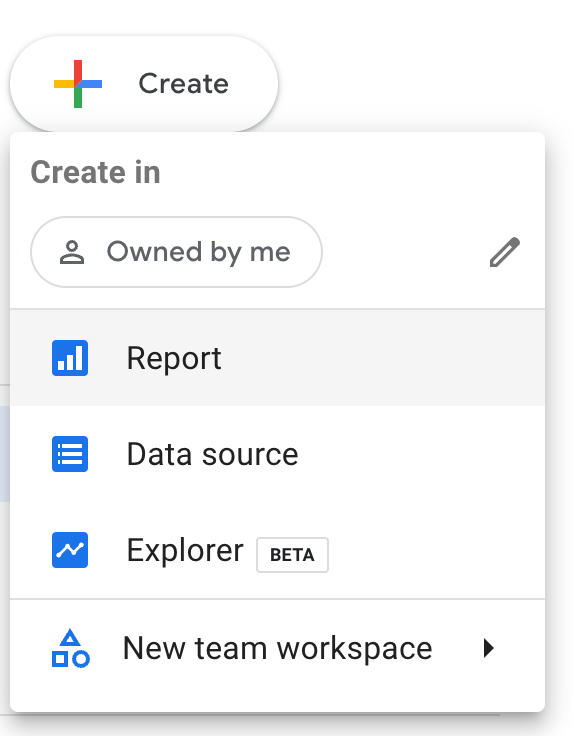
In this task, you will create a dummy Looker Studio report. These steps help you refresh your Looker Studio knowledge in creating reports. You need to use this report to perform the following tasks in this lab to learn scheduling features.

Create a simple report.

  1. Click Create from the left side panel, and select Report.
create_report

Enter your basic info and agree on terms of service and click Continue. Select “No” to all the options and click Continue.

  1. On the Add data to report window, select the BigQuery tile.

adddataa

  1. If prompted, click the Authorize button to let Looker Studio view your data in BigQuery.
  2. From the left menu, click Public Datasets > Your Project ID > san_francisco > bikeshare_trips.

dataset

  1. Click Add in the bottom right corner to add this data into the report.
  2. You will then be prompted with "You are about to add a data source to this report", click Add to report.
  3. Change the report name to Test report.

renamereport

Add a filter control on the report.

  1. From the toolbar, select Add a control.

control

  1. Select Drop-down list from the list. Then click on a blank area on the report to place the filter control.
  2. You just created a filter control named start_station_name in the report. Update the filter value to San Francisco Caltrain only.

Now you have successfully created a dummy Looker Studio report with a filter control on it.

Click Check my progress to verify the objective. Create a simple Looker Studio report

Task 3. Create scheduled report deliveries

In this task, you practice creating scheduled report deliveries to different channels.

  1. Navigate to the Test report in your Recent folder or Owned by me folder. Click on the three dots next to the report to move it to Sandbox in the team workspace. Then, select Move to and choose > Sandbox. Finally, click Next.
  2. Open the report, find the Share button in the top right corner, and click the arrow.
  3. Select Schedule delivery from the dropdown list.

schedule

  1. On the new dialog window, configure your scheduling preferences under Settings.
    • Select Email in Destination. (You can also review the settings for scheduling reports to Google Chat by selecting Google Chat. However, this is not a requirement in the lab.)
    • Enter the schedule name Schedule 1.
    • Leave the rest as is, click Save.
  2. On the new dialog, you can review your scheduled delivery. To create a second schedule, click New Schedule.
    • Select Email in Destination.
    • Enter the schedule name Schedule 2.
    • Set repeat frequency to Every weekday (Monday to Friday).
    • Leave the rest as is, click Save.
  3. On the new dialog, you can review the overview information on the two scheduled deliveries. Click Send now on Schedule 1 to send a test email for the scheduled delivery.
  4. On the same dialog, click on the three dots on Schedule 2 and toggle off Active. Note that Edit and Delete are also on the list. Click Done to close the dialog window.

You have successfully scheduled two email report deliveries on a Looker Studio report in a team workspace. You have practiced sending out a test email and deactivating a schedule. You have also reviewed the scheduling settings for a report delivered through Google Chat.

Task 4. Apply filters in scheduled reports

In this task, you practice applying filters on your scheduled deliveries.

  1. Navigate to the Test report in the team workspace.
  2. Open the report, find the Share button in the top right corner, and click on the arrow.
  3. Select Schedule delivery from the dropdown list.
  4. Click Schedule 1 and on the new dialog window, review the details of it, click Edit schedule.
  5. To the right of Settings, select Filters.
  6. Update the filter value to also select San Francisco Caltrain 2, you will have two filtered values in the scheduled report. Click Save.

You have successfully added a filter on schedule 1. When Looker Studio sends out the scheduled report delivery, the new filter value will be applied.

Task 5. Create a personal report link

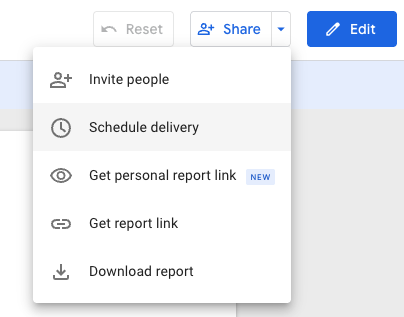
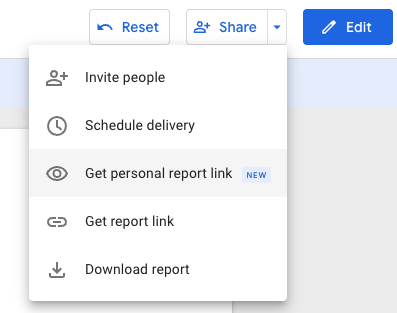
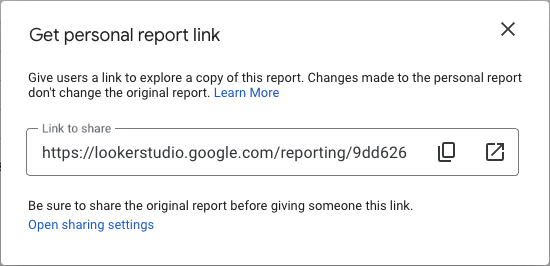
In this task, you practice creating a personal report link and share an editable report with another user while preventing changes to your original report.

  1. Navigate to the Test report in the team workspace.
  2. Open the report, find the Share button in the top right corner, and click the arrow.
  3. Select Get personal report link from the dropdown list.

personallink

  1. The new dialog shows a personal report link. There are two icons besides the link, the first icon is to copy the link, and the second icon is to open the link in a new tab. Click the first icon to copy the link. (In the lab, it is recommended to paste the link in a document or textbook for later use.)

twoicons

  1. In the top right corner, click the profile icon and select Add an account from the drop down list.

addaccount

  1. Use user 2’s email and password to log in Looker Studio as user2.
    • Username 2:
    • Password 2:
  2. Open the link that you copied in step 4 as user2. The link creates a copy of the original report. In the new report, remove the filter control.
  3. Log back in as user 1 and review the original report. Notice that the editable report that user 2 updated did not change your original report.

You have successfully created a personal report link and practiced using it to collaborate with your team.

Demo video

End your lab

When you have completed your lab, click End Lab. Qwiklabs removes the resources you’ve used and cleans the account for you.

You will be given an opportunity to rate the lab experience. Select the applicable number of stars, type a comment, and then click Submit.

The number of stars indicates the following:

  • 1 star = Very dissatisfied
  • 2 stars = Dissatisfied
  • 3 stars = Neutral
  • 4 stars = Satisfied
  • 5 stars = Very satisfied

You can close the dialog box if you don't want to provide feedback.

For feedback, suggestions, or corrections, please use the Support tab.

Copyright 2024 Google LLC All rights reserved. Google and the Google logo are trademarks of Google LLC. All other company and product names may be trademarks of the respective companies with which they are associated.

시작하기 전에

  1. 실습에서는 정해진 기간 동안 Google Cloud 프로젝트와 리소스를 만듭니다.
  2. 실습에는 시간 제한이 있으며 일시중지 기능이 없습니다. 실습을 종료하면 처음부터 다시 시작해야 합니다.
  3. 화면 왼쪽 상단에서 실습 시작을 클릭하여 시작합니다.

시크릿 브라우징 사용

  1. 실습에 입력한 사용자 이름비밀번호를 복사합니다.
  2. 비공개 모드에서 콘솔 열기를 클릭합니다.

콘솔에 로그인

    실습 사용자 인증 정보를 사용하여
  1. 로그인합니다. 다른 사용자 인증 정보를 사용하면 오류가 발생하거나 요금이 부과될 수 있습니다.
  2. 약관에 동의하고 리소스 복구 페이지를 건너뜁니다.
  3. 실습을 완료했거나 다시 시작하려고 하는 경우가 아니면 실습 종료를 클릭하지 마세요. 이 버튼을 클릭하면 작업 내용이 지워지고 프로젝트가 삭제됩니다.

현재 이 콘텐츠를 이용할 수 없습니다

이용할 수 있게 되면 이메일로 알려드리겠습니다.

감사합니다

이용할 수 있게 되면 이메일로 알려드리겠습니다.

한 번에 실습 1개만 가능

모든 기존 실습을 종료하고 이 실습을 시작할지 확인하세요.

시크릿 브라우징을 사용하여 실습 실행하기

이 실습을 실행하려면 시크릿 모드 또는 시크릿 브라우저 창을 사용하세요. 개인 계정과 학생 계정 간의 충돌로 개인 계정에 추가 요금이 발생하는 일을 방지해 줍니다.