arrow_back

App Dev: Storing Image and Video Files in Cloud Storage - Python

登录 加入
访问 700 多个实验和课程

App Dev: Storing Image and Video Files in Cloud Storage - Python

实验 1 小时 universal_currency_alt 5 积分 show_chart 中级
info 此实验可能会提供 AI 工具来支持您学习。
访问 700 多个实验和课程

GSP185

Google Cloud self-paced labs logo

Overview

Cloud Storage allows world-wide storage and retrieval of any amount of data at any time. You can use Cloud Storage for a range of scenarios including serving website content, storing data for archival and disaster recovery, or distributing large data objects to users via direct download.

In this lab you'll configure an application to use Cloud Storage to store and retrieve application data. The application is an online Quiz, the data is the form data, including an image you upload from your local machine.

Objectives

In this lab, you learn how to perform the following tasks:

  • Set up Cloud Shell as your development environment
  • Update the application code to integrate Cloud Datastore
  • Use the Quiz application to upload an image file into Cloud Storage and view the image in the Quiz

Setup and requirements

Before you click the Start Lab button

Read these instructions. Labs are timed and you cannot pause them. The timer, which starts when you click Start Lab, shows how long Google Cloud resources are made available to you.

This hands-on lab lets you do the lab activities in a real cloud environment, not in a simulation or demo environment. It does so by giving you new, temporary credentials you use to sign in and access Google Cloud for the duration of the lab.

To complete this lab, you need:

  • Access to a standard internet browser (Chrome browser recommended).
Note: Use an Incognito (recommended) or private browser window to run this lab. This prevents conflicts between your personal account and the student account, which may cause extra charges incurred to your personal account.
  • Time to complete the lab—remember, once you start, you cannot pause a lab.
Note: Use only the student account for this lab. If you use a different Google Cloud account, you may incur charges to that account.

How to start your lab and sign in to the Google Cloud console

  1. Click the Start Lab button. If you need to pay for the lab, a dialog opens for you to select your payment method. On the left is the Lab Details pane with the following:

    • The Open Google Cloud console button
    • Time remaining
    • The temporary credentials that you must use for this lab
    • Other information, if needed, to step through this lab
  2. Click Open Google Cloud console (or right-click and select Open Link in Incognito Window if you are running the Chrome browser).

    The lab spins up resources, and then opens another tab that shows the Sign in page.

    Tip: Arrange the tabs in separate windows, side-by-side.

    Note: If you see the Choose an account dialog, click Use Another Account.
  3. If necessary, copy the Username below and paste it into the Sign in dialog.

    {{{user_0.username | "Username"}}}

    You can also find the Username in the Lab Details pane.

  4. Click Next.

  5. Copy the Password below and paste it into the Welcome dialog.

    {{{user_0.password | "Password"}}}

    You can also find the Password in the Lab Details pane.

  6. Click Next.

    Important: You must use the credentials the lab provides you. Do not use your Google Cloud account credentials. Note: Using your own Google Cloud account for this lab may incur extra charges.
  7. Click through the subsequent pages:

    • Accept the terms and conditions.
    • Do not add recovery options or two-factor authentication (because this is a temporary account).
    • Do not sign up for free trials.

After a few moments, the Google Cloud console opens in this tab.

Note: To access Google Cloud products and services, click the Navigation menu or type the service or product name in the Search field. Navigation menu icon and Search field

Activate Cloud Shell

Cloud Shell is a virtual machine that is loaded with development tools. It offers a persistent 5GB home directory and runs on the Google Cloud. Cloud Shell provides command-line access to your Google Cloud resources.

  1. Click Activate Cloud Shell Activate Cloud Shell icon at the top of the Google Cloud console.

  2. Click through the following windows:

    • Continue through the Cloud Shell information window.
    • Authorize Cloud Shell to use your credentials to make Google Cloud API calls.

When you are connected, you are already authenticated, and the project is set to your Project_ID, . The output contains a line that declares the Project_ID for this session:

Your Cloud Platform project in this session is set to {{{project_0.project_id | "PROJECT_ID"}}}

gcloud is the command-line tool for Google Cloud. It comes pre-installed on Cloud Shell and supports tab-completion.

  1. (Optional) You can list the active account name with this command:
gcloud auth list
  1. Click Authorize.

Output:

ACTIVE: * ACCOUNT: {{{user_0.username | "ACCOUNT"}}} To set the active account, run: $ gcloud config set account `ACCOUNT`
  1. (Optional) You can list the project ID with this command:
gcloud config list project

Output:

[core] project = {{{project_0.project_id | "PROJECT_ID"}}} Note: For full documentation of gcloud, in Google Cloud, refer to the gcloud CLI overview guide.

Launch the Cloud Shell code editor

  1. From Cloud Shell, click Open Editor to launch the code editor.

The Open Editor button.

Note: The code editor launches in a separate tab of your browser, along with Cloud Shell.
  1. Run the following command to configure your Project ID, replacing YOUR-PROJECT-ID with your Project ID:
gcloud config set project <YOUR-PROJECT-ID>

Task 1. Prepare the quiz application

In this section, you access Cloud Shell, clone the git repository containing the Quiz application, and run the application.

Clone source code in Cloud Shell

  • To clone the repository for the class, execute the following command:
git clone https://github.com/GoogleCloudPlatform/training-data-analyst

Configure and run the quiz application

  1. Change the working directory:

    cd ~/training-data-analyst/courses/developingapps/python/cloudstorage/start
  2. Set the region using a variable:

    REGION={{{project_0.default_region | REGION}}} sed -i s/us-central/$REGION/g prepare_environment.sh
  3. Configure the application:

    . prepare_environment.sh Note: Ignore any warnings.

    This script file:

    • Creates an App Engine application.
    • Exports an environment variable, GCLOUD_PROJECT.
    • Updates pip, then runs pip install -r requirements.txt.
    • Creates entities in Cloud Datastore.
    • Prints out the Project ID.
  4. Run the application:

    python run_server.py

    The application is running when you see the following output:

    * Running on http://127.0.0.1:8080/ (Press CTRL+C to quit) * Restarting with stat * Debugger is active! * Debugger PIN: 502-577-323

Review the quiz application

  1. To view the application, click Web preview > Preview on port 8080.

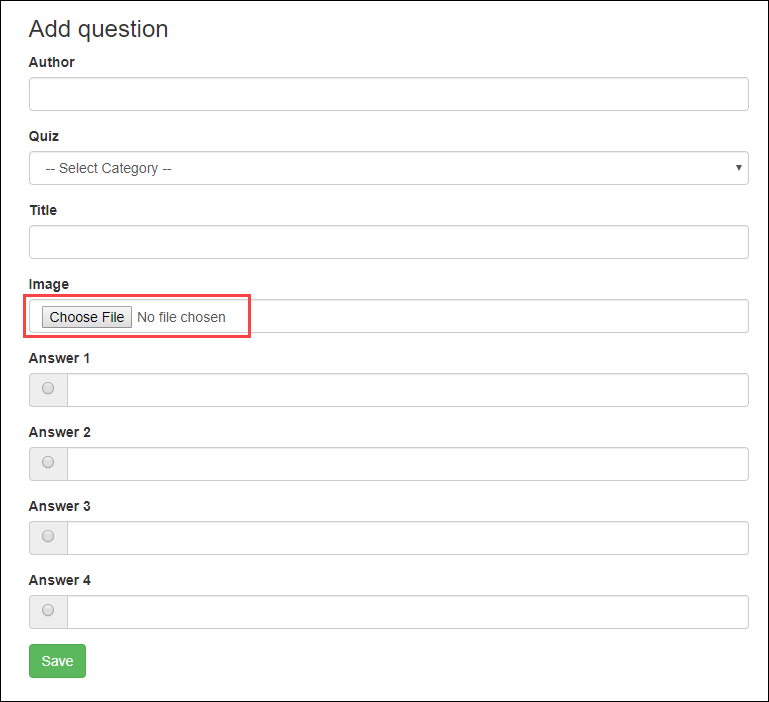
  2. Click the Create Question link in the toolbar.

You should see a simple form that contains text boxes for the question and answers and radio buttons to select the correct answer

The Add question form, wherein the Choose File button is highlighted within the Image category.

Note: The form has a new file upload field that will be used to upload either image or video files. In this lab you upload an image file; you use the same process to upload video file.

Task 2. Examine the quiz application code

In this section, you review the case study application code.

In this lab you'll view and edit files. You can use the shell editors that are installed on Cloud Shell, such as nano or vim or the Cloud Shell code editor.

This lab uses the Cloud Shell code editor to review the Quiz application code.

Examine the application code

  1. Navigate to the /training-data-analyst/courses/developingapps/python/cloudstorage/start folder using the file browser panel on the left side of the editor.

  2. Select the add.html file in the ...quiz/webapp/templates/ folder.

    This file contains the template for the Create Question form.

    Notice how the form has been modified to use multipart/form-data as the enc-type, and there are two new form controls:

    • A file upload control called image
    • A hidden field called imageUrl
  3. Select the routes.py file in the ...quiz/webapp folder.

    This file contains the route for the POST handler that receives the form data. It has been modified to get the image file from the form.

  4. Select the questions.py file in the ...quiz/webapp folder.

    This file contains the handler that processes the form data extracted in the routes.py file. You will modify this file to use a new module that is a client for Cloud Storage.

  5. Select the ...quiz/gcp/storage.py file.

    This is the file where you will write code to save image file data into Cloud Storage.

Task 3. Create a Cloud Storage Bucket

In this section, you create a Cloud Storage bucket and export an environment variable that references it.

  1. Return to the Cloud Shell command line.

  2. Stop the application by pressing Ctrl+C.

  3. Create a Cloud Storage bucket named <Project ID>-media:

    gsutil mb gs://$DEVSHELL_PROJECT_ID-media

    You can create a bucket using the gsutil mb command, passing through the name of the bucket as gs://BUCKET_NAME

    You can use $DEVSHELL_PROJECT_ID as the bucket name prefix followed by -media

  4. To export the Cloud Storage bucket name as an environment variable named GCLOUD_BUCKET, execute the following command:

export GCLOUD_BUCKET=$DEVSHELL_PROJECT_ID-media Note: Recall that the application makes use of environment variables for configuration. This allows the development team to deploy the application into development, test, staging, and production just by changing these variables.

Click Check my progress to verify the objective.

Create a bucket

Task 4. Adding objects to Cloud Storage

In this section, you write code to save uploaded files into Cloud Storage.

Note: Update code within the sections marked as follows:

# TODO

# END TODO

To maximize your learning, review the code, inline comments, and related API documentation.

For information on API documentation for Cloud Storage, refer to the APIs and reference reference.

Import and use the Python Cloud Storage module

  1. In code editor, move to the top of the ...quiz/gcp/storage.py file.
  2. Get the bucket name from the GCLOUD_BUCKET environment variable.
  3. Import the storage module from the google.client package.
  4. Create a Cloud Storage client.
  5. Get a reference to the Cloud Storage bucket.

quiz/gcp/storage.py

# TODO: Get the Bucket name from the # GCLOUD_BUCKET environment variable bucket_name = os.getenv('GCLOUD_BUCKET') # END TODO # TODO: Import the storage module from google.cloud import storage # END TODO # TODO: Create a client for Cloud Storage storage_client = storage.Client() # END TODO # TODO: Use the client to get the Cloud Storage bucket bucket = storage_client.get_bucket(bucket_name) # END TODO

Write code to send a file to Cloud Storage

  1. Still in storage.py, in the upload_file(...) function, remove the existing pass statement, then use the Cloud Storage client to upload a file to your Cloud Storage bucket and make it publicly available.
  2. Get a reference to a Cloud Storage blob object in the bucket.
  3. Use the blob object to upload the image.
  4. Make the file public.
  5. Return the blob's public URL.

quiz/gcp/storage.py - upload)file(...) function

""" Uploads a file to a given Cloud Storage bucket and returns the public url to the new object. """ def upload_file(image_file, public): # TODO: Use the bucket to get a blob object blob = bucket.blob(image_file.filename) # END TODO # TODO: Use the blob to upload the file blob.upload_from_string( image_file.read(), content_type=image_file.content_type) # END TODO # TODO: Make the object public if public: blob.make_public() # END TODO # TODO: Modify to return the blob's Public URL return blob.public_url # END TODO
  1. Save storage.py.

Write code to use the Cloud Storage functionality

  1. In the editor, move to the top of the ...quiz/webapp/questions.py file.
  2. Modify the import statement to use your storage client as well as the datastore client.
  3. Move to the upload_file(...) function. Use your storage client to upload a file, and assign the returned public URL to a variable.
  4. Modify the return statement to return the public URL.
  5. Move to the save_question(...) function. Write an if test to see if the image_file is present.
  6. If it is, then call the upload_file(...) function, and assign the public URL to a entity property named imageUrl.
  7. If not, then assign an empty string to the entity imageUrl property.

quiz/webapp/questions.py

# TODO: Import the storage module from quiz.gcp import storage, datastore # END TODO """ uploads file into google cloud storage - upload file - return public_url """ def upload_file(image_file, public): if not image_file: return None # TODO: Use the storage client to Upload the file # The second argument is a boolean public_url = storage.upload_file( image_file, public ) # END TODO # TODO: Return the public URL # for the object return public_url # END TODO """ uploads file into google cloud storage - call method to upload file (public=true) - call datastore helper method to save question """ def save_question(data, image_file): # TODO: If there is an image file, then upload it # And assign the result to a new Datastore # property imageUrl # If there isn't, assign an empty string if image_file: data['imageUrl'] = str( upload_file(image_file, True)) else: data['imageUrl'] = u'' # END TODO data['correctAnswer'] = int(data['correctAnswer']) datastore.save_question(data) return
  1. Save questions.py.

Run the application and create a Cloud Storage object

  1. Save the ...gcp/storage.py and ...webapp/questions.py files, and then return to the Cloud Shell command.
  2. Return to Cloud Shell to run the application:
python run_server.py
  1. Download an image file to your local machine from Google storage.

  2. In Cloud Shell, click Web preview > Preview on port 8080 to preview the Quiz application.

  3. Click the Create Question link.

  4. Complete the form with the following values, and then click Save.

    Form Field Value
    Author Your name
    Quiz Google Cloud Platform
    Title Which product does this logo relate to?
    Image Upload the Google_Cloud_Storage_logo.png file you previously downloaded
    Answer 1 App Engine
    Answer 2 Cloud Storage (Select the Answer 2 radio button)
    Answer 3 Compute Engine
    Answer 4 Container Engine
  5. Return to the Cloud Console and navigate to Navigation menu > Cloud Storage.

  6. On the Cloud Storage > Buckets page, click the correct bucket (named <Project ID>-media).

You should see your new object named Google_Cloud_Storage_logo.png.

Upload objects to your bucket

Run the client application and test the Cloud Storage public URL

  1. Add /api/quizzes/gcp to the end of the application's URL.

    You should see that JSON data has been returned to the client corresponding to the Question you added in the web application.

    The imageUrl property should have a value corresponding to the object in Cloud Storage.

  2. Return to the application home page and click the Take Test link.

  3. Click GCP, and answer each question.

    When you get to the question you just added, you should see the image has been formatted inside the client-side web application!

Congratulations!

This concluded the lab, App Dev: Storing Image and Video Files in Cloud Storage - Python. You used Cloud Storage to store and retrieve application data.

Next steps / Learn more

Manual Last Updated January 24, 2025

Lab Last Tested January 24, 2025

Copyright 2025 Google LLC. All rights reserved. Google and the Google logo are trademarks of Google LLC. All other company and product names may be trademarks of the respective companies with which they are associated.

准备工作

  1. 实验会创建一个 Google Cloud 项目和一些资源,供您使用限定的一段时间
  2. 实验有时间限制,并且没有暂停功能。如果您中途结束实验,则必须重新开始。
  3. 在屏幕左上角,点击开始实验即可开始

使用无痕浏览模式

  1. 复制系统为实验提供的用户名密码
  2. 在无痕浏览模式下,点击打开控制台

登录控制台

  1. 使用您的实验凭证登录。使用其他凭证可能会导致错误或产生费用。
  2. 接受条款,并跳过恢复资源页面
  3. 除非您已完成此实验或想要重新开始,否则请勿点击结束实验,因为点击后系统会清除您的工作并移除该项目

此内容目前不可用

一旦可用,我们会通过电子邮件告知您

太好了!

一旦可用,我们会通过电子邮件告知您

一次一个实验

确认结束所有现有实验并开始此实验

使用无痕浏览模式运行实验

请使用无痕模式或无痕式浏览器窗口运行此实验。这可以避免您的个人账号与学生账号之间发生冲突,这种冲突可能导致您的个人账号产生额外费用。