


Before you begin
- Labs create a Google Cloud project and resources for a fixed time
- Labs have a time limit and no pause feature. If you end the lab, you'll have to restart from the beginning.
- On the top left of your screen, click Start lab to begin
Create a Compute Engine Virtual Machine Instance
/ 30
Install software and configure the VM instance
/ 30
Run application software to get success response
/ 40
Compute Engine is just one resource provided on Google Cloud.
In this lab, you set up a Python development environment on Google Cloud, using Compute Engine to create a virtual machine (VM) and installing software libraries for software development.
You perform the following tasks:
Google Cloud consists of a set of physical assets, such as computers and hard disk drives, and virtual resources, such as virtual machines (VMs), that are contained in Google's data centers around the globe. Each data center location is in a global region. Regions include Central US, Western Europe, and East Asia. Each region is a collection of zones, which are isolated from each other within the region. Each zone is identified by a name that combines a letter identifier with the name of the region. For example, zone a in the East Asia region is named asia-east1-a.
This distribution of resources provides several benefits, including redundancy in case of failure and reduced latency by locating resources closer to clients. This distribution also introduces some rules about how resources can be used together.
Any Google Cloud resources that you allocate and use must belong to a project. You can think of a project as the organizing entity for what you're building.
A project is made up of the settings, permissions, and other metadata that describe your applications.
Resources within a single project can work together easily, for example by communicating through an internal network, subject to the regions-and-zones rules. The resources that each project contains remain separate across project boundaries; you can only interconnect them through an external network connection.
Each Google Cloud project has a:
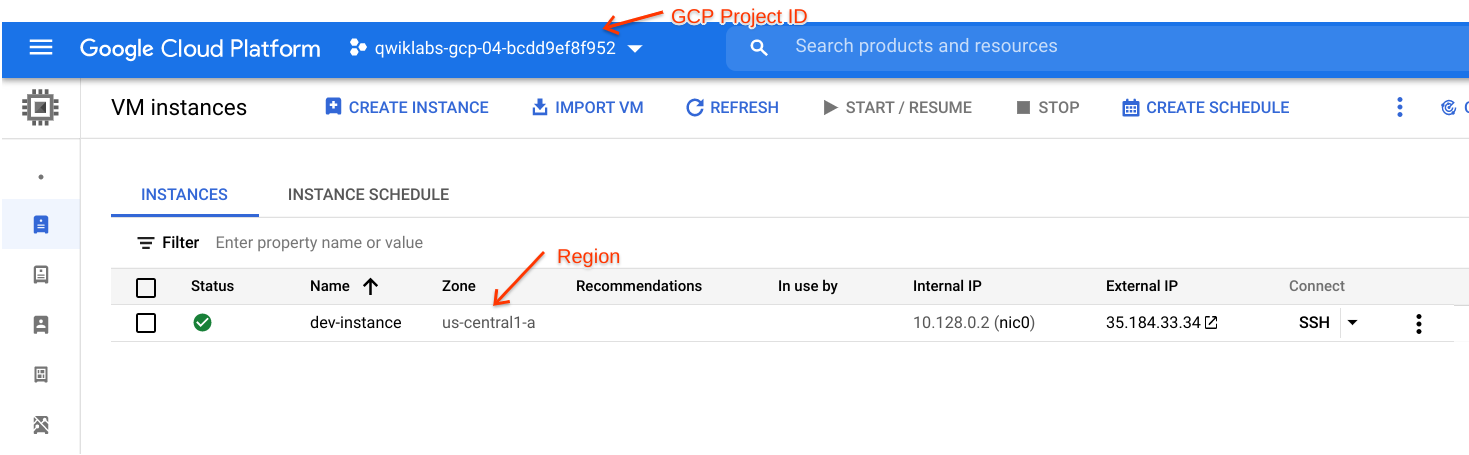
As you work with Google Cloud, you'll use these identifiers in certain command lines and API calls. The following screenshot shows a project name, its ID, and number:
The Cloud Console displays project ID and name
In this example:
Each project ID is unique across Google Cloud. Once you have created a project, you can delete the project but its ID can never be used again.
When billing is enabled, each project is associated with one billing account. Multiple projects can have their resource usage billed to the same account.
A project serves as a namespace. This means every resource within each project must have a unique name, but you can usually reuse resource names if they are in separate projects. Some resource names must be globally unique. Refer to the documentation for the resource for details.
In this lab, you provision a Compute Engine virtual machine (VM) and install software libraries for Python software development on Google Cloud.
Google Cloud gives you three basic ways to interact with the services and resources.
Cloud Console: a web-based, graphical user interface that you can use to manage your Google Cloud projects and resources.
Command-line interface:
Client libraries: The Cloud SDK includes client libraries that enable you to easily create and manage resources. Google Cloud client libraries expose APIs to provide access to services and resource management functions. You also can use the Google API client libraries to access APIs for products such as Google Maps, Google Drive, and YouTube.
Read these instructions. Labs are timed and you cannot pause them. The timer, which starts when you click Start Lab, shows how long Google Cloud resources are made available to you.
This hands-on lab lets you do the lab activities in a real cloud environment, not in a simulation or demo environment. It does so by giving you new, temporary credentials you use to sign in and access Google Cloud for the duration of the lab.
To complete this lab, you need:
Click the Start Lab button. If you need to pay for the lab, a dialog opens for you to select your payment method. On the left is the Lab Details pane with the following:
Click Open Google Cloud console (or right-click and select Open Link in Incognito Window if you are running the Chrome browser).
The lab spins up resources, and then opens another tab that shows the Sign in page.
Tip: Arrange the tabs in separate windows, side-by-side.
If necessary, copy the Username below and paste it into the Sign in dialog.
You can also find the Username in the Lab Details pane.
Click Next.
Copy the Password below and paste it into the Welcome dialog.
You can also find the Password in the Lab Details pane.
Click Next.
Click through the subsequent pages:
After a few moments, the Google Cloud console opens in this tab.

In this section, you use the Cloud Console to provision a new Compute Engine (VM) instance.
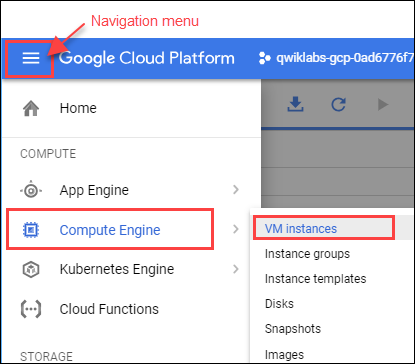
In the Console, click Navigation menu > Compute Engine > VM Instances.
To create a new instance, click Create Instance.
In the Machine configuration.
Select the following values:
| Property | Value (type value or select option as specified) |
|---|---|
| Name | dev-instance |
| Region | |
| Zone | |
| Series | E2 |
Click Security.
In the Access scopes section, select Allow full access to all Cloud APIs.
Click Networking.
Select the following value:
Leave the remaining settings as their defaults, and click Create.
Click Check my progress to verify your performed task. If you have completed the task successfully you will granted with an assessment score.
dev-instance row, click SSH.This launches a browser-hosted SSH session. If you have a popup blocker, you may need to click twice.
There's no need to configure or manage SSH keys.
In the SSH session, to update the Debian package list, execute the following command:
To install Git, execute the following command:
When prompted, enter Y to continue, accepting the use of additional disk space.
To install Python, execute the following command:
Again, when prompted, enter Y to continue, accepting the use of additional disk space.
To install pip, execute the following command:
Click Check my progress to verify your performed task. If you have completed the task successfully you will granted with an assessment score.
In this section, you verify the software installation on your VM and run some sample code.
Still in the SSH window, verify the installation by checking the Python and pip version:
The output provides the version of Python and pip that you installed.
Clone the class repository:
Change the working directory:
Run a simple web server:
Return to the Cloud Console VM instances list (Navigation menu > Compute Engine > VM Instances), and click on the External IP address for the dev-instance.
A browser opens and displays a Hello GCP dev! message from Python.
Click Check my progress to verify your performed task. If you have completed the task successfully you will granted with an assessment score.
Return to the SSH window, and stop the application by pressing Ctrl+C.
Install the Python packages needed to enumerate Compute Engine VM instances:
Now list your instance in Cloud Shell. Enter the following command to run a simple Python application that lists Compute Engine instances. Replace <PROJECT_ID> with your Project ID and <YOUR_VM_ZONE> is the region you specified when you created your VM. Find these values on the VM instances page of the console:
Your instance name should appear in the SSH terminal window.
Example output:
Below are multiple choice-questions to reinforce your understanding of this lab's concepts. Answer them to the best of your abilities.
This concluded the self-paced lab, App Dev: Setting Up a Development Environment - Python. You set up a Python development environment on Google Cloud!
Learn more about Application Development in the Google Cloud and Python on the Google Cloud.
Manual Last Updated December 11, 2024
Lab Last Tested October 22, 2024
Copyright 2025 Google LLC. All rights reserved. Google and the Google logo are trademarks of Google LLC. All other company and product names may be trademarks of the respective companies with which they are associated.


This content is not currently available
We will notify you via email when it becomes available

Great!
We will contact you via email if it becomes available

One lab at a time
Confirm to end all existing labs and start this one