GSP704

Overview
In this lab you will deploy an Apache Cassandra™ database using the Google Cloud marketplace. You will connect to the database using CQL Shell and run some simple DDL commands to create a table, load some data and query it.
What you'll learn
In this lab, you learn how to perform the following tasks:
- Deploy Apache Cassandra™ using the Google Cloud marketplace.
- Connect to Cassandra™ using CQL Shell.
- Create keyspaces and tables using CQL.
- Read and write data using CQL.
Setup and requirements
Before you click the Start Lab button
Read these instructions. Labs are timed and you cannot pause them. The timer, which starts when you click Start Lab, shows how long Google Cloud resources are made available to you.
This hands-on lab lets you do the lab activities in a real cloud environment, not in a simulation or demo environment. It does so by giving you new, temporary credentials you use to sign in and access Google Cloud for the duration of the lab.
To complete this lab, you need:
- Access to a standard internet browser (Chrome browser recommended).
Note: Use an Incognito (recommended) or private browser window to run this lab. This prevents conflicts between your personal account and the student account, which may cause extra charges incurred to your personal account.
- Time to complete the lab—remember, once you start, you cannot pause a lab.
Note: Use only the student account for this lab. If you use a different Google Cloud account, you may incur charges to that account.
How to start your lab and sign in to the Google Cloud console
-
Click the Start Lab button. If you need to pay for the lab, a dialog opens for you to select your payment method.
On the left is the Lab Details pane with the following:
- The Open Google Cloud console button
- Time remaining
- The temporary credentials that you must use for this lab
- Other information, if needed, to step through this lab
-
Click Open Google Cloud console (or right-click and select Open Link in Incognito Window if you are running the Chrome browser).
The lab spins up resources, and then opens another tab that shows the Sign in page.
Tip: Arrange the tabs in separate windows, side-by-side.
Note: If you see the Choose an account dialog, click Use Another Account.
-
If necessary, copy the Username below and paste it into the Sign in dialog.
{{{user_0.username | "Username"}}}
You can also find the Username in the Lab Details pane.
-
Click Next.
-
Copy the Password below and paste it into the Welcome dialog.
{{{user_0.password | "Password"}}}
You can also find the Password in the Lab Details pane.
-
Click Next.
Important: You must use the credentials the lab provides you. Do not use your Google Cloud account credentials.
Note: Using your own Google Cloud account for this lab may incur extra charges.
-
Click through the subsequent pages:
- Accept the terms and conditions.
- Do not add recovery options or two-factor authentication (because this is a temporary account).
- Do not sign up for free trials.
After a few moments, the Google Cloud console opens in this tab.
Note: To access Google Cloud products and services, click the Navigation menu or type the service or product name in the Search field.

Activate Cloud Shell
Cloud Shell is a virtual machine that is loaded with development tools. It offers a persistent 5GB home directory and runs on the Google Cloud. Cloud Shell provides command-line access to your Google Cloud resources.
-
Click Activate Cloud Shell  at the top of the Google Cloud console.
-
Click through the following windows:
- Continue through the Cloud Shell information window.
- Authorize Cloud Shell to use your credentials to make Google Cloud API calls.
When you are connected, you are already authenticated, and the project is set to your Project_ID, . The output contains a line that declares the Project_ID for this session:
Your Cloud Platform project in this session is set to {{{project_0.project_id | "PROJECT_ID"}}}
gcloud is the command-line tool for Google Cloud. It comes pre-installed on Cloud Shell and supports tab-completion.
- (Optional) You can list the active account name with this command:
gcloud auth list
- Click Authorize.
Output:
ACTIVE: *
ACCOUNT: {{{user_0.username | "ACCOUNT"}}}
To set the active account, run:
$ gcloud config set account `ACCOUNT`
- (Optional) You can list the project ID with this command:
gcloud config list project
Output:
[core]
project = {{{project_0.project_id | "PROJECT_ID"}}}
Note: For full documentation of gcloud, in Google Cloud, refer to the gcloud CLI overview guide.
Task 1. Deploy Cassandra™
-
On the Navigation menu ( ), click Marketplace.
-
Search for apache cassandra and click on the search result named Bitnami package for Apache Cassandra.
-
Click GET STARTED.
-
Accept the Terms and agreements, and click Agree.
-
Click Deploy.
-
If prompted, click on Enable for the Compute Engine API and the Infrastructure Manager API.
-
Under Deployment Service Account, select Existing Account and choose the account Compute Engine default service account .
-
Select zone as .
-
Under Machine Type, change the Series to E2, and select the e2-medium Machine type.
-
Leave all the other values as default, and click Deploy.
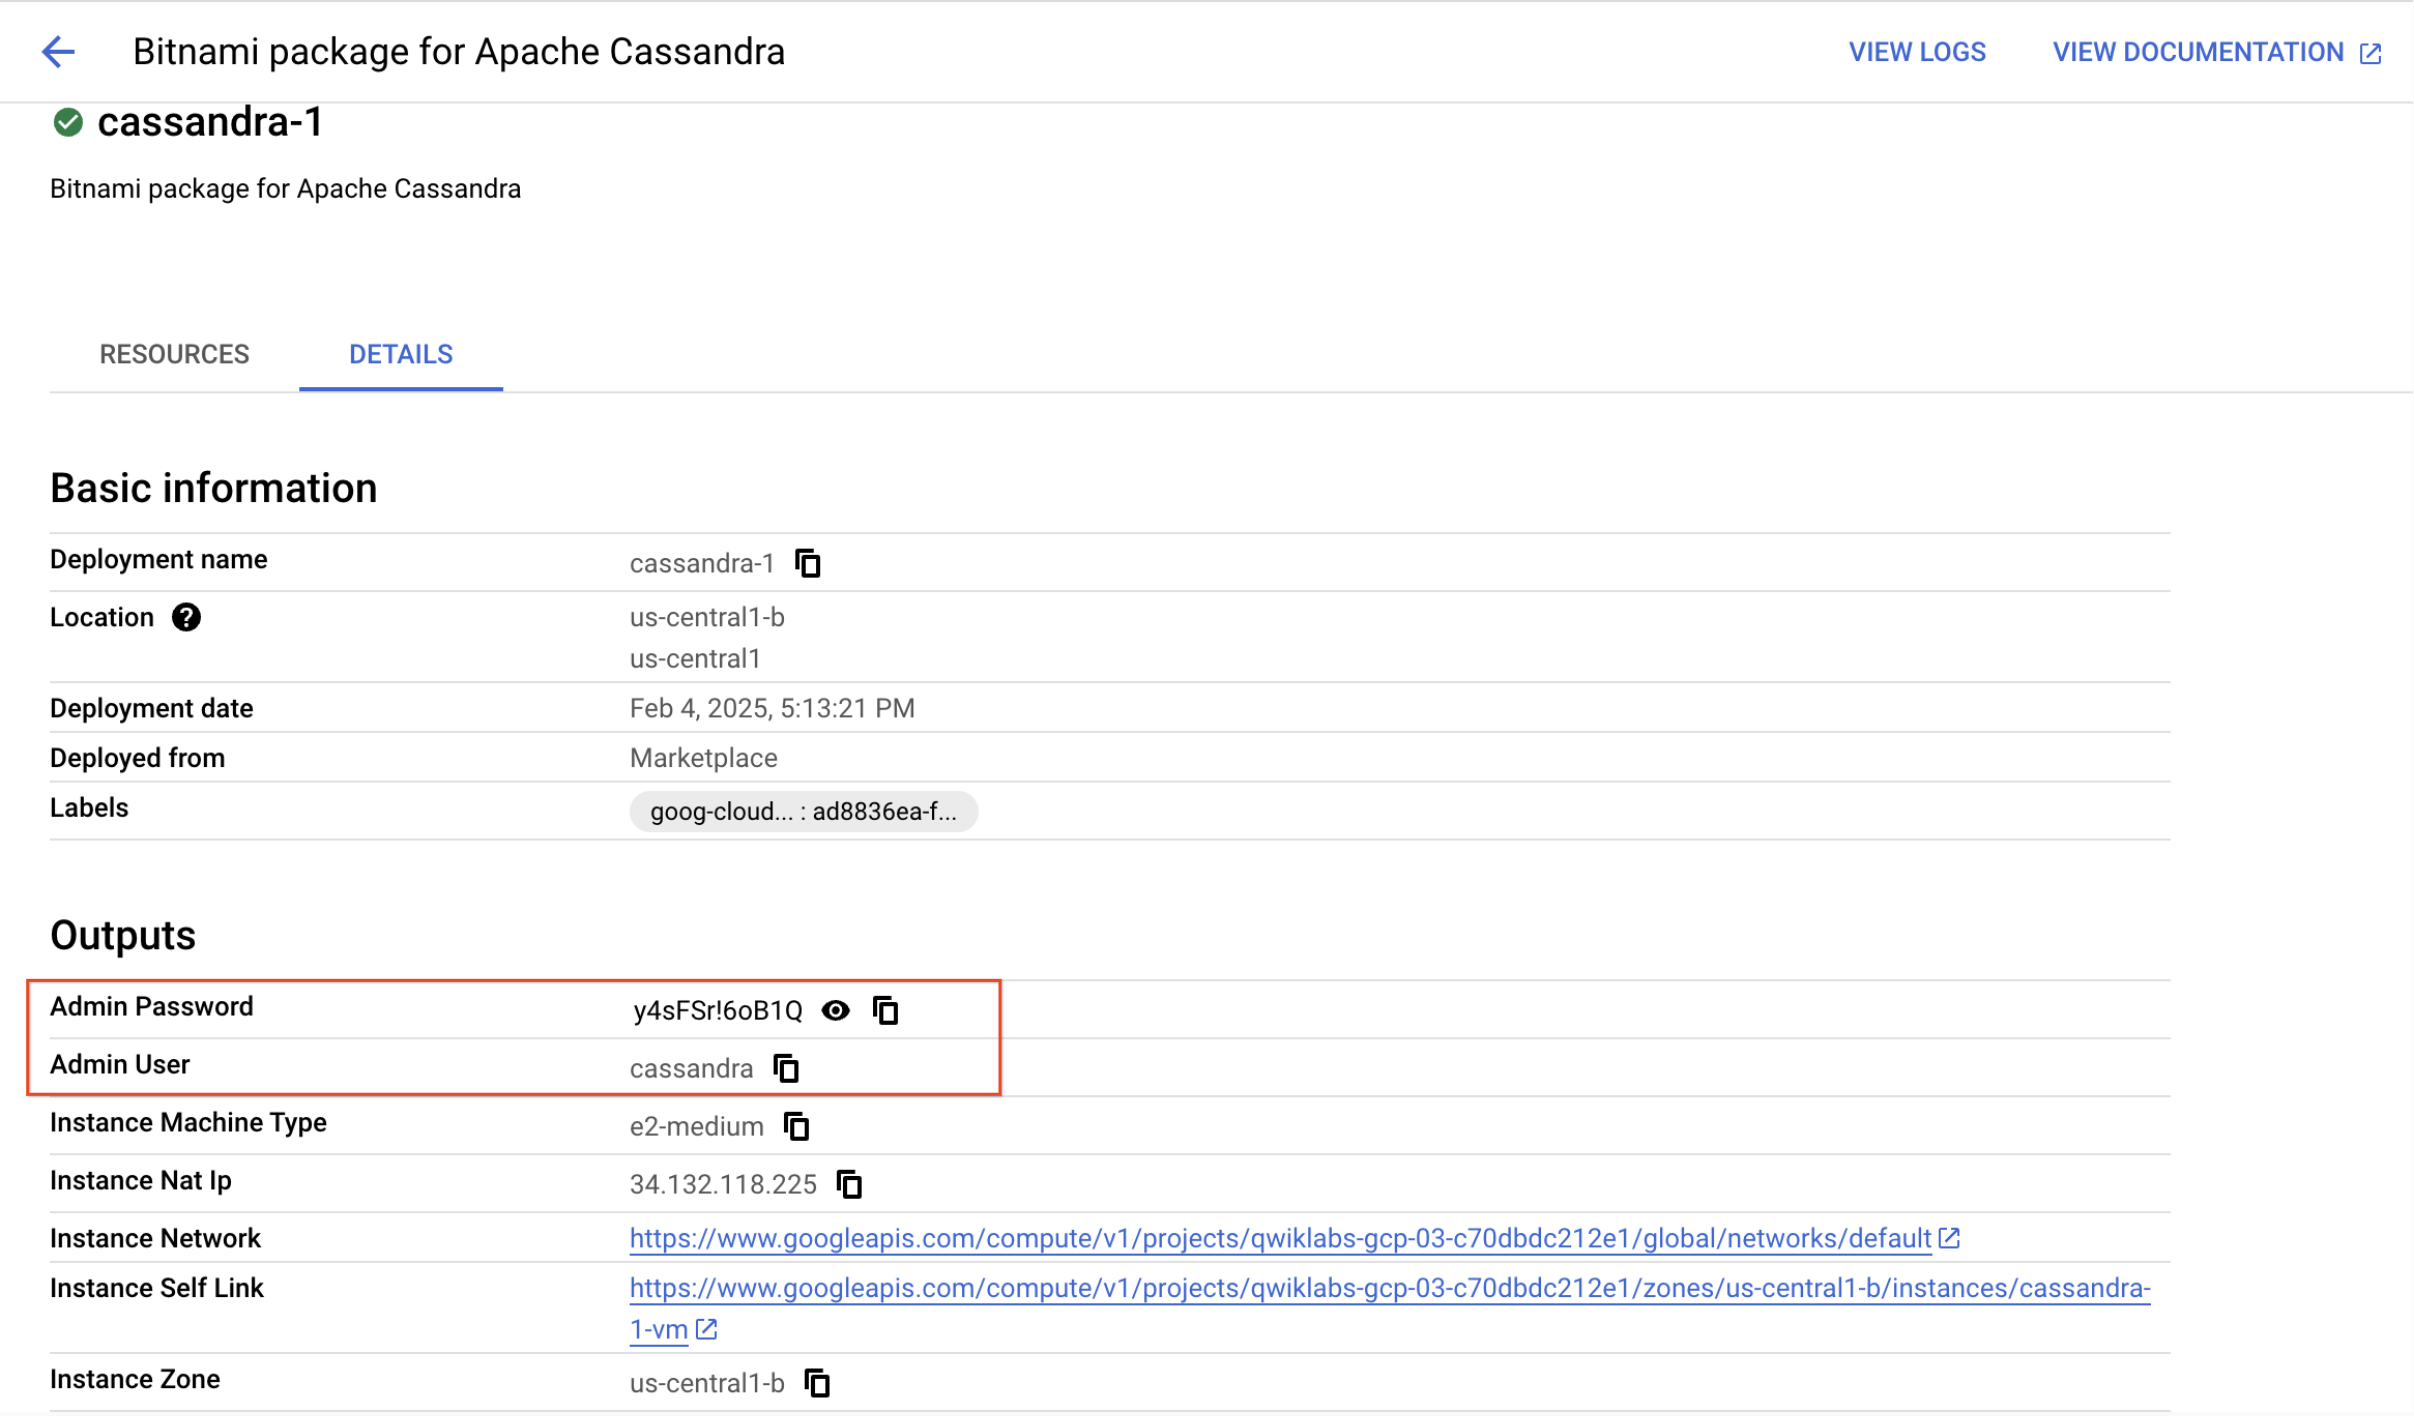
When the database has finished deploying you will see the details in the Deployment Manager.
Click Check my progress to verify the objective.
Deploy Cassandra Database using the Google Cloud Marketplace
Task 2. Connect to the database
- Note the Admin user and Admin password from the details tab.
-
To connect to the database, open up an SSH session by clicking the SSH button from the VM instance.
-
To open the CQL Shell, type the following command into the command line, replacing <> with those you previously recorded:
cqlsh -u <<user>>
After running the command, you'll be asked for your password. Just type it in and hit enter to continue.
ifinlayson@cassandra-1-vm:~$ cqlsh -u cassandra
password:
Connected to My Cluster at 127.0.0.1:9042.
[cqlsh 5.0.1 | Cassandra 3.11.5 | CQL spec 3.4.4 | Native protocol v4
Use HELP for help.
cassandra@cqlsh
Task 3. Create a keyspace and table
- Once you are logged in to the database, create a keyspace:
CREATE KEYSPACE space_flights WITH replication = {'class': 'SimpleStrategy', 'replication_factor': 1};
- Create a table in the keyspace:
CREATE TABLE space_flights.catalog (
spacecraft_name text,
journey_id timeuuid,
start timestamp,
end timestamp,
active boolean,
summary text,
PRIMARY KEY ((spacecraft_name), journey_id)
) WITH CLUSTERING ORDER BY (journey_id desc);
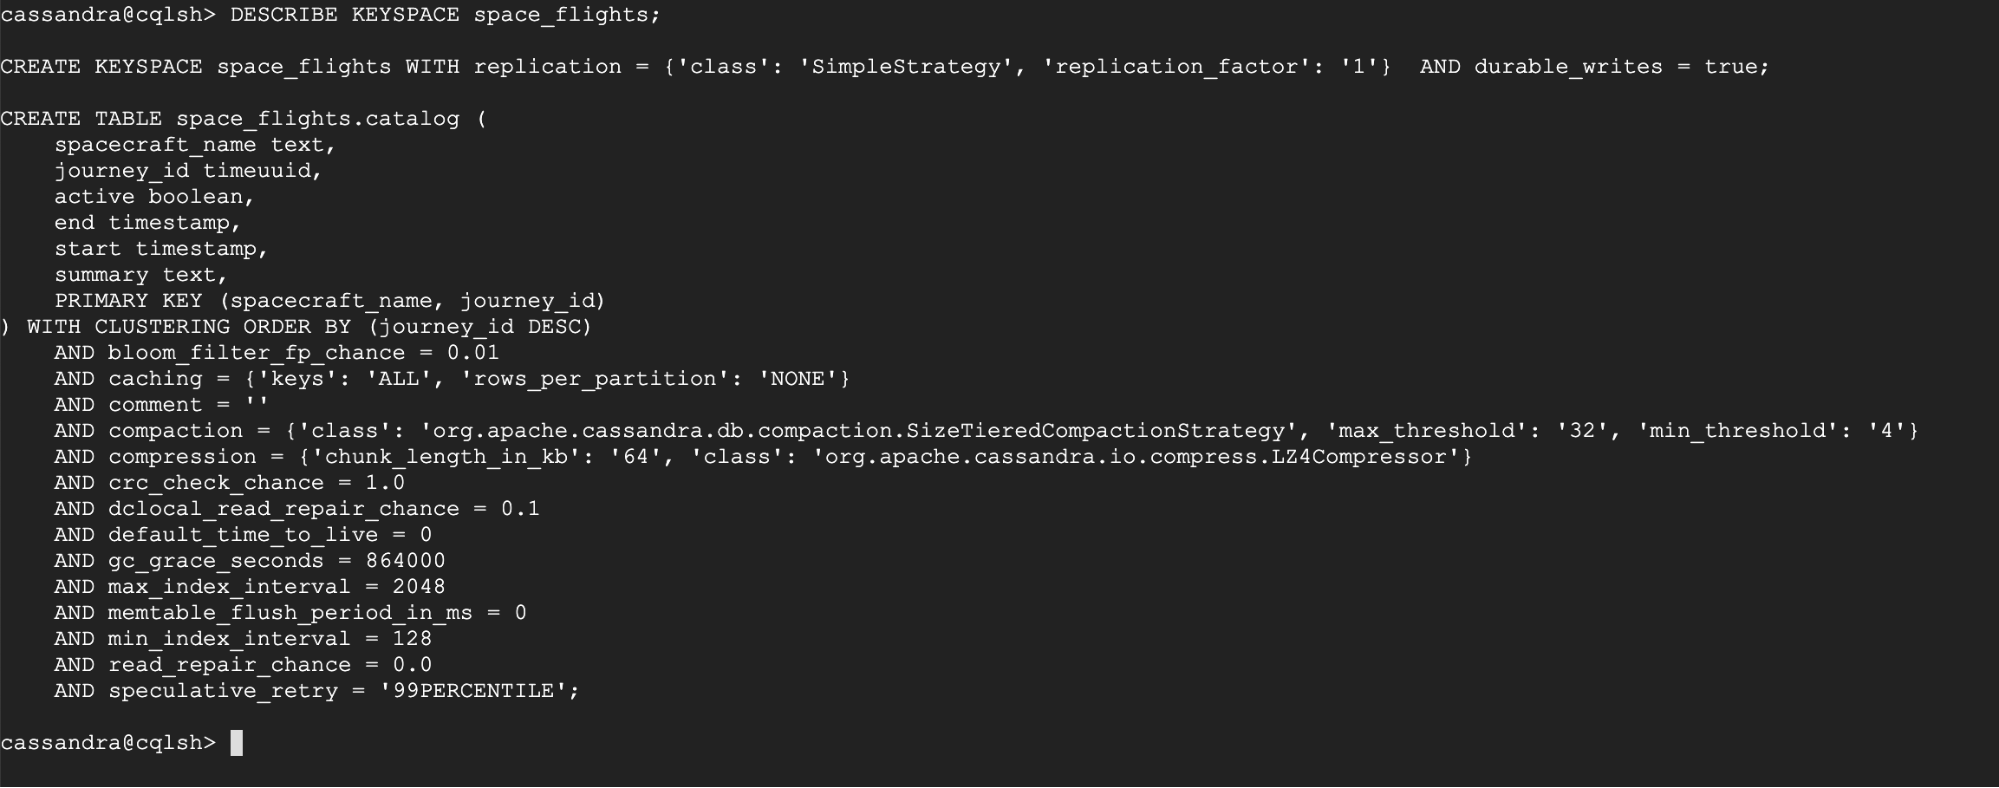
- You can view the keyspace and table you created using the following commands:
DESCRIBE KEYSPACE space_flights;
DESCRIBE TABLE space_flights.catalog;
Notice that the output includes default values for a number of settings that you did not specify when you ran the CREATE statements.
Click Check my progress to verify the objective.
Create a keyspace and table
Insert data into the table
- Insert the following data:
INSERT INTO space_flights.catalog (spacecraft_name, journey_id, start, end, active, summary) VALUES ('vostok1', 805b1a00-5673-11a8-8080-808080808080, '1961-4-12T06:07:00+0000', '1961-4-12T07:55:00+0000', False, 'First manned spaceflight. Completed one Earth orbit.');
INSERT INTO space_flights.catalog (spacecraft_name, journey_id, start, end, active, summary) VALUES ('mercury-redstone3', 2396fc00-68cd-11a8-8080-808080808080, '1961-5-5T14:34:00+0000', '1961-5-5T14:49:00+0000', False, 'First American manned suborbital spaceflight (altitude 187 kilometres, 116 miles).');
INSERT INTO space_flights.catalog (spacecraft_name, journey_id, start, end, active, summary) VALUES ('mercury-redstone4', 2d2f1800-a53c-11a8-8080-808080808080, '1961-7-21T12:20:00+0000', '1961-7-21T12:35:00+0000', False, 'Second American manned suborbital flight (altitude 118.26mi, 190km).');
INSERT INTO space_flights.catalog (spacecraft_name, journey_id, start, end, active, summary) VALUES ('vostok2', 5c2ac800-b191-11a8-8080-808080808080, '1961-8-6T05:00:00+0000', '1961-8-7T05:01:00+0000', False, 'Day-long flight. Completed 17 Earth orbits. Brief manual control by pilot.');
INSERT INTO space_flights.catalog (spacecraft_name, journey_id, start, end, active, summary) VALUES ('mercury-atlas6', 8c7b3200-4d82-11a9-8080-808080808080, '1962-2-20T15:47:00+0000', '1962-2-20T20:42:00+0000', False, 'First American manned orbital flight. Completed three orbits.');
INSERT INTO space_flights.catalog (spacecraft_name, journey_id, start, end, active, summary) VALUES ('mercury-atlas7', e9d69600-9685-11a9-8080-808080808080, '1962-5-24T13:45:00+0000', '1962-5-24T18:41:00+0000', False, 'First manual retrofire. Earth photography and study of liquids in weightless conditions.');
INSERT INTO space_flights.catalog (spacecraft_name, journey_id, start, end, active, summary) VALUES ('vostok3', ff31b400-d46d-11a9-8080-808080808080, '1962-8-11T08:30:00+0000', '1962-8-15T06:52:00+0000', False, 'First instance of two manned spacecraft in orbit simultaneously.');
INSERT INTO space_flights.catalog (spacecraft_name, journey_id, start, end, active, summary) VALUES ('vostok4', 403fcc00-d533-11a9-8080-808080808080, '1962-8-12T08:02:00+0000', '1962-8-15T06:59:00+0000', False, 'First instance of two manned spacecraft in orbit simultaneously.');
INSERT INTO space_flights.catalog (spacecraft_name, journey_id, start, end, active, summary) VALUES ('mercury-atlas8', 977b6200-fe3b-11a9-8080-808080808080, '1962-10-3T13:15:00+0000', '1962-10-3T22:28:00+0000', False, 'First flawless Mercury mission.');
Task 4. Query the table
- Select all of the records from the table:
select * from space_flights.catalog;

- Select one of the records by its primary key:
SELECT * FROM space_flights.catalog WHERE spacecraft_name = 'vostok2';

- Exit the CQL shell:
exit
- Close the SSH window.
Click Check my progress to verify the objective.
Insert data into the table
Congratulations!
In this lab you deployed an Apache Cassandra™ database, connected to the database using CQL Shell and ran some simple DDL commands to create a table, load some data and query it.
Next steps / Learn more
-
DataStax on the Google Cloud Marketplace!
- Take advantage of the largest library of technical courses at DataStax Academy.
Google Cloud training and certification
...helps you make the most of Google Cloud technologies. Our classes include technical skills and best practices to help you get up to speed quickly and continue your learning journey. We offer fundamental to advanced level training, with on-demand, live, and virtual options to suit your busy schedule. Certifications help you validate and prove your skill and expertise in Google Cloud technologies.
Manual Last Updated February 06, 2025
Lab Last Tested February 06, 2025
Copyright 2025 Google LLC. All rights reserved. Google and the Google logo are trademarks of Google LLC. All other company and product names may be trademarks of the respective companies with which they are associated.


