Checkpoints
Creating and Managing Service Accounts
/ 30
Access BigQuery from a Service Account
/ 70
Service Accounts and Roles: Fundamentals
GSP199

Overview
Service accounts are a special type of Google account that grant permissions to virtual machines instead of end users. Service accounts are primarily used to ensure safe, managed connections to APIs and Google Cloud services. Granting access to trusted connections and rejecting malicious ones is a must-have security feature for any Google Cloud project. In this lab, you get hands-on practice with the ins and outs of service accounts.
What you'll learn
In this lab, you learn how to:
- Create and manage service accounts.
- Create a virtual machine and associate it with a service account.
- Use client libraries to access BigQuery from a service account.
- Run a query on a BigQuery public dataset from a Compute Engine instance.
Prerequisites
Some experience with Cloud IAM is recommended, but little to no prior knowledge with service accounts is assumed. If you're looking for more advanced hands-on practice in this topic area, be sure to check out the following labs:
Setup and requirements
Before you click the Start Lab button
Read these instructions. Labs are timed and you cannot pause them. The timer, which starts when you click Start Lab, shows how long Google Cloud resources will be made available to you.
This hands-on lab lets you do the lab activities yourself in a real cloud environment, not in a simulation or demo environment. It does so by giving you new, temporary credentials that you use to sign in and access Google Cloud for the duration of the lab.
To complete this lab, you need:
- Access to a standard internet browser (Chrome browser recommended).
- Time to complete the lab---remember, once you start, you cannot pause a lab.
How to start your lab and sign in to the Google Cloud console
-
Click the Start Lab button. If you need to pay for the lab, a pop-up opens for you to select your payment method. On the left is the Lab Details panel with the following:
- The Open Google Cloud console button
- Time remaining
- The temporary credentials that you must use for this lab
- Other information, if needed, to step through this lab
-
Click Open Google Cloud console (or right-click and select Open Link in Incognito Window if you are running the Chrome browser).
The lab spins up resources, and then opens another tab that shows the Sign in page.
Tip: Arrange the tabs in separate windows, side-by-side.
Note: If you see the Choose an account dialog, click Use Another Account. -
If necessary, copy the Username below and paste it into the Sign in dialog.
{{{user_0.username | "Username"}}} You can also find the Username in the Lab Details panel.
-
Click Next.
-
Copy the Password below and paste it into the Welcome dialog.
{{{user_0.password | "Password"}}} You can also find the Password in the Lab Details panel.
-
Click Next.
Important: You must use the credentials the lab provides you. Do not use your Google Cloud account credentials. Note: Using your own Google Cloud account for this lab may incur extra charges. -
Click through the subsequent pages:
- Accept the terms and conditions.
- Do not add recovery options or two-factor authentication (because this is a temporary account).
- Do not sign up for free trials.
After a few moments, the Google Cloud console opens in this tab.

Activate Cloud Shell
Cloud Shell is a virtual machine that is loaded with development tools. It offers a persistent 5GB home directory and runs on the Google Cloud. Cloud Shell provides command-line access to your Google Cloud resources.
- Click Activate Cloud Shell
at the top of the Google Cloud console.
When you are connected, you are already authenticated, and the project is set to your Project_ID,
gcloud is the command-line tool for Google Cloud. It comes pre-installed on Cloud Shell and supports tab-completion.
- (Optional) You can list the active account name with this command:
- Click Authorize.
Output:
- (Optional) You can list the project ID with this command:
Output:
gcloud, in Google Cloud, refer to the gcloud CLI overview guide.
Set the region for your project
Run the following command to set the region for your project:
What are service accounts?
A service account is a special Google account that belongs to your application or a virtual machine (VM) instead of an individual end user. Your application uses the service account to call the Google API of a service, so that the users aren't directly involved.
For example, a Compute Engine VM may run as a service account, and that account can be given permissions to access the resources it needs. This way the service account is the identity of the service, and the service account's permissions control which resources the service can access.
A service account is identified by its email address, which is unique to the account.
Types of service accounts
User-managed service accounts
When you create a new Cloud project using Google Cloud console and if Compute Engine API is enabled for your project, a Compute Engine Service account is created for you by default. It is identifiable using the email:
If your project contains an App Engine application, the default App Engine service account is created in your project by default. It is identifiable using the email:
Google-managed service accounts
In addition to the user-managed service accounts, you might see some additional service accounts in your project’s IAM policy or in the console. These service accounts are created and owned by Google. These accounts represent different Google services and each account is automatically granted IAM roles to access your Google Cloud project.
Google APIs service account
An example of a Google-managed service account is a Google API service account identifiable using the email:
This service account is designed specifically to run internal Google processes on your behalf and is not listed in the Service Accounts section of the console. By default, the account is automatically granted the project editor role on the project and is listed in the IAM section of the console. This service account is deleted only when the project is deleted.
Understanding IAM roles
When an identity calls a Google Cloud API, Google Cloud Identity and Access Management requires that the identity has the appropriate permissions to use the resource. You can grant permissions by granting roles to a user, a group, or a service account.
Types of roles
There are three types of roles in Cloud IAM:
- Primitive roles, which include the Owner, Editor, and Viewer roles that existed prior to the introduction of Cloud IAM.
- Predefined roles, which provide granular access for a specific service and are managed by Google Cloud.
- Custom roles, which provide granular access according to a user-specified list of permissions.
Learn more about roles from the Understanding roles Guide.
Task 1. Create and manage service accounts
When you create a new Cloud project, Google Cloud automatically creates one Compute Engine service account and one App Engine service account under that project. You can create up to 98 additional service accounts to your project to control access to your resources.
Creating a service account
Creating a service account is similar to adding a member to your project, but the service account belongs to your applications rather than an individual end user.
- To create a service account, run the following command in Cloud Shell:
The output of this command is the service account, which looks similar to the following:
Granting roles to service accounts
When granting IAM roles, you can treat a service account either as a resource or as an identity.
Your application uses a service account as an identity to authenticate to Google Cloud services. For example, if you have a Compute Engine Virtual Machine (VM) running as a service account, you can grant the editor role to the service account (the identity) for a project (the resource).
At the same time, you might also want to control who can start the VM. You can do this by granting a user (the identity) the serviceAccountUser role for the service account (the resource).
Granting roles to a service account for specific resources
You grant roles to a service account so that the service account has permission to complete specific actions on the resources in your Cloud Platform project. For example, you might grant the storage.admin role to a service account so that it has control over objects and buckets in Cloud Storage.
- Run the following in Cloud Shell to grant roles to the service account you just made:
The output displays a list of roles the service account now has:
Click Check my progress to verify the objective.
Task 2. Use the client libraries to access BigQuery using a service account
In this section, you query the BigQuery public datasets from an instance with the help of a service account that has the necessary roles.
Create a service account
First create a new service account from the console.
-
Go to Navigation menu > IAM & Admin, select Service accounts and click on + Create Service Account.
-
Fill necessary details with:
- Service account name: bigquery-qwiklab
-
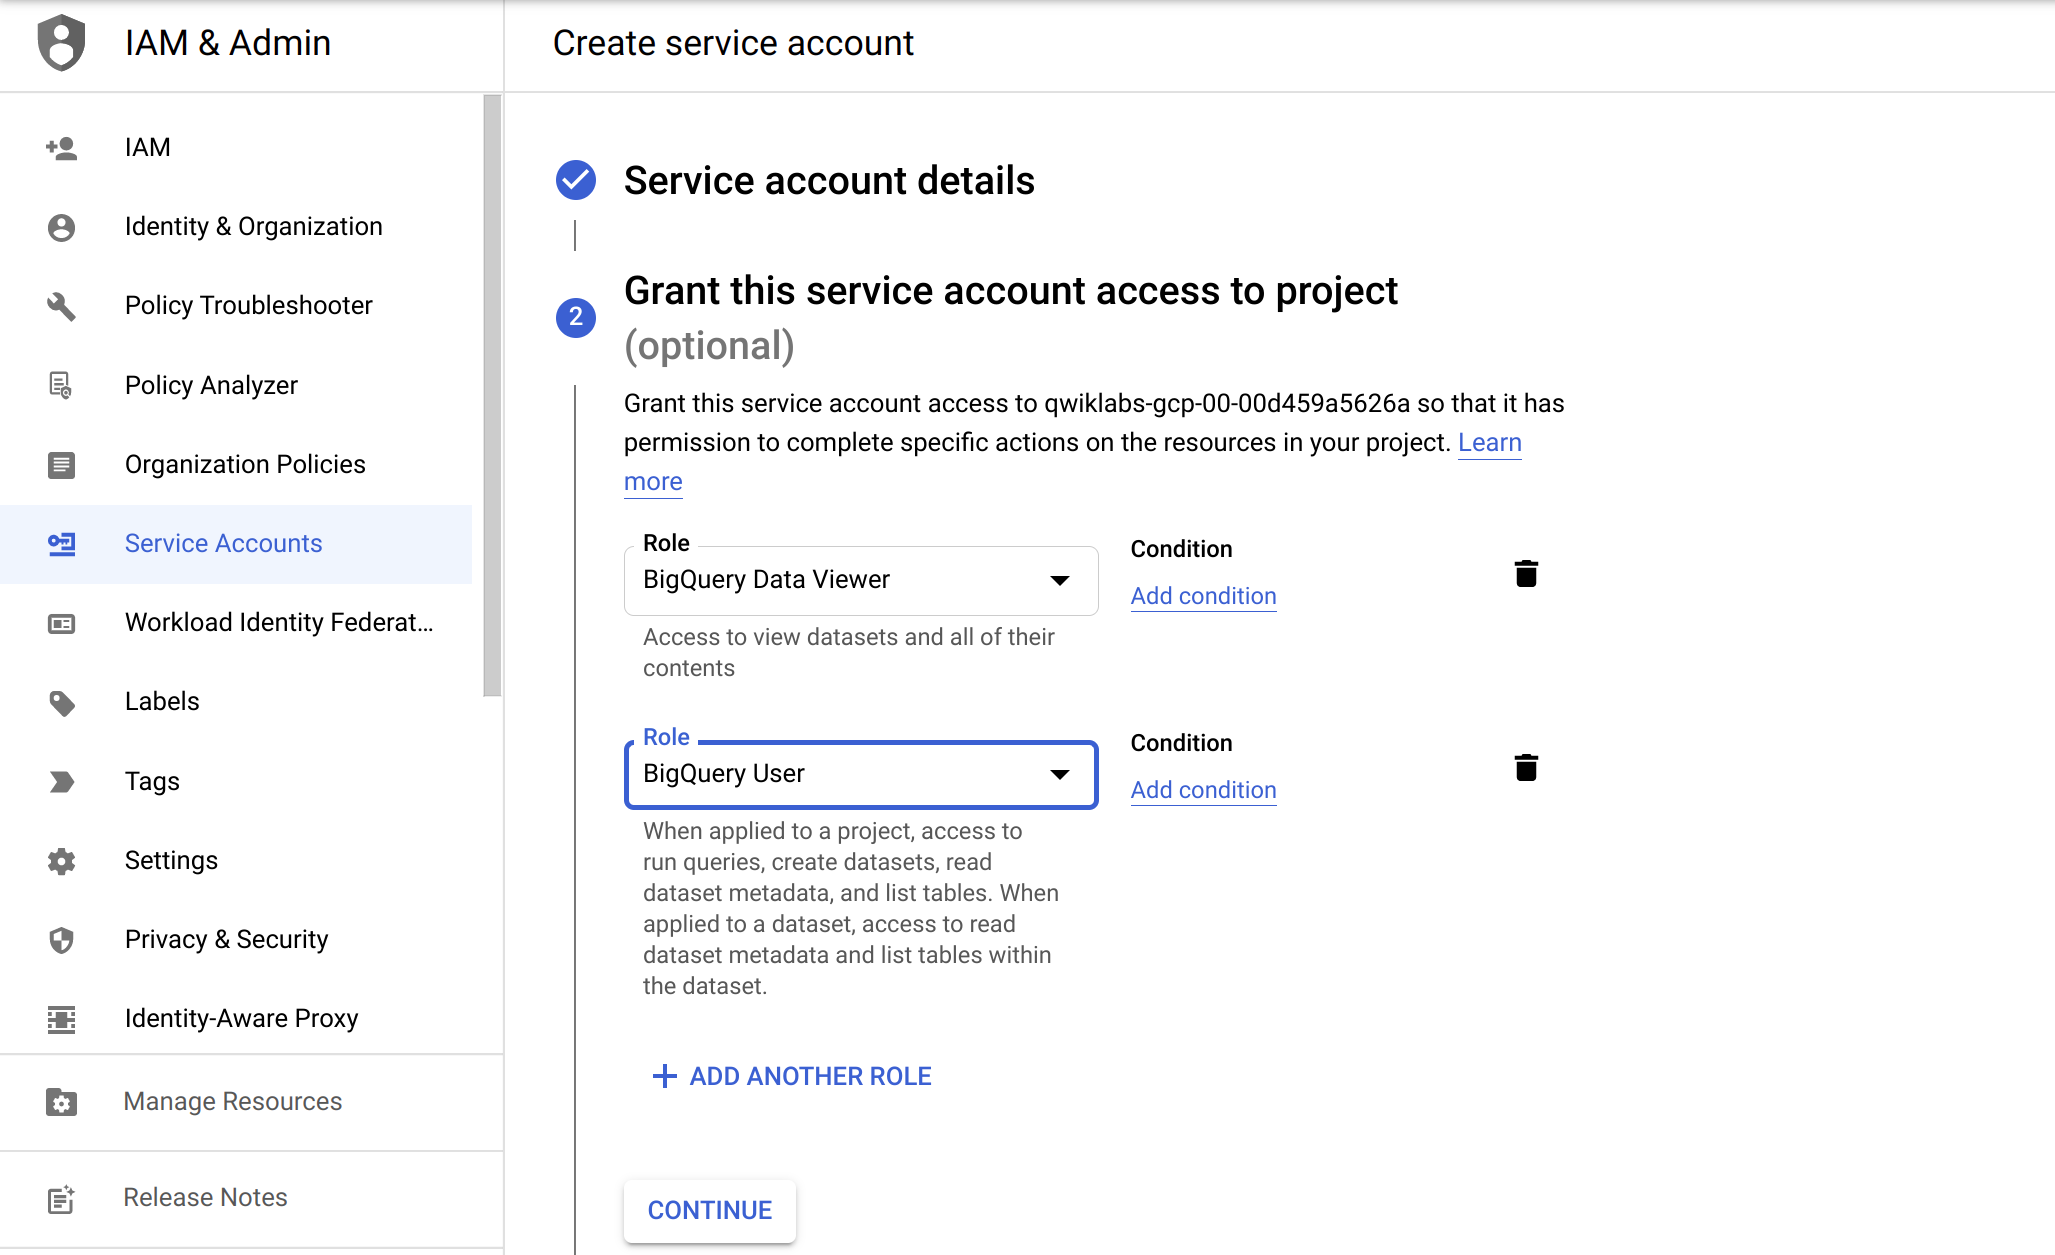
Now click Create and Continue and then add the following roles:
-
Bigquery > BigQuery Data Viewer
-
BigQuery > BigQuery User
-
Your console should resemble the following:
- Click Continue and then click Done.
Create a VM instance
-
In the console, go to Compute Engine > VM Instances, and click Create Instance.
-
Create your VM with the following information:
| Configuration | Value |
|---|---|
| Name | bigquery-instance |
| Region | |
| Zone | |
| Series | E2 |
| Machine Type | e2-medium |
| Boot Disk | Debian GNU/Linux 11 (bullseye) x86/64 |
| Service account | bigquery-qwiklab |
| Access scopes | Set access for each API |
| BigQuery | Enabled |
bigquery-qwiklab service account doesn't appear in the drop-down list, try typing the name into the "Filter" section.- Click Create.
Put the example code on a Compute Engine instance
- In the console, go to Compute Engine > VM Instances.
- SSH into
bigquery-instanceby clicking on the SSH button.
In the SSH window, install the necessary dependencies by running the following commands:
Now create the example Python file:
Add the Project ID to query.py with:
Run the following to make sure that the sed command has successfully changed the Project ID in the file:
Example output (yours may differ):
Add the service account email to query.py with:
Run the following to make sure that the sed command has successfully changed the service account email in the file:
Example output (yours may differ):
The application now uses the permissions that are associated with this service account. Run the query with the following Python command:
The query should return the following output (your numbers may vary):
Awesome work! You made a request to a BigQuery public dataset with a bigquery-qwiklab service account.
Click Check my progress to verify the objective.
Congratulations!
In this lab, you learned how to use service accounts.
Next steps / Learn more
- Read more about creating and managing service accounts in the Creating and managing service accounts Guide.
- Check out these labs:
Google Cloud training and certification
...helps you make the most of Google Cloud technologies. Our classes include technical skills and best practices to help you get up to speed quickly and continue your learning journey. We offer fundamental to advanced level training, with on-demand, live, and virtual options to suit your busy schedule. Certifications help you validate and prove your skill and expertise in Google Cloud technologies.
Manual Last Updated July 17, 2024
Lab Last Tested July 17, 2024
Copyright 2024 Google LLC All rights reserved. Google and the Google logo are trademarks of Google LLC. All other company and product names may be trademarks of the respective companies with which they are associated.