This lab was developed with the partner, MongoDB. Your personal information may be shared with MongoDB, the lab sponsor, if you have opted-in to receive product updates, announcements, and offers in your Account Profile.
Note: This lab requires a partner account. Please follow the lab instructions to create your account before starting the lab.
GSP1148
Overview
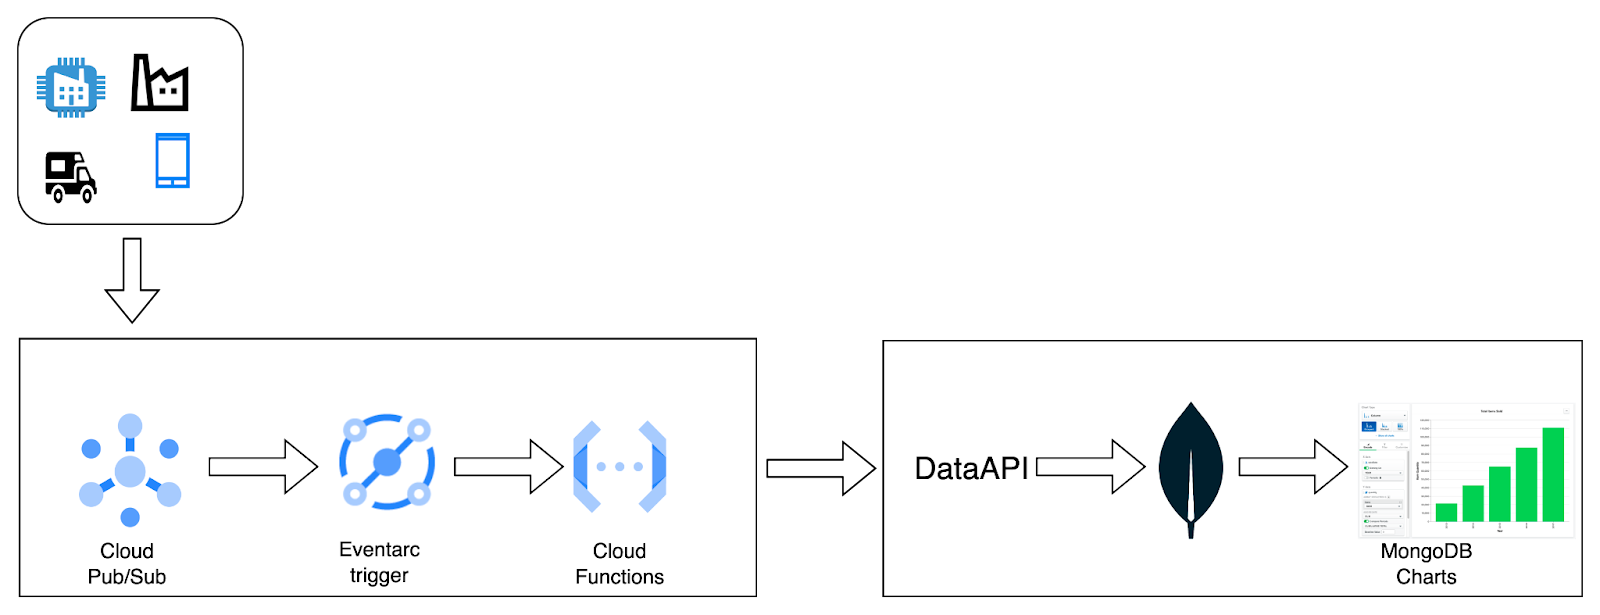
In this lab, you will construct a pipeline that seamlessly transports real-time data generated by edge devices or sensors to MongoDB using MongoDB Atlas Data API. Through this process, you will establish a Pub/Sub topic that monitors change stream data, an Eventarc trigger that connects the Pub/Sub topic to a Google Cloud Function, and a MongoDB collection to securely store the data. You'll also visualize the data with MongoDB Atlas Charts.
With MongoDB Atlas on Google Cloud, you will be able to integrate with the Google Cloud product suite to create more value. MongoDB with Google Cloud provides great geographic presence, Cost to performance ratio and security.
Objectives
In this lab, you will do the following:
Provision your MongoDB Atlas cluster.
Create a database and collections within it and load with the initial set of data.
Set up the MongoDB Atlas Data API and create an API key.
Create a Pub/Sub topic that can read the change stream IIoT data.
Create an Eventarc trigger with Pub/Sub as a source and Cloud Function as destination.
Create a Cloud Function that uses MongoDB Atlas Data API to write the data to MongoDB.
Configure MongoDB Atlas Charts to display and visualize the data.
Run a Cloud Function to simulate an IIOT sensor that publishes data to Pub/Sub.
Prerequisites
If you are new to MongoDB Atlas, take up the lab Introduction to MongoDB Atlas to setup your first MongoDB cluster or refer below documentation:
Read these instructions. Labs are timed and you cannot pause them. The timer, which starts when you click Start Lab, shows how long Google Cloud resources will be made available to you.
This Qwiklabs hands-on lab lets you do the lab activities yourself in a real cloud environment, not in a simulation or demo environment. It does so by giving you new, temporary credentials that you use to sign in and access Google Cloud for the duration of the lab.
What you need
To complete this lab, you need:
Access to a standard internet browser (Chrome browser recommended).
Time to complete the lab.
Note: If you already have your own personal Google Cloud account or project, do not use it for this lab.
Note: If you are using a Pixelbook, open an Incognito window to run this lab.
How to start your lab and sign in to the Google Cloud Console
Click the Start Lab button. If you need to pay for the lab, a pop-up opens for you to select your payment method.
On the left is a panel populated with the temporary credentials that you must use for this lab.
Copy the username, and then click Open Google Console.
The lab spins up resources, and then opens another tab that shows the Sign in page.
Tip: Open the tabs in separate windows, side-by-side.
In the Sign in page, paste the username that you copied from the Connection Details panel. Then copy and paste the password.
Important: You must use the credentials from the Connection Details panel. Do not use your Qwiklabs credentials. If you have your own Google Cloud account, do not use it for this lab (avoids incurring charges).
Click through the subsequent pages:
Accept the terms and conditions.
Do not add recovery options or two-factor authentication (because this is a temporary account).
Do not sign up for free trials.
After a few moments, the Cloud Console opens in this tab.
Task 1. Setting up and Configuring Atlas for Data Management: Cluster, API, and Charts
Set up a MongoDB cluster
Scenario: There is a weather station generating weather data. The data generator is mimicking the weather station sensors. You will be creating a real time monitoring system for the weather data using MongoDB Charts in this section.
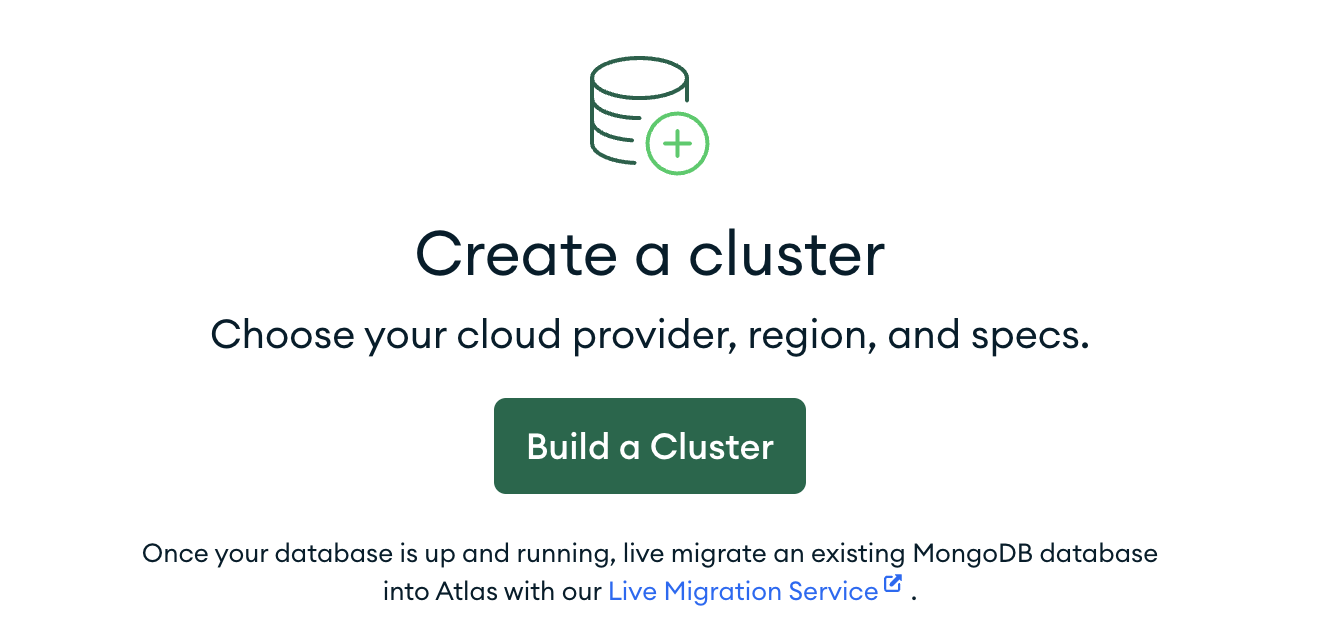
Log into your Atlas account, and click on Build a Cluster. (or, you may see +Create button.)
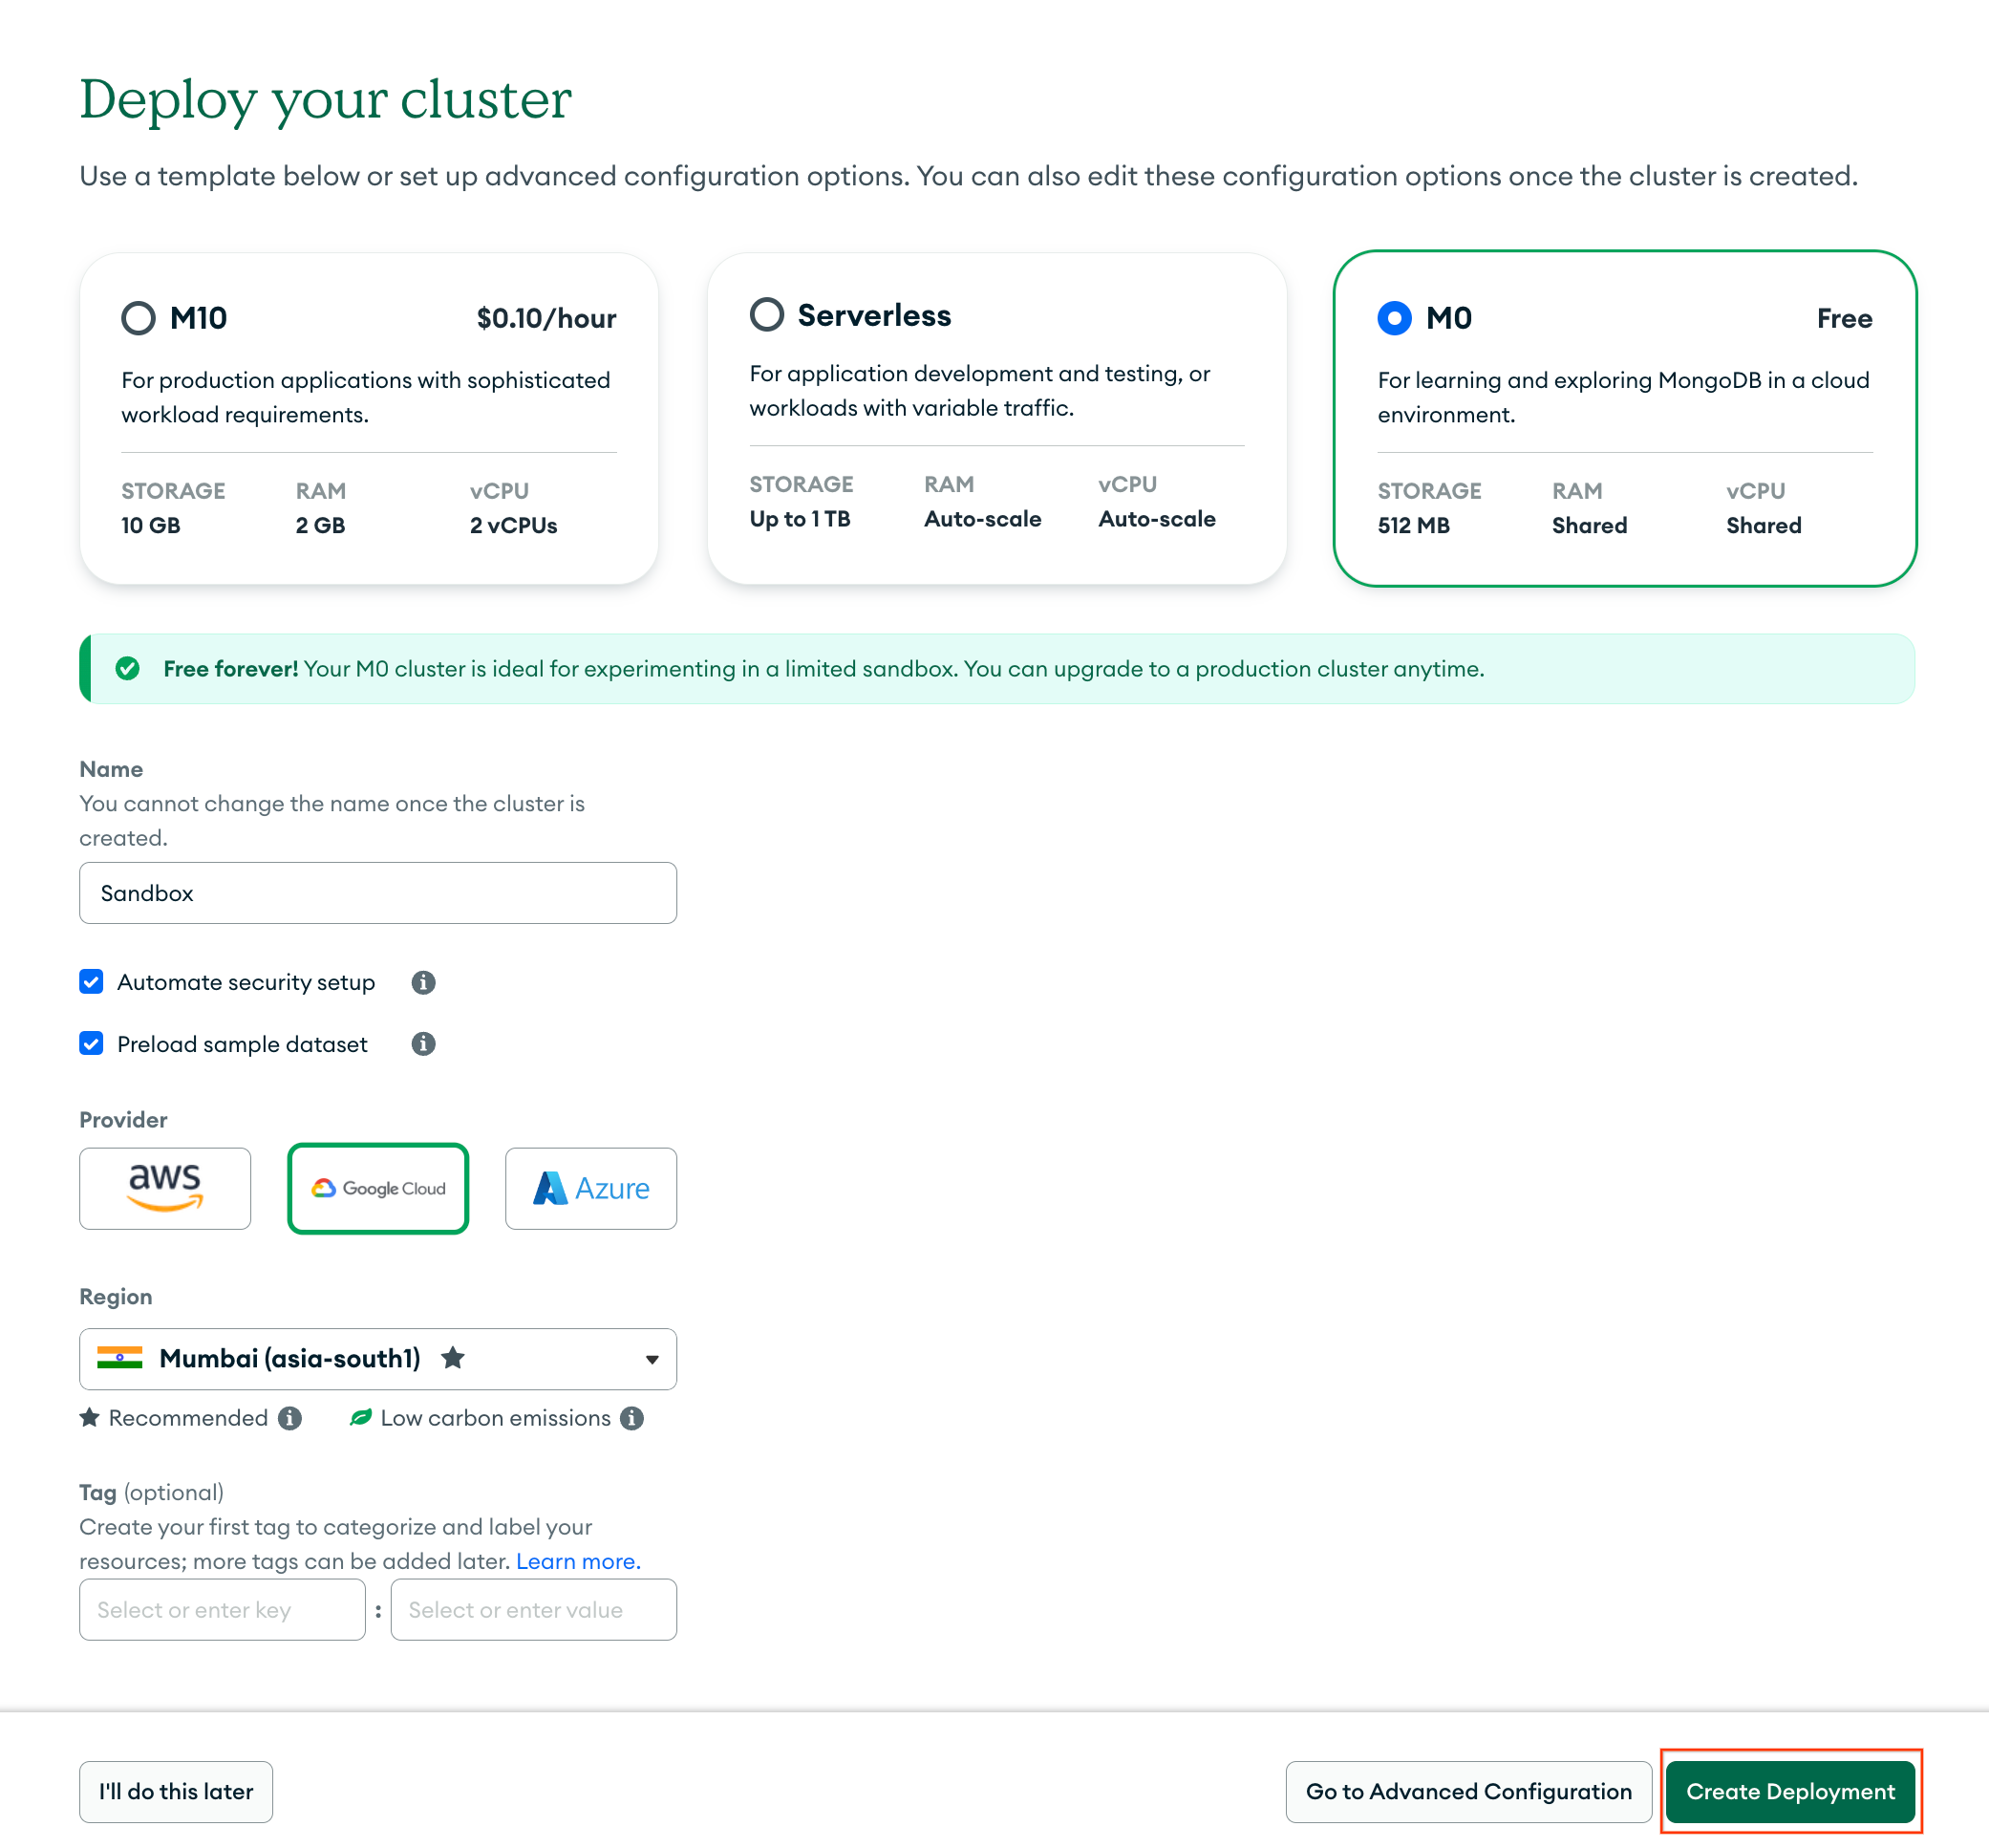
On the Deploy your cluster page select M0.
Name the cluster Sandbox.
Select Google Cloud in Cloud Provider & Region. Select the nearest region to you.
Click on Create Deployment.
Click Close.
Click on Browse Collections and then click on the +Create Database button.
Name your database weather_station and collection name sensor and click on Create. Make sure you observe this exact casing and spelling on the database and collection names, otherwise your Cloud Function will fail later.
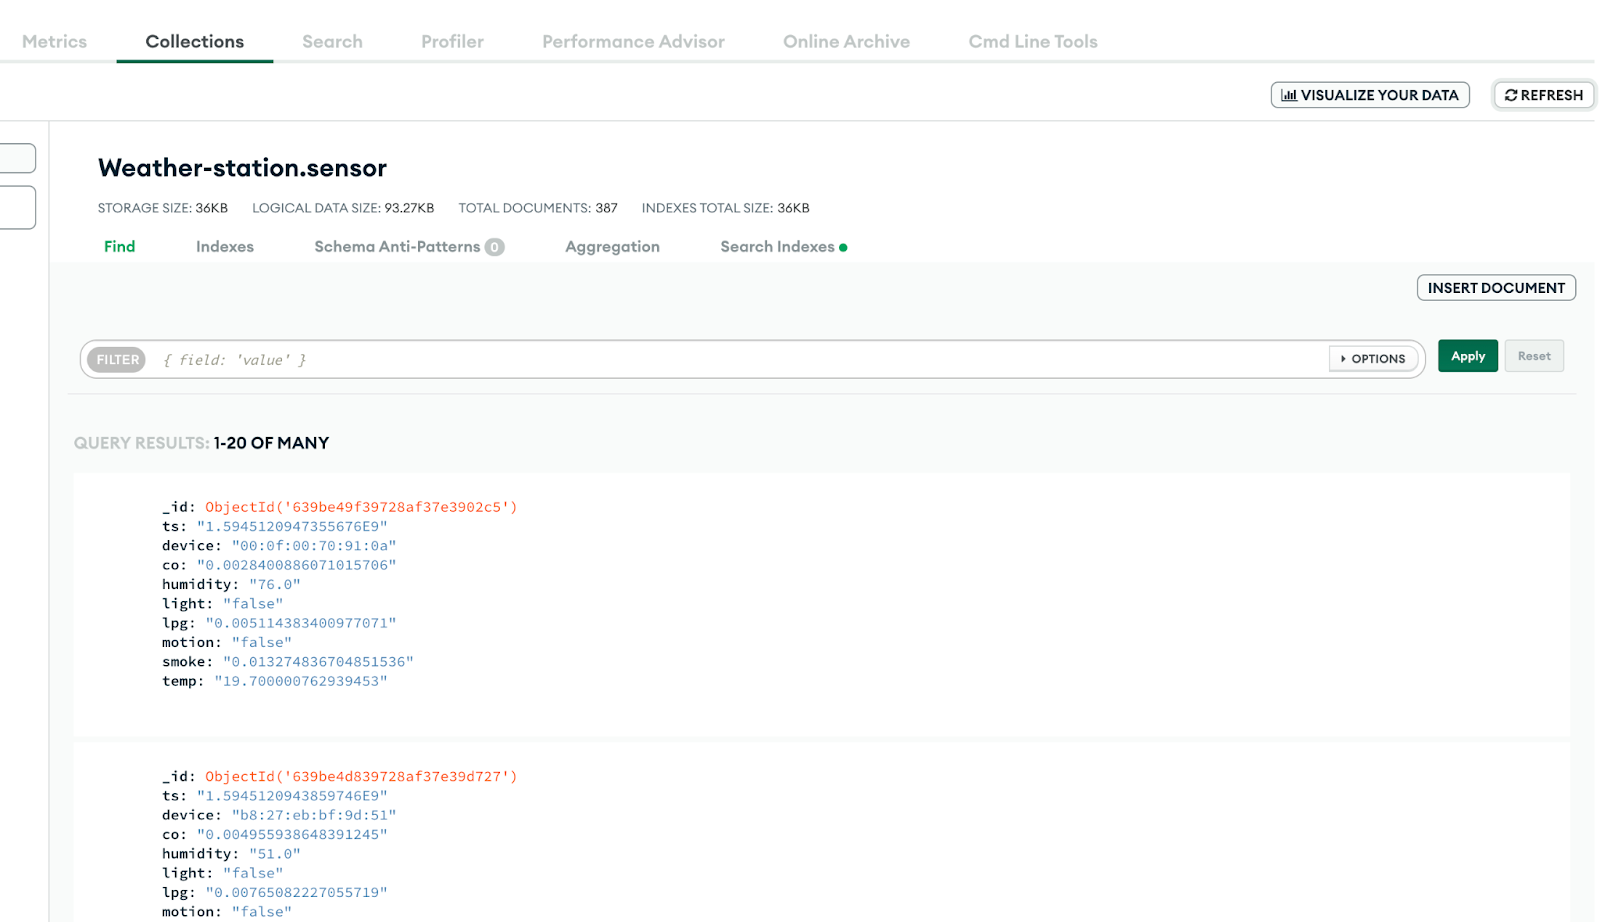
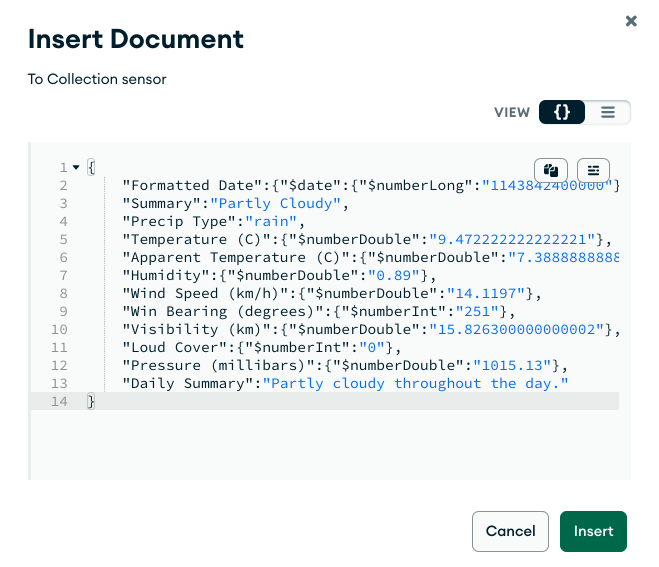
To insert a sample document into the collection, click on Insert document.
You can either enter the fields one at a time, or add the whole document as JSON. Switch to the JSON view:
Copy and paste the below document into the collection.
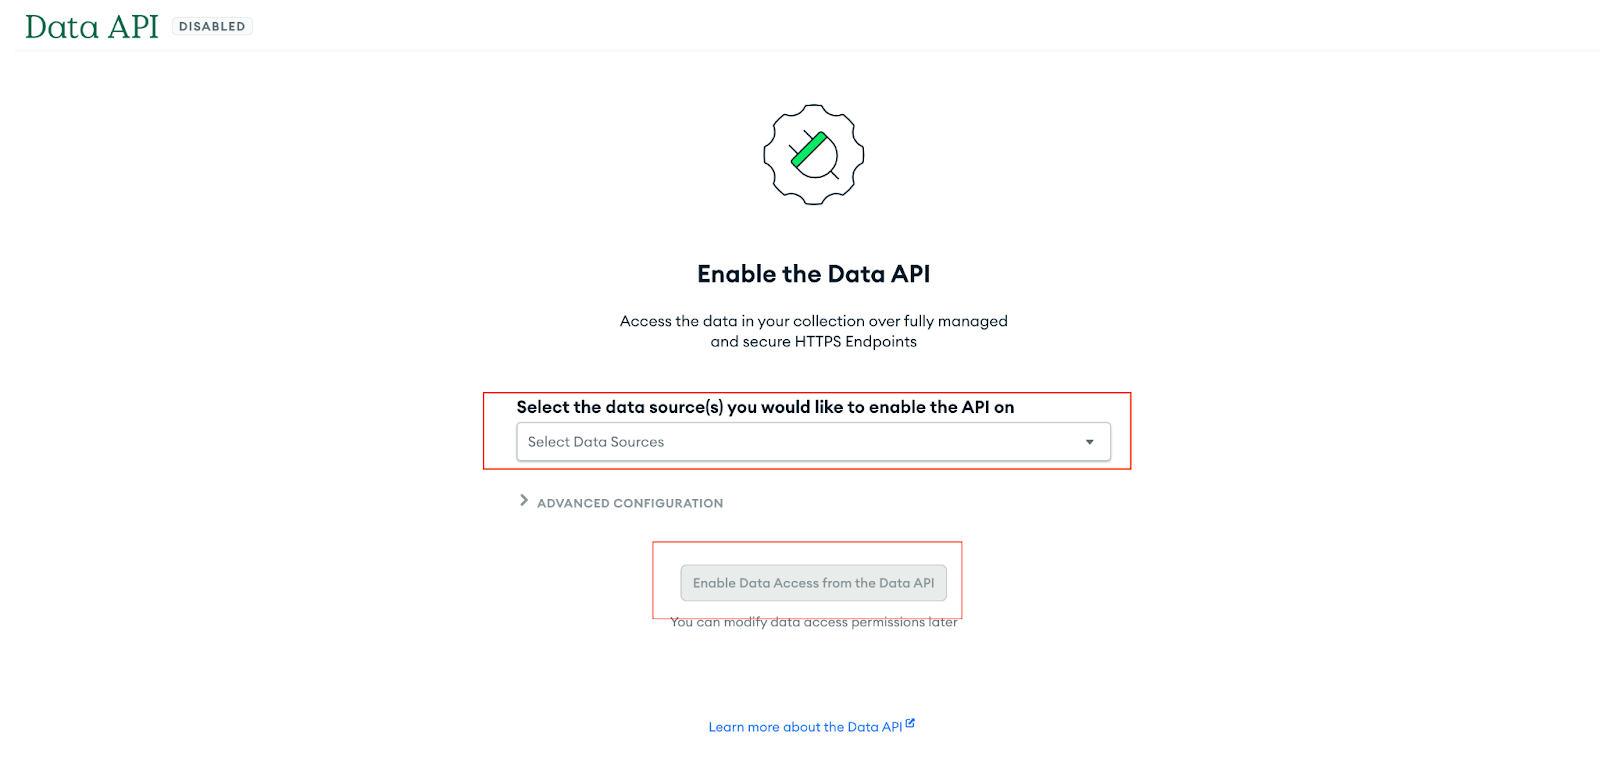
In this section you will configure the Data API in MongoDB Atlas. The MongoDB Atlas Data API lets you read and write data in Atlas with standard HTTPS requests. To use the Data API, all you need is an HTTPS client and a valid API key. You will use the Data API to communicate with the weather_station database from Cloud Functions.
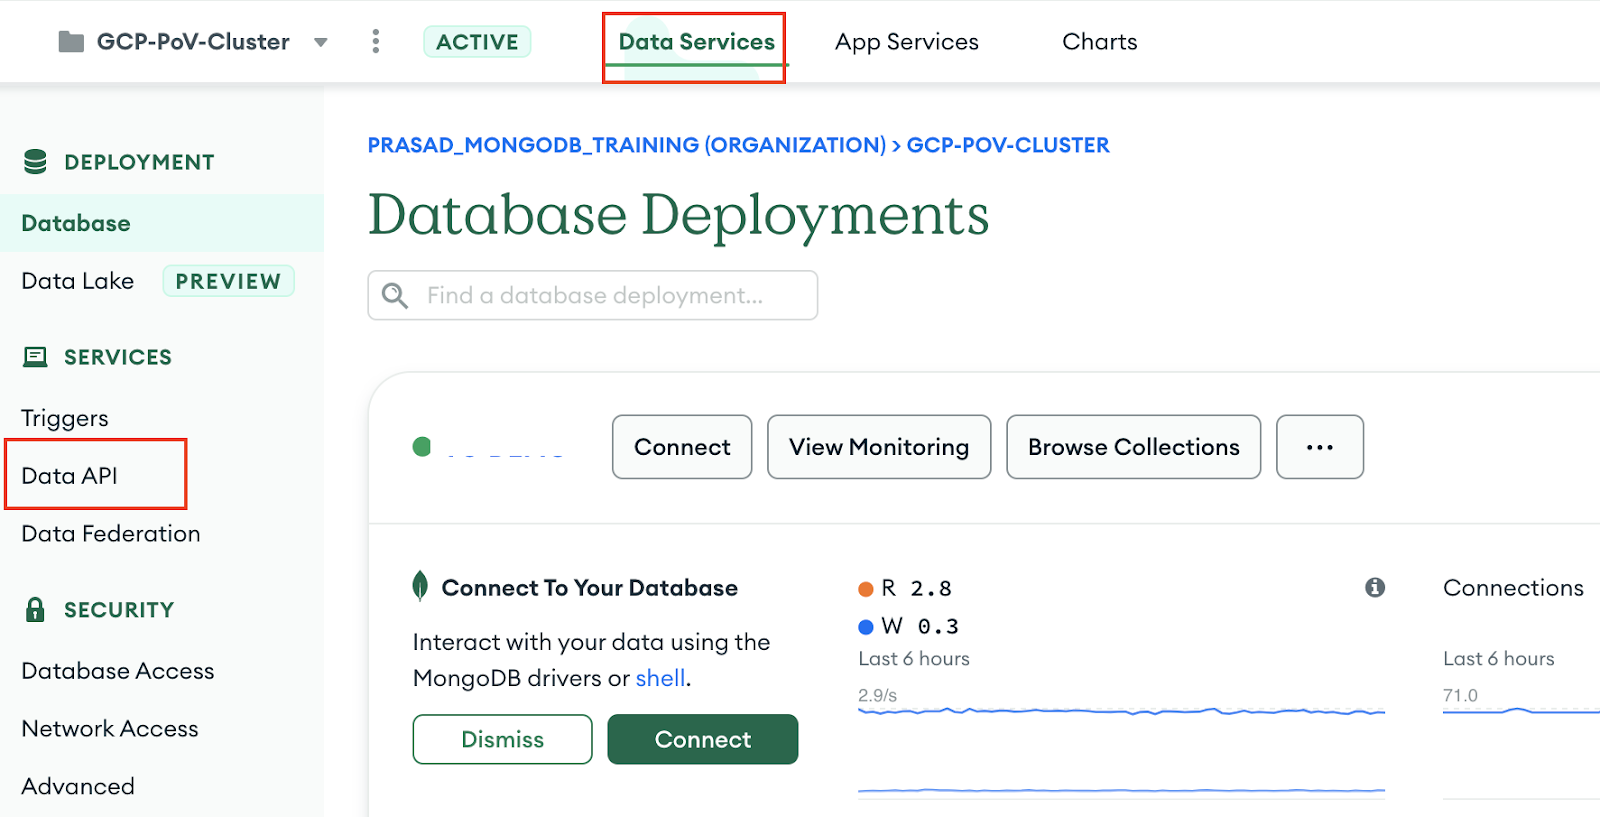
On the MongoDB Home screen of data services, Click on Data API from the side pane.
Click on Select data sources drop down and select Sandbox cluster created in MongoDB Create cluster stage. Click on Enable Data Access from Data API.
Click on Users tab.
Click on Create API Key, Name your API key weather_station-api-key and click on Generate API Key. Copy the API key, store it locally and click on Close.
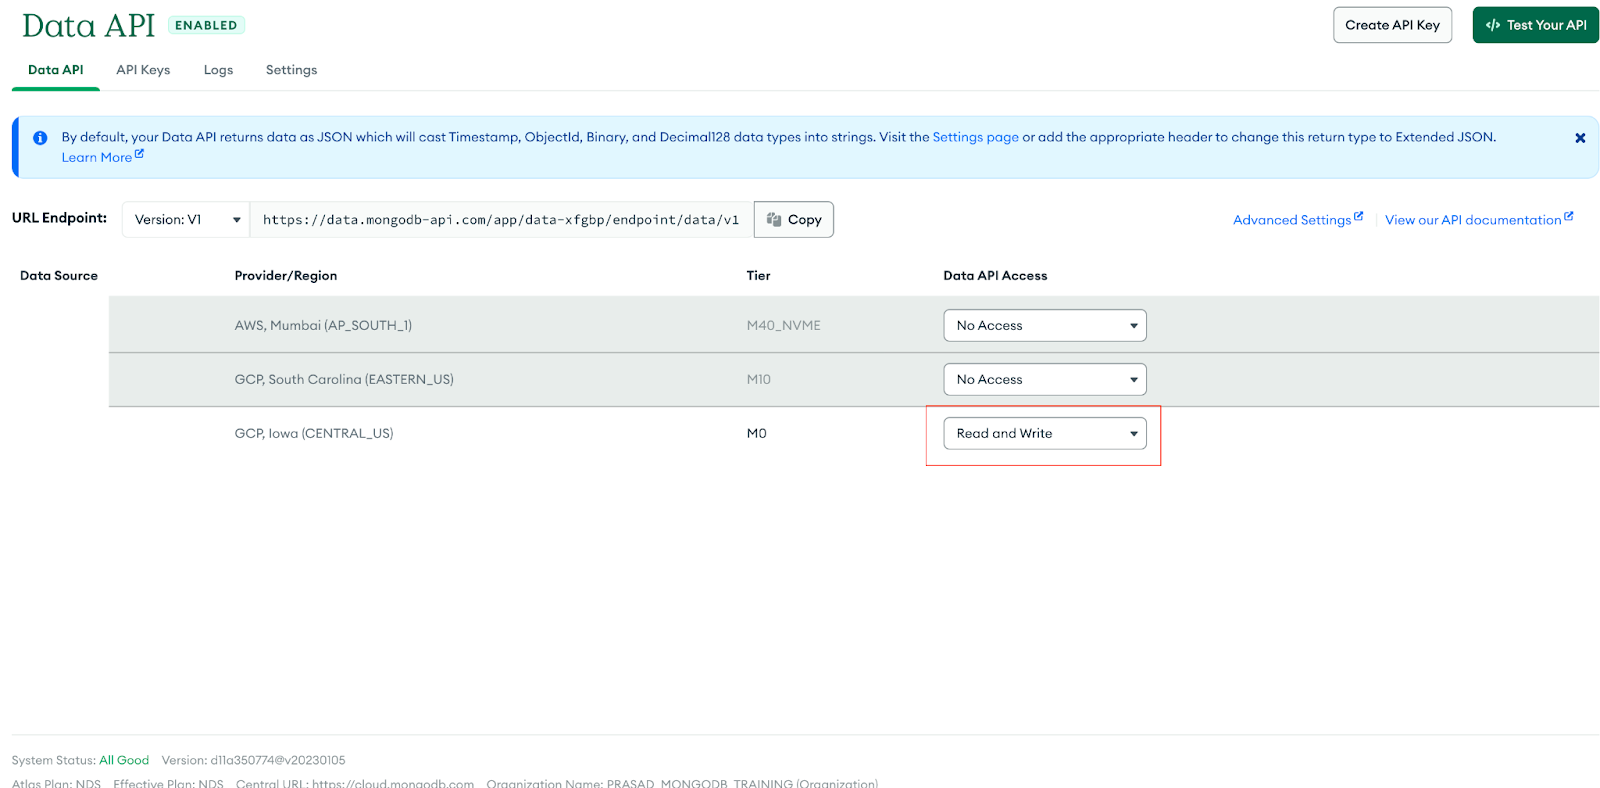
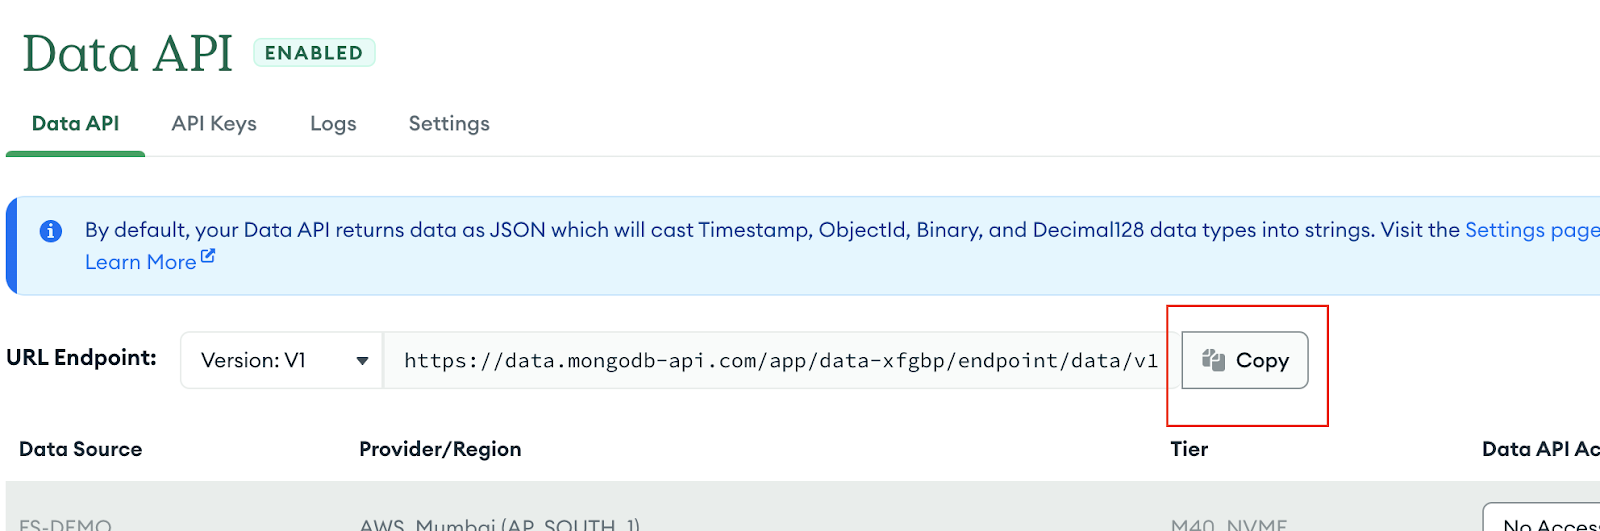
Click Data API tab and select Read and Write.
Copy the Data API URL Endpoint and store it locally to use in upcoming steps.
Set up Charts on MongoDB Atlas
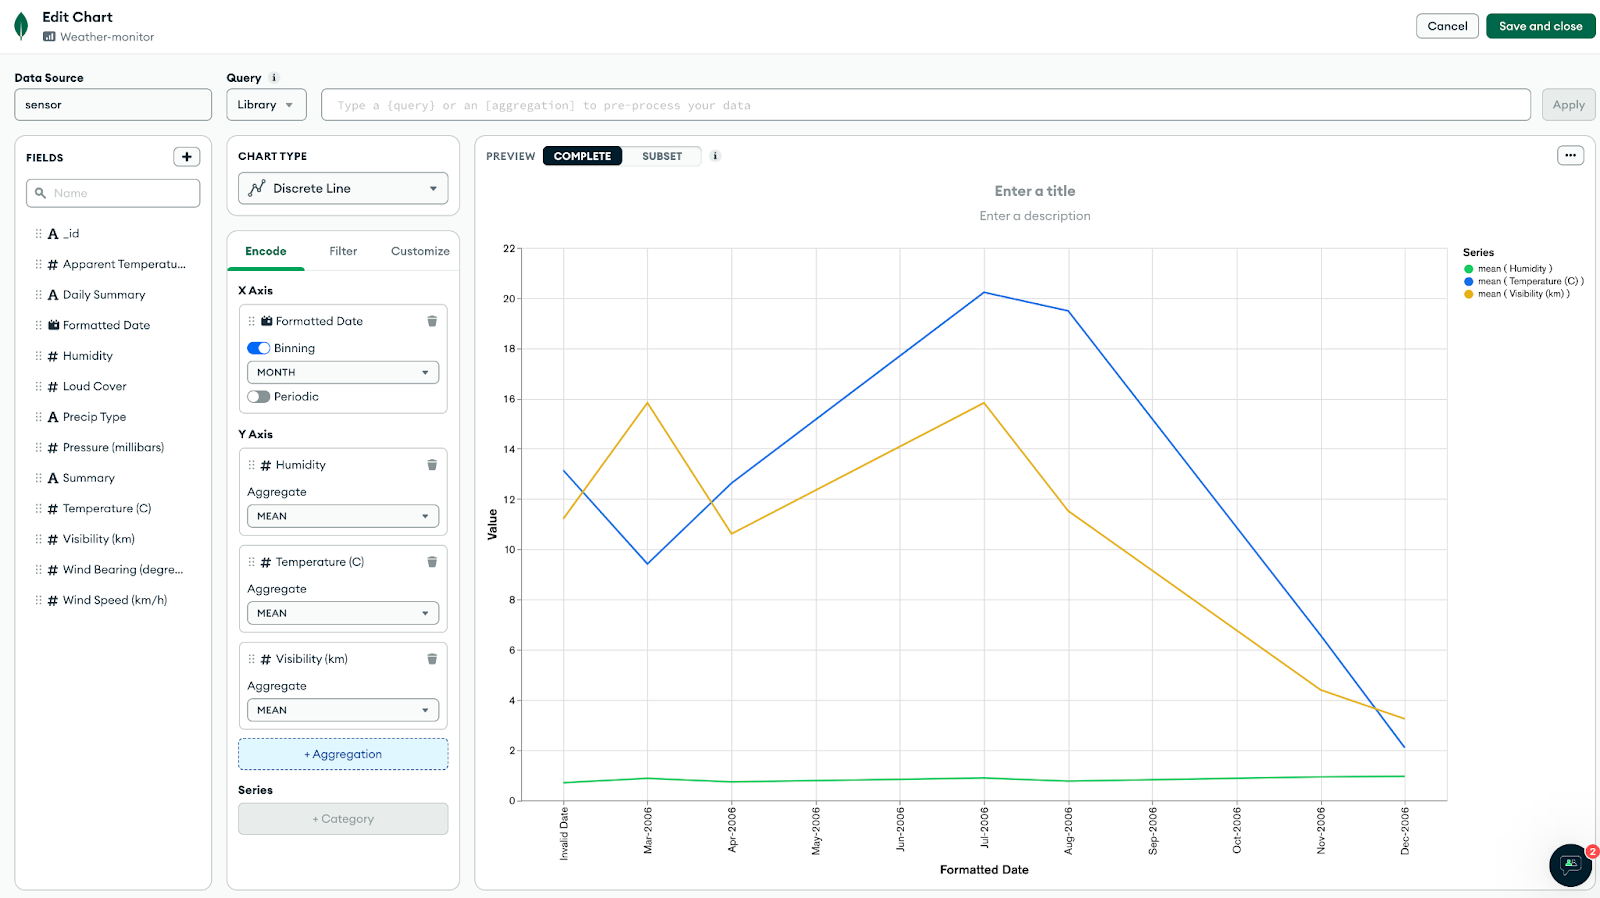
To get a sense of what's in the data set, You can use Charts and visualize the data. In this section you will create a Discrete Line chart to understand the correlation between the Temperature and Humidity and how it changes with time.
Navigate to Charts from MongoDB Atlas Home page. Click on Charts.
Click Select for Chart builder. (You may also get an option like Add dashboard > Name the dashboard > Save > Add chart)
Select the data source > Sandbox (Cluster) > weather_station > sensor.
Select the Discrete Line chart type and drag and drop the Formatted Date field to x axis and Humidity and Temperature fields to y axis.
You are Halfway through!!!
At this stage you have now completed the Atlas set up. You have set up an Atlas cluster, created a database and collection to store sensor data, created a Data API to write the data to the collections and created charts to visualize the data.
Task 2. Building the Real-time Data Pipeline in Google Cloud Console
Verify the pre-configured Pub/Sub Topic
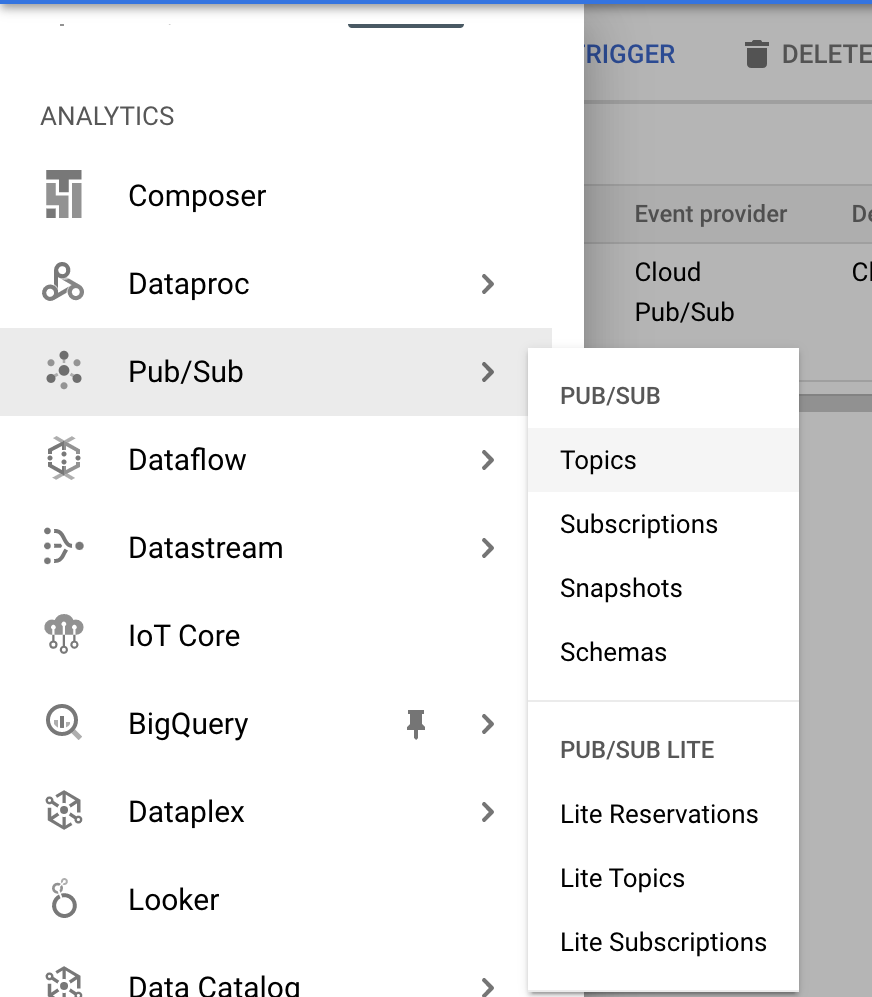
In the Google Cloud console, click on Navigation menu () > Analytics> Pub/Sub.
A topic with the name "weather-sensor-trigger" is pre configured to read the Change Stream data from the generator function.
Create a Cloud Function with an Eventarc trigger
In the Google Cloud console, find the Search bar on the top and search for "Cloud Functions". You will see a previously created function that you'll use later.
Click on Create Function. Use the following configuration:
Property
Value
Environment
2nd gen
Function name
weather-sensor-function
Region
The one allocated to you for the project
Trigger type
Cloud Pub/Sub
Select a Cloud Pub/Sub topic
weather-sensor-trigger
Expand the Runtime, build, connections and security settings section. Enter the following values:
Property
value
Memory allocated
512 MiB
Timeout
540 seconds
Autoscaling: Max number of instances
5
Click Next. Enable all required APIs in the prompt that follows.
Change the Runtime to Python 3.9 or Python 3.10. The Entry Point will be replaced by hello_pubsub.
Replace the default main.py content by the below code snippet.
import base64
import functions_framework
# Triggered from a message on a Cloud Pub/Sub topic.
@functions_framework.cloud_event
def hello_pubsub(cloud_event):
api_key = "paste the api key copied from Setup Data API from MongoDB step"
url = "Paste the Data API copied from Step Setup Data API from MongoDB data services"+"/action/insertOne"
import requests
import json
payload = json.dumps({
"collection": "sensor",
"database": "weather_station",
"dataSource": "Sandbox",
"document": json.loads(base64.b64decode(cloud_event.data["message"]["data"]).decode("utf-8"))
})
headers = {
'Content-Type': 'application/json',
'Access-Control-Request-Headers': '*',
'api-key': api_key,
}
print(payload)
response = requests.request("POST", url, headers=headers, data=payload)
return response
Get the values for url and api_key from the MongoDB Atlas Data API section under Setup a MongoDB App services section. Please note that the url should be followed by /action/insertOne.
Add below requirements in requirements.txt file:
functions-framework==3.*
requests
Click on the Deploy button. It should take a few seconds to finish deployment.
Click Check my progress to verify the objective.
Create a Cloud Function
Testing it all together
Go back to the list with your Cloud Functions. The cloud function with name "sensor-data-generator" is pre configured..
Click on the "sensor-data-generator" function.
Click on Trigger.
Click on the trigger URL. The function will generate the data and push to the Pub/Sub topic.
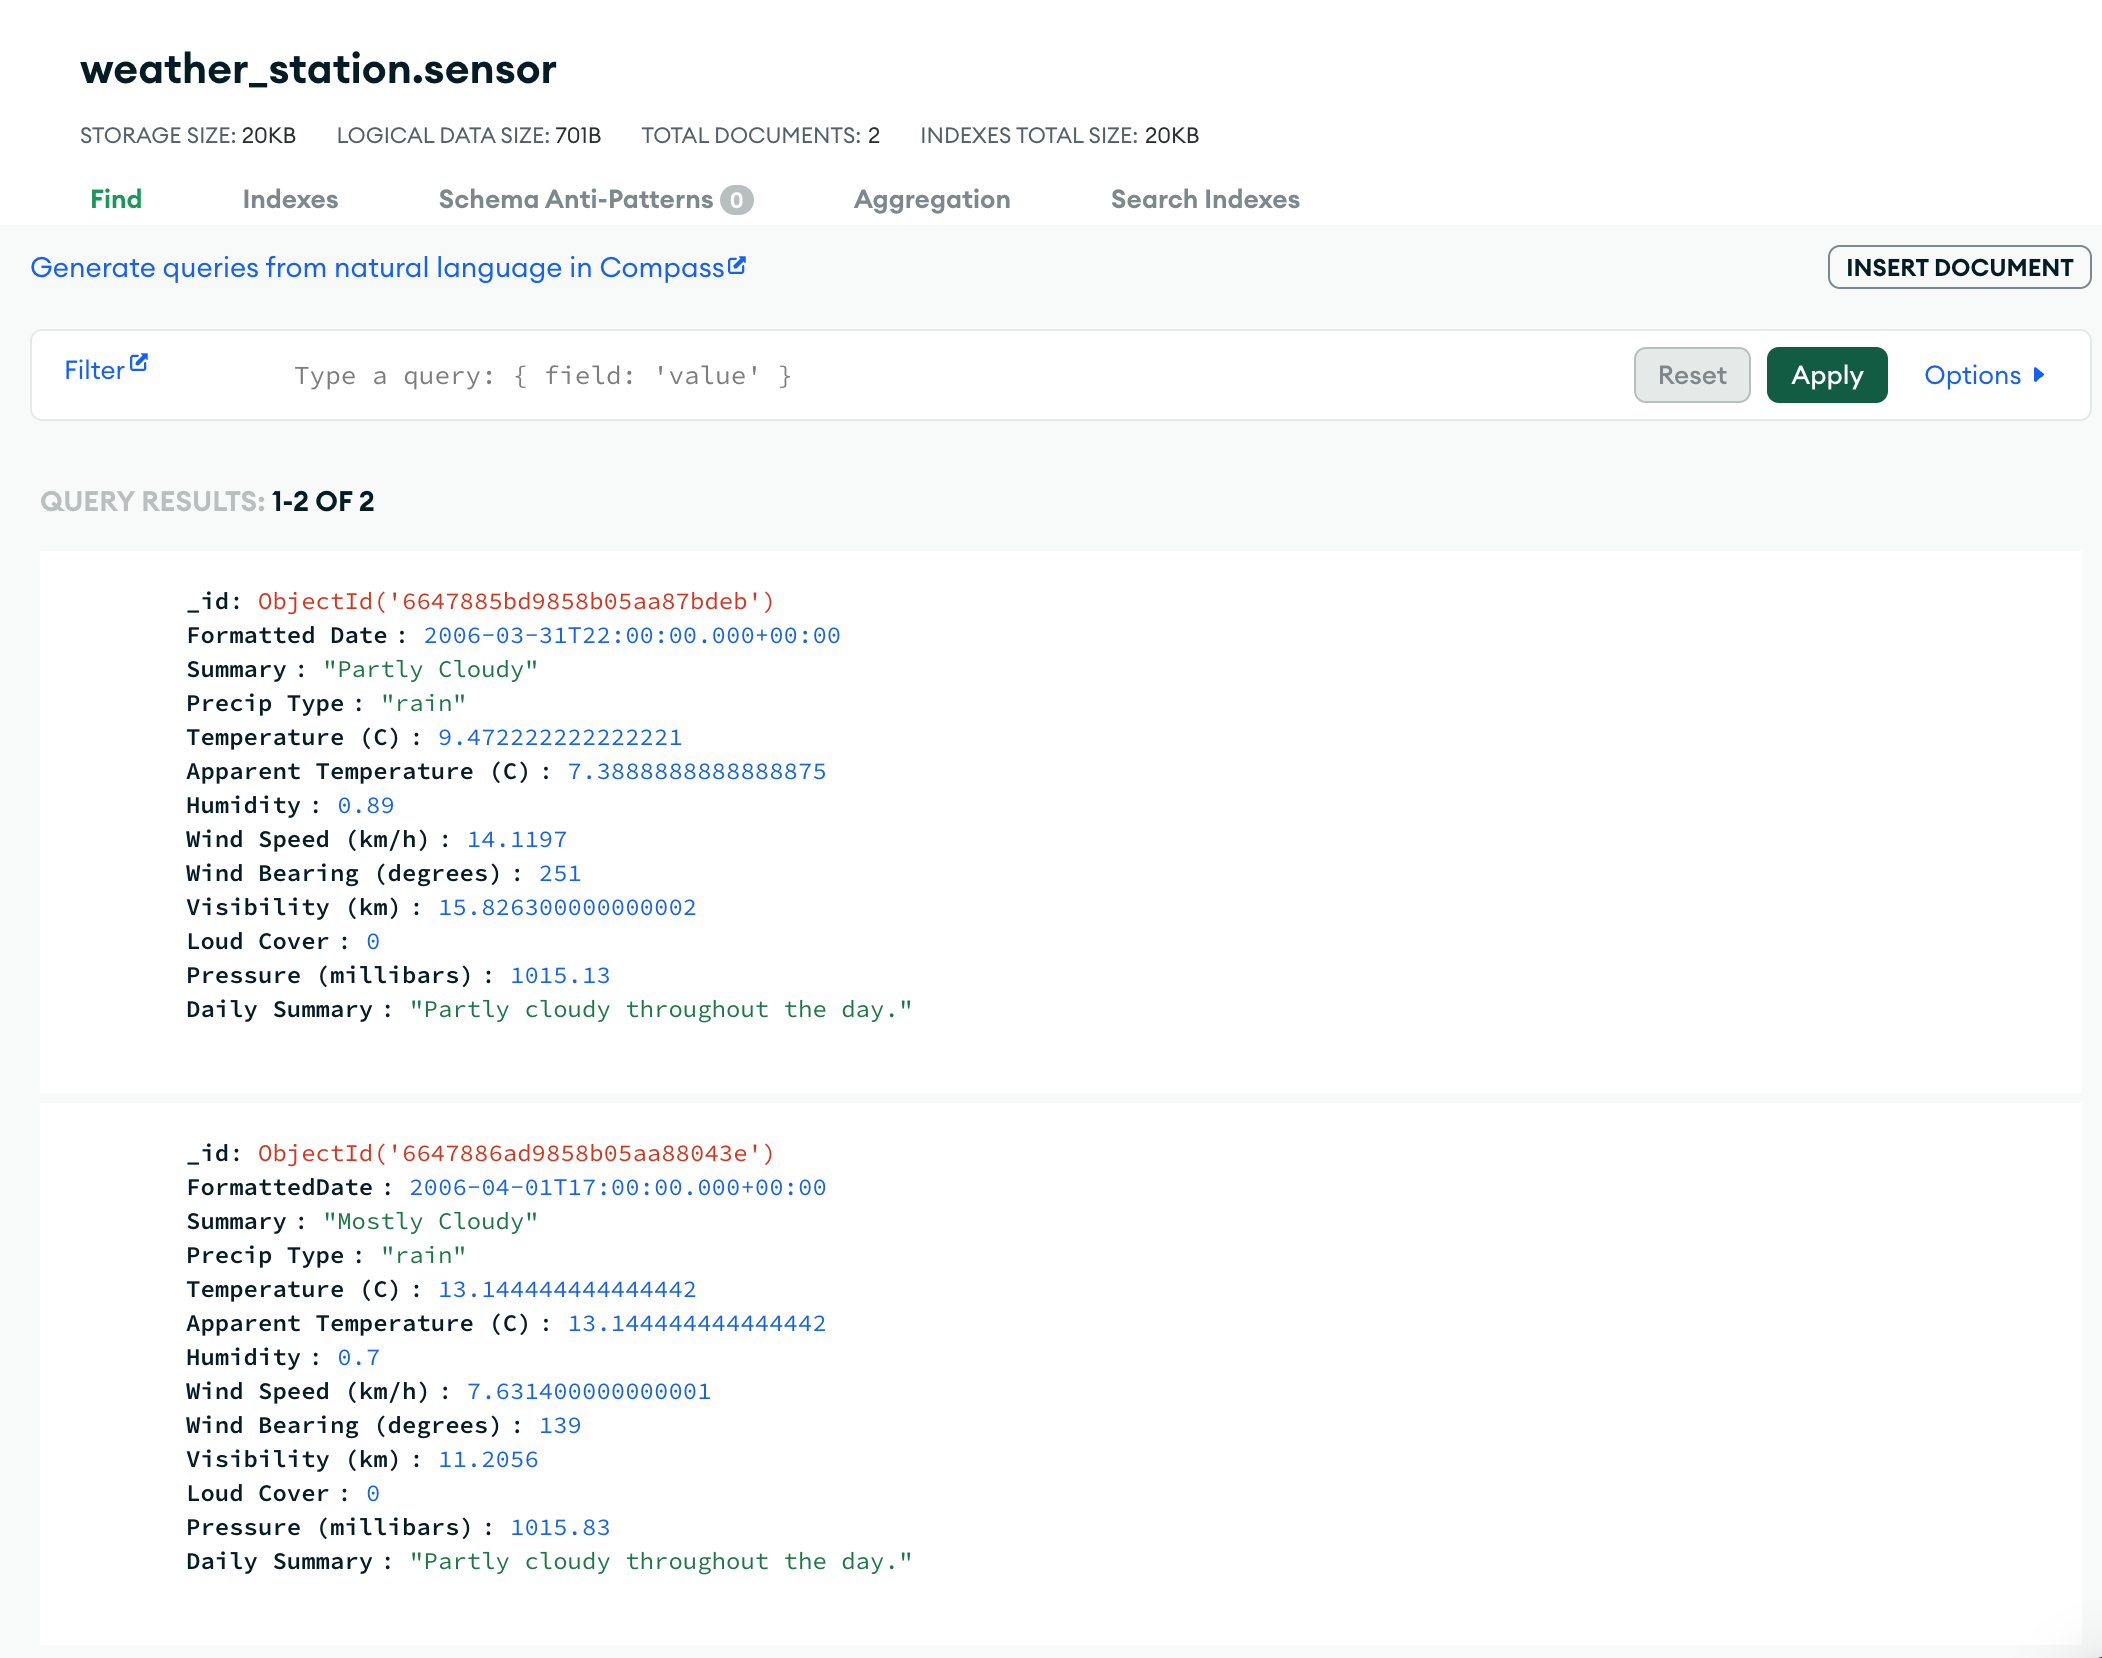
To verify the data is loaded into MongoDB > Navigate to your collection and click on refresh.
Click Check my progress to verify the objective.
Verify the data has successfully loaded into MongoDB
Congratulations!
In this lab you learned how to build an IoT use case using MongoDB Atlas and Google Cloud Eventarc, Cloud Pub/Sub and Cloud functions. You have also learned how to use MongoDB Data API to read and write from MongoDB and use MongoDB Charts to visualize the data.
...helps you make the most of Google Cloud technologies. Our classes include technical skills and best practices to help you get up to speed quickly and continue your learning journey. We offer fundamental to advanced level training, with on-demand, live, and virtual options to suit your busy schedule. Certifications help you validate and prove your skill and expertise in Google Cloud technologies.
Manual Last Updated: June 21, 2024
Lab Last Tested: June 21, 2024
Copyright 2024 Google LLC All rights reserved. Google and the Google logo are trademarks of Google LLC. All other company and product names may be trademarks of the respective companies with which they are associated.
Os laboratórios criam um projeto e recursos do Google Cloud por um período fixo
Os laboratórios têm um limite de tempo e não têm o recurso de pausa. Se você encerrar o laboratório, vai precisar recomeçar do início.
No canto superior esquerdo da tela, clique em Começar o laboratório
Usar a navegação anônima
Copie o nome de usuário e a senha fornecidos para o laboratório
Clique em Abrir console no modo anônimo
Fazer login no console
Faça login usando suas credenciais do laboratório. Usar outras credenciais pode causar erros ou gerar cobranças.
Aceite os termos e pule a página de recursos de recuperação
Não clique em Terminar o laboratório a menos que você tenha concluído ou queira recomeçar, porque isso vai apagar seu trabalho e remover o projeto
Este conteúdo não está disponível no momento
Você vai receber uma notificação por e-mail quando ele estiver disponível
Ótimo!
Vamos entrar em contato por e-mail se ele ficar disponível
Um laboratório por vez
Confirme para encerrar todos os laboratórios atuais e iniciar este
Use a navegação anônima para executar o laboratório
Para executar este laboratório, use o modo de navegação anônima ou uma janela anônima do navegador. Isso evita conflitos entre sua conta pessoal e a conta de estudante, o que poderia causar cobranças extras na sua conta pessoal.
In this lab, you will provision the MongoDB Atlas cluster and run a Cloud Function to simulate an IIOT sensor that publishes data to Pub/Sub.
Duração:
Configuração: 3 minutos
·
Tempo de acesso: 90 minutos
·
Tempo para conclusão: 90 minutos


 ) > Analytics> Pub/Sub.