


准备工作
- 实验会创建一个 Google Cloud 项目和一些资源,供您使用限定的一段时间
- 实验有时间限制,并且没有暂停功能。如果您中途结束实验,则必须重新开始。
- 在屏幕左上角,点击开始实验即可开始
Create an API Key
/ 25
Upload an Image to a Cloud Storage bucket
/ 25
Upload an image for Face Detection to your bucket
/ 25
Upload an image for Landmark Annotation to your bucket
/ 25
The Cloud Vision API is a cloud-based service that allows you to analyze images and extract information. It can be used to detect objects, faces, and text in images. The Cloud Vision API lets you understand the content of an image by encapsulating powerful machine learning models in a simple REST API.
In this lab, you explore how to send images to the Cloud Vision API and see it detect objects, faces, and landmarks.
In this lab, you learn how to perform the following tasks:
curl.Read these instructions. Labs are timed and you cannot pause them. The timer, which starts when you click Start Lab, shows how long Google Cloud resources are made available to you.
This hands-on lab lets you do the lab activities in a real cloud environment, not in a simulation or demo environment. It does so by giving you new, temporary credentials you use to sign in and access Google Cloud for the duration of the lab.
To complete this lab, you need:
Click the Start Lab button. If you need to pay for the lab, a dialog opens for you to select your payment method. On the left is the Lab Details pane with the following:
Click Open Google Cloud console (or right-click and select Open Link in Incognito Window if you are running the Chrome browser).
The lab spins up resources, and then opens another tab that shows the Sign in page.
Tip: Arrange the tabs in separate windows, side-by-side.
If necessary, copy the Username below and paste it into the Sign in dialog.
You can also find the Username in the Lab Details pane.
Click Next.
Copy the Password below and paste it into the Welcome dialog.
You can also find the Password in the Lab Details pane.
Click Next.
Click through the subsequent pages:
After a few moments, the Google Cloud console opens in this tab.

Cloud Shell is a virtual machine that is loaded with development tools. It offers a persistent 5GB home directory and runs on the Google Cloud. Cloud Shell provides command-line access to your Google Cloud resources.
Click Activate Cloud Shell 
Click through the following windows:
When you are connected, you are already authenticated, and the project is set to your Project_ID,
gcloud is the command-line tool for Google Cloud. It comes pre-installed on Cloud Shell and supports tab-completion.
Output:
Output:
gcloud, in Google Cloud, refer to the gcloud CLI overview guide.
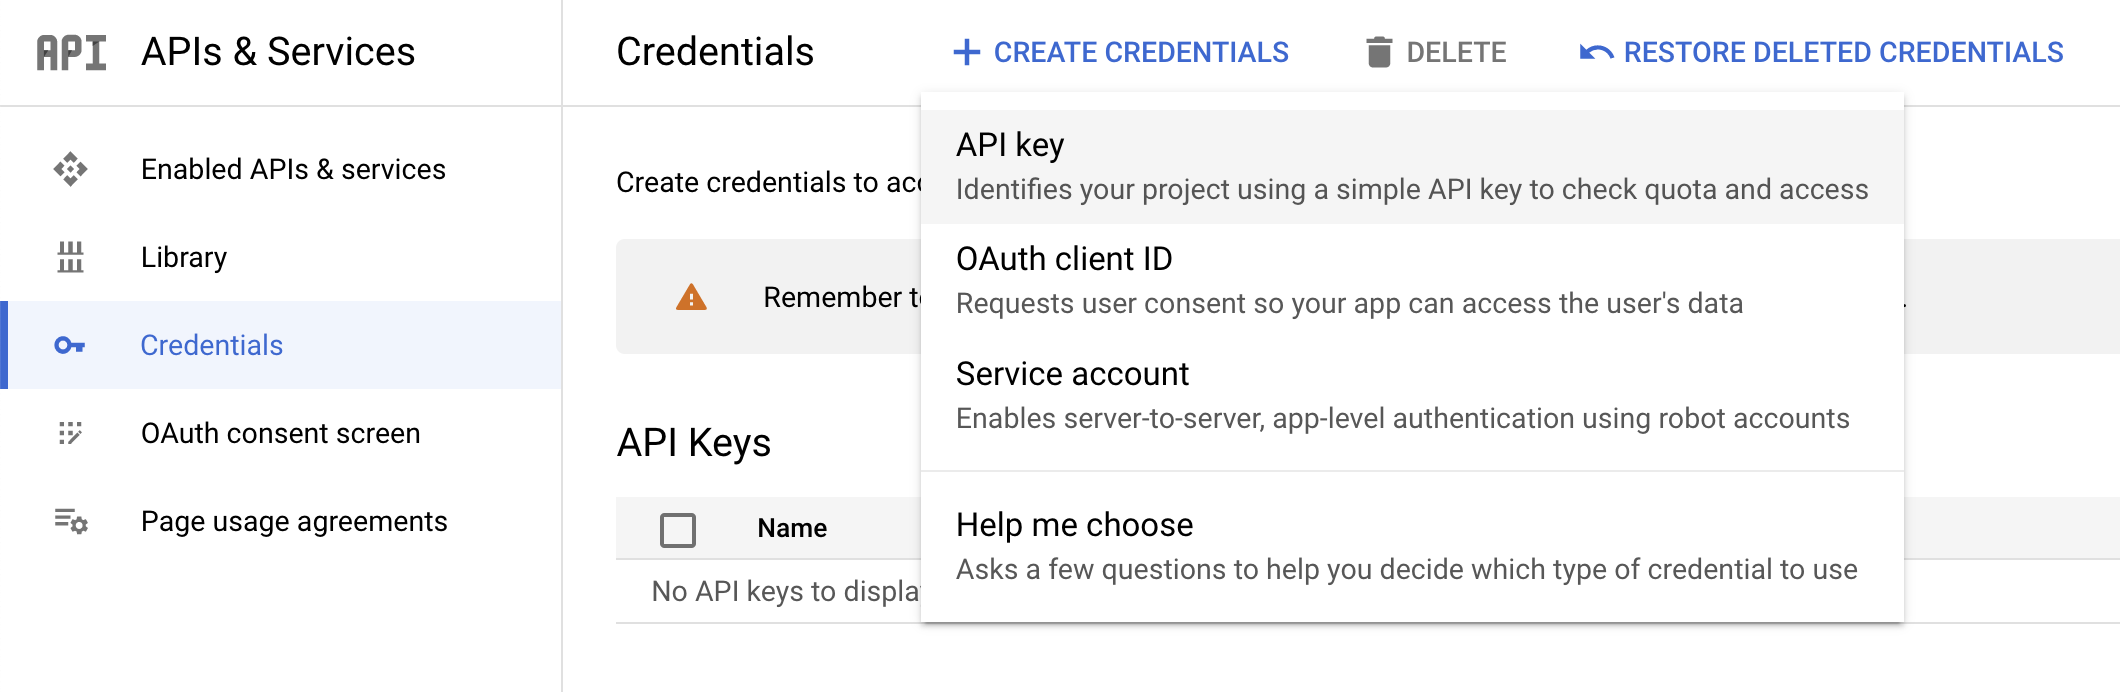
In this task, you generate an API key to pass in your request URL in preparation of using curl to send a request to the Vision API.
To create an API key, from the Navigation menu go to APIs & Services > Credentials in the Cloud console.
Click Create Credentials and select API key.
Click Check my progress to check your lab progress.
Next, save it to an environment variable to avoid having to insert the value of your API key in each request.
There are two ways to send an image to the Cloud Vision API for image detection: by sending the API a base64-encoded image string, or passing it the URL of a file stored in Cloud Storage.
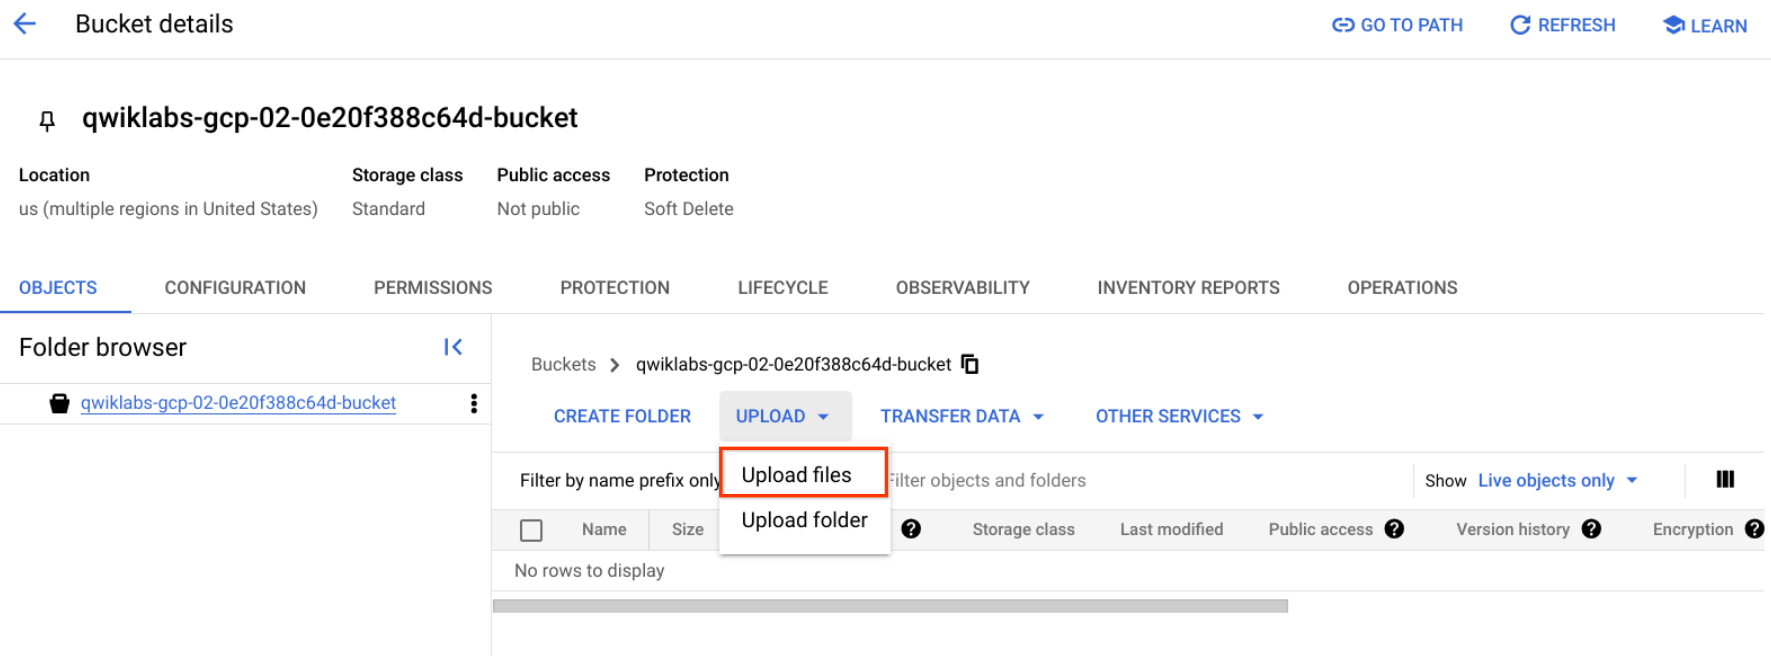
This lab uses the Cloud Storage URL approach. The first step is to create a Cloud Storage bucket to store your images.
From the Navigation menu, select Cloud Storage > Buckets. Next to Buckets, click Create.
Give your bucket a unique name:
After naming your bucket, click Choose how to control access to objects.
Deselect the Enforce public access prevention on this bucket checkbox and select the Fine-grained radio button.
All other settings for your bucket can remain as their defaults.
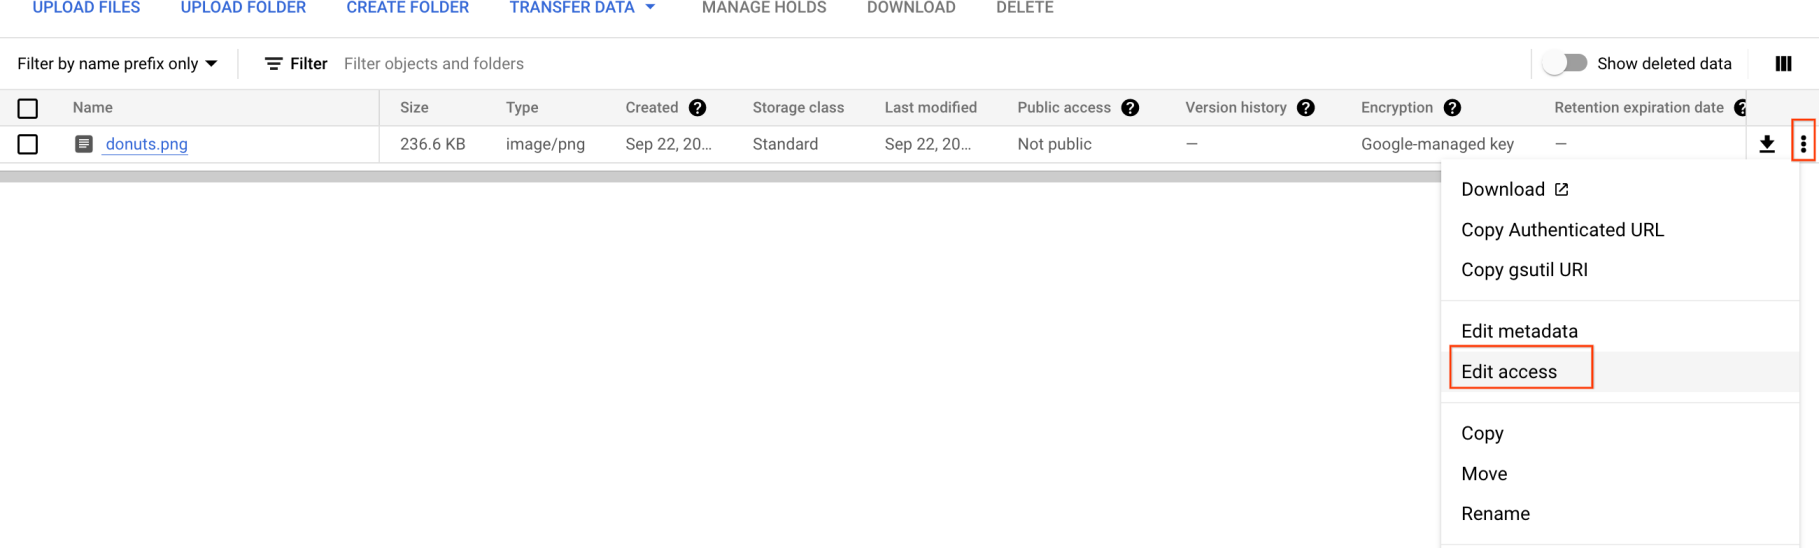
You should see the file in your bucket.
Now you need to make this image publicly available.
Click Add entry then enter the following:
Then click Save.
With the file in your bucket, you're ready to create a Cloud Vision API request, passing it the URL of this donuts picture.
Click Check my progress to check your lab progress.
Create a request.json file in Cloud Shell home directory.
or your preferred command line editor (nano, vim, or emacs), create a request.json file.
request.json:You can use Gemini Code Assist in an integrated development environment (IDE) such as Cloud Shell to receive guidance on code or solve problems with your code. Before you can start using Gemini Code Assist, however, you need to enable it.
In the Cloud Shell Editor, navigate to Cloud Code > Help and Feedback > Change Settings.
In the Settings, search for Gemini Code Assist.
Locate and ensure that the checkbox is selected for Geminicodeassist: Enable, and close the Settings.
Click Cloud Code - No Project in the status bar at the bottom of the screen.
Authorize the plugin as instructed. If a project is not automatically selected, click Select a Google Cloud Project, and choose
Verify that your Google Cloud project (
The first Cloud Vision API feature you explore, is label detection. The method you use returns a list of labels (words) of what's in your image.
curl command to call the Cloud Vision API and save the response in label_detection.json file:Your response should look something like the following.
Output:
The API was able to identify the specific type of donuts these are, powdered sugar. Cool! For each label the Vision API found, it returns a:
description with the name of the item.score, a number from 0 - 1 indicating how confident it is that the description matches what's in the image.mid value that maps to the item's mid in Google's Knowledge Graph. You can use the mid when calling the Knowledge Graph API to get more information on the item.label_detection.json. This action enables Gemini Code Assist, as indicated by the presence of the  icon in the upper-right corner of the editor.
To help you be more productive while minimizing context switching, Gemini Code Assist provides AI-powered smart actions directly in your code editor. In this section, you decide to ask Gemini Code Assist to help explain the Cloud Vision API response to a team member.
Click the Gemini Code Assist: Smart Actions
Gemini Code Assist opens a chat pane with the prefilled prompt of Explain this. In the inline text box of the Code Assist chat, replace the prefilled prompt with the following, and click Send:
Detailed explanations for the Cloud Vision API response in label_detection.json code appears in the Gemini Code Assist chat.
In addition to getting labels on what's in your image, the Cloud Vision API can also search the internet for additional details on your image. Through the API's WebDetection method, you get a lot of interesting data back:
To try out web detection, use the same image of beignets and change one line in the request.json file (you can also venture out into the unknown and use an entirely different image).
In the Cloud Shell Editor, still in the same directory, navigate to and open request.json.
Click the Gemini Code Assist: Smart Actions
In addition to providing detailed code explanations, you can also use the AI-powered features of Gemini Code Assist to make changes to your code directly in your code editor. In this instance, you decide to let Gemini Code Assist help you edit the contents of the request.json file.
request.json file, paste the following prompt into the Gemini Code Assist inline text field that opens from the toolbar.To prompt Gemini Code Assist to modify the code accordingly, press ENTER.
When prompted in the Gemini Diff view, click Accept.
The contents of the request.json file should now resemble the following.
curl command to call the Cloud Vision API:webEntities. Here are some of the entities this image returned:This image has been used in many presentations on Cloud ML APIs, which is why the API found the entities "Machine learning" and "Google Cloud Platform".
If you inspect the URLs under fullMatchingImages, partialMatchingImages, and pagesWithMatchingImages, notice that many of the URLs point to this lab site (super meta!).
Say you wanted to find other images of beignets, but not the exact same images. That's where the visuallySimilarImages part of the API response comes in handy. Here are a few of the visually similar images it found:
You can navigate to those URLs to see the similar images:
And now you probably really want a powdered sugar beignet (sorry)! This is similar to searching by an image on Google Images.
With Cloud Vision you can access this functionality with an easy to use REST API and integrate it into your applications.
Next explore the face detection methods of the Vision API.
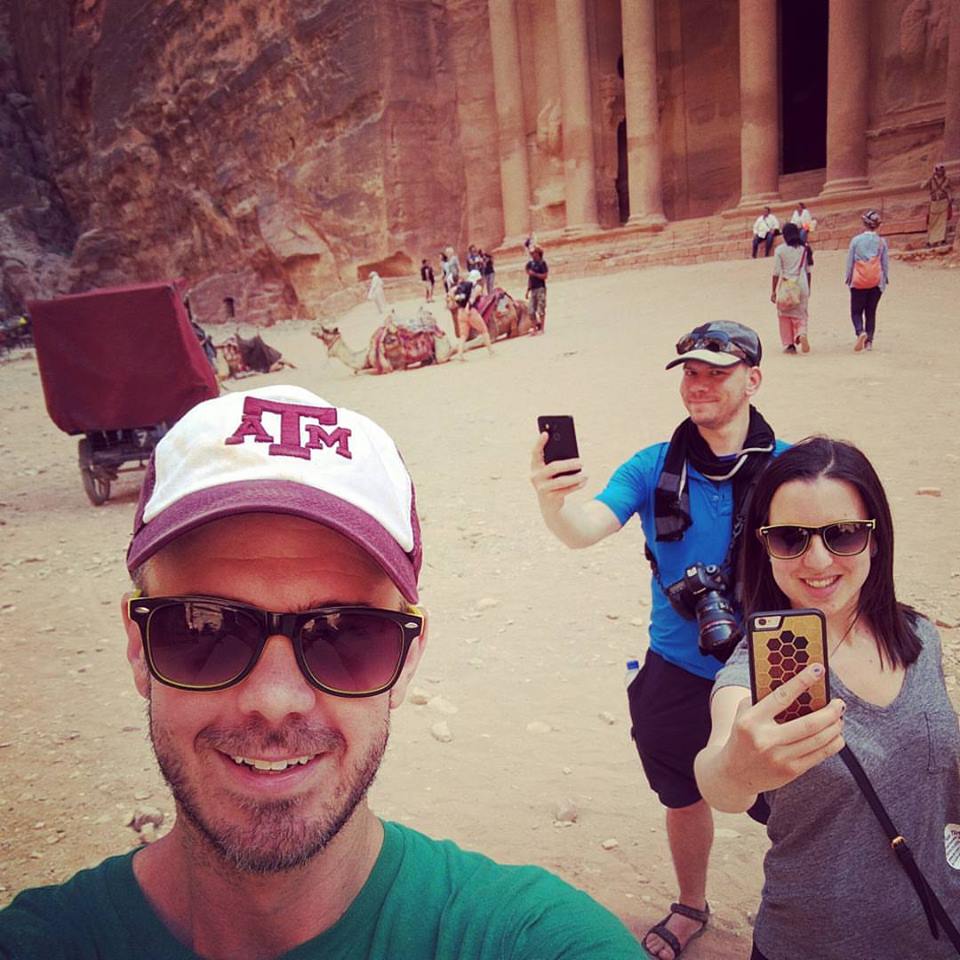
The face detection method returns data on faces found in an image, including the emotions of the faces and their location in the image.
To use this method, you upload a new image with faces to the Cloud Storage bucket.
Click Check my progress to check your lab progress.
In the Cloud Shell Editor, still in the same directory, navigate to request.json.
Click the Gemini Code Assist: Smart Actions
To assist with updating your request.json file, paste the following prompt into the Gemini Code Assist inline text field that opens from the toolbar.
To prompt Gemini Code Assist to modify the code accordingly, press ENTER.
When prompted in the Gemini Diff view, click Accept.
Your updated request file should resemble the following:
curl command to call the Cloud Vision API:faceAnnotations object in the response. Notice that the API returns an object for each face found in the image—in this case, three. Here's a clipped version of the response:boundingPoly gives you the x,y coordinates around the face in the image.fdBoundingPoly is a smaller box than boundingPoly, focusing on the skin part of the face.landmarks is an array of objects for each facial feature, some you may not have even known about. This tells us the type of landmark, along with the 3D position of that feature (x,y,z coordinates) where the z coordinate is the depth. The remaining values give you more details on the face, including the likelihood of joy, sorrow, anger, and surprise.The response you're reading is for the person standing furthest back in the image - you can see he's making a kind of a silly face which explains the joyLikelihood of LIKELY.
Landmark detection can identify common (and obscure) landmarks. It returns the name of the landmark, its latitude and longitude coordinates, and the location of where the landmark was identified in an image.
To use this method, you upload a new image to the Cloud Storage bucket.
Citation: Saint Basil's Cathedral, Moscow, Russia (December 19, 2019) by Adrien Wodey on Unsplash, the free media repository. Retrieved from https://unsplash.com/photos/multicolored-dome-temple-yjyWCNx0J1U. This file is licensed under the Unsplash license.
Click Check my progress to check your lab progress.
request.json file with the following, which includes the URL of the new image, and uses landmark detection:curl command to call the Cloud Vision API:landmarkAnnotations part of the response:The Cloud Vision API was able to identify where the picture was taken and provides the map coordinates of the location (Saint Basil's Cathedral in Red Square, Moscow, Russia).
The values in this response should look similar to the labelAnnotations response above:
mid of the landmarkdescription)score
boundingPoly shows the region in the image where the landmark was identified.locations key tells us the latitude longitude coordinates of the picture.The Vision API can detect and extract multiple objects in an image with Object Localization. Object localization identifies multiple objects in an image and provides a LocalizedObjectAnnotation for each object in the image. Each LocalizedObjectAnnotation identifies information about the object, the position of the object, and rectangular bounds for the region of the image that contains the object.
Object localization identifies both significant and less-prominent objects in an image.
Object information is returned in English only. Cloud Translation can translate English labels into various other languages.
To use this method, you use an existing image on the internet and update the request.json file.
request.json file with the following, which includes the URL of the new image, and uses object localization.curl command to call the Cloud Vision API:localizedObjectAnnotations part of the response:As you can see, the Vision API was able to tell that this picture contains a bicycle and a bicycle wheel. The values in this response should look similar to the labelAnnotations response above: the mid of the object, it's name (name), a confidence score, and the boundingPoly shows the region in the image where the object was identified.
Furthermore, the boundingPoly has a normalizedVertices key, which gives you the coordinates of the object in the image. These coordinates are normalized to a range of 0 to 1, where 0 represents the top left of the image, and 1 represents the bottom right of the image.
Great! You successfully used the Vision API to analyze an image and extract information about the objects in the image.
You've looked at the Vision API's label, face, landmark detection and object localization methods, but there are three others you haven't explored. Dive into the Method: images.annotate documentation to learn about the other three:
You've learned how to analyze images with the Vision API. In this lab you passed the API the Cloud Storage URL of different images, and it returned the labels, faces, landmarks, and objects it found in the image. You can also pass the API a base64-encoded string of an image, which is useful if you want to analyze an image that's stored in a database or in memory.
...helps you make the most of Google Cloud technologies. Our classes include technical skills and best practices to help you get up to speed quickly and continue your learning journey. We offer fundamental to advanced level training, with on-demand, live, and virtual options to suit your busy schedule. Certifications help you validate and prove your skill and expertise in Google Cloud technologies.
Manual Last Updated August 21, 2025
Lab Last Tested August 21, 2025
Copyright 2025 Google LLC. All rights reserved. Google and the Google logo are trademarks of Google LLC. All other company and product names may be trademarks of the respective companies with which they are associated.


此内容目前不可用
一旦可用,我们会通过电子邮件告知您

太好了!
一旦可用,我们会通过电子邮件告知您

一次一个实验
确认结束所有现有实验并开始此实验