
Before you begin
- Labs create a Google Cloud project and resources for a fixed time
- Labs have a time limit and no pause feature. If you end the lab, you'll have to restart from the beginning.
- On the top left of your screen, click Start lab to begin
Deploy GKE cluster
/ 5
Modify GKE clusters
/ 5
Deploy a sample nginx workload
/ 5
You have recently been hired by a telecommunication enterprise using Google Cloud as its principal cloud services provider. As a cloud compute specialist, you are instructed to research and adopt the Google Kubernetes Engine (GKE) services offered by Google Cloud.
Some of your concerns surround the following aspects of the project include the following:
Since you have been working with Amazon Web Services (AWS) at your previous employer, you know how the Elastic Kubernetes Service (EKS) is used to orchestrate containers. To deploy EKS, you made use of various tools including the following:
You defined and provisioned the cluster according to business needs and in the background, EKS provisioned the necessary number of nodes corresponding to the server instances that ran your containers.
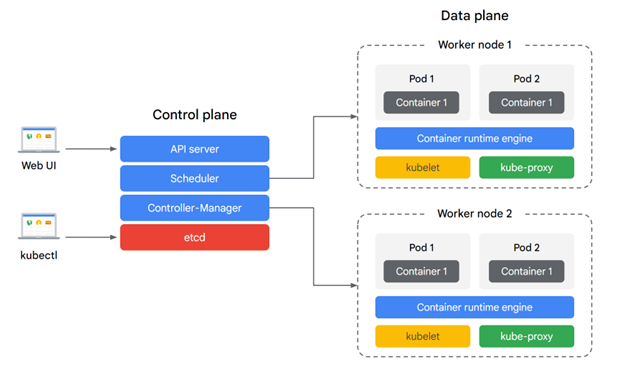
An example of how your Kubernetes architecture worked is as follows:
In this lab, you use the Google Cloud Console to build GKE clusters and deploy a sample Pod.
In this lab, you learn how to perform the following tasks:
For each lab, you get a new Google Cloud project and set of resources for a fixed time at no cost.
Sign in to Qwiklabs using an incognito window.
Note the lab's access time (for example, 1:15:00), and make sure you can finish within that time.
There is no pause feature. You can restart if needed, but you have to start at the beginning.
When ready, click Start lab.
Note your lab credentials (Username and Password). You will use them to sign in to the Google Cloud Console.
Click Open Google Console.
Click Use another account and copy/paste credentials for this lab into the prompts.
If you use other credentials, you'll receive errors or incur charges.
Accept the terms and skip the recovery resource page.
After you complete the initial sign-in steps, the project dashboard opens.
In this task, you use the Google Cloud Console and Cloud Shell to deploy GKE clusters.
In the Google Cloud Console, on the Navigation menu (
Click Create to begin creating a GKE cluster. Click SWITCH TO STANDARD CLUSTER.
Again click to SWITCH TO STANDARD CLUSTER.
Examine the console UI and the controls to change the cluster name, the cluster location, Kubernetes version, the number of nodes, and the node resources such as the machine type in the default node pool.
Clusters can be created across a region or in a single zone. A single zone is the default. When you deploy across a region the nodes are deployed to three separate zones and the total number of nodes deployed will be three times higher.
Change the cluster name to standard-cluster-1.
Select Zonal as Location type and choose zone to us-central1-a. Leave all the values at their defaults and click Create.
The cluster begins provisioning.
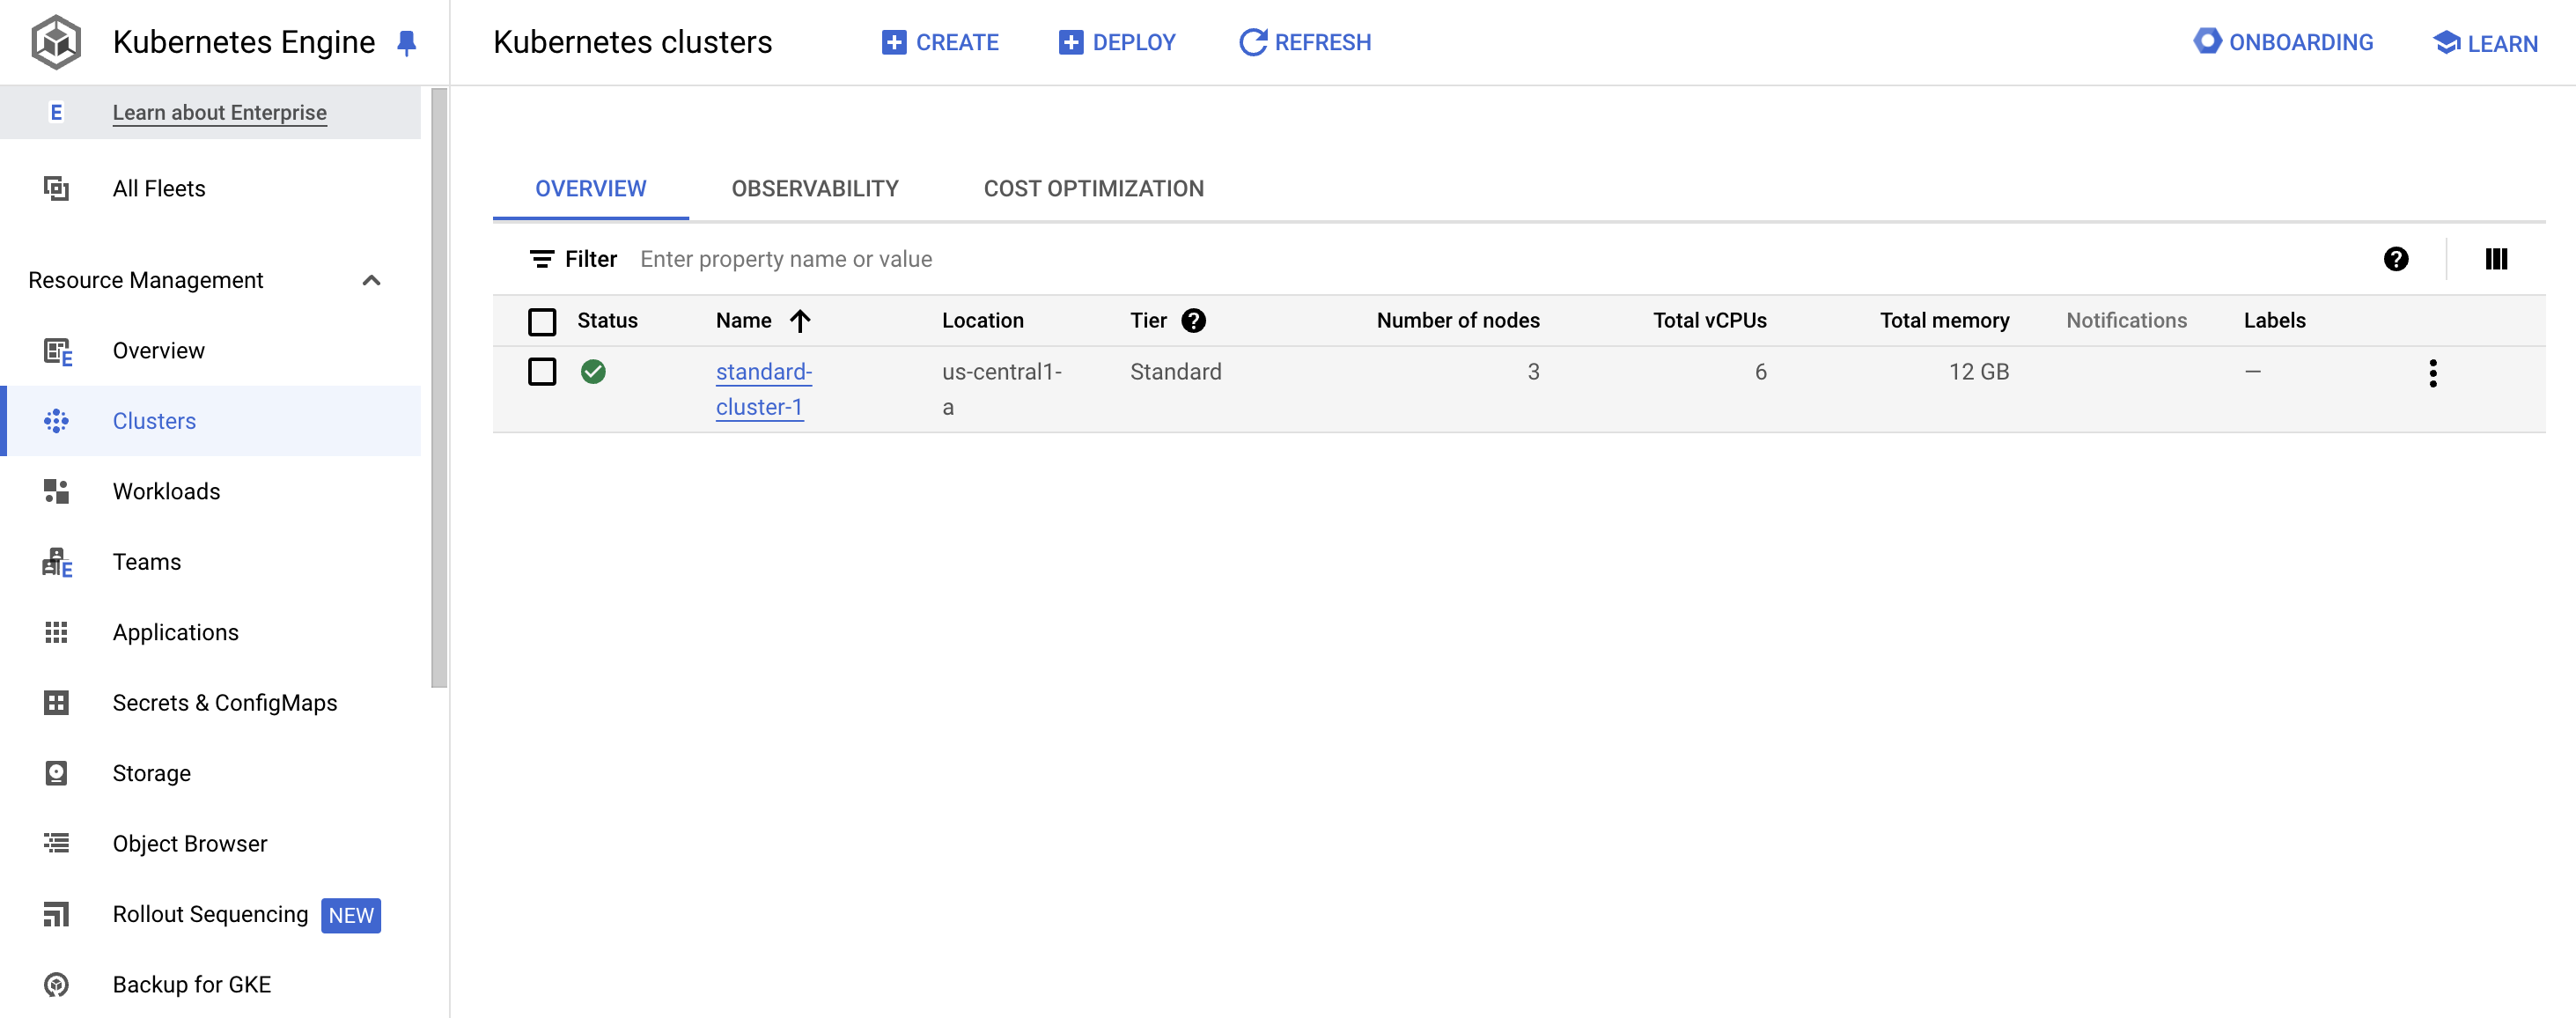
When provisioning is complete, the Kubernetes Engine > Clusters page looks like the screenshot:
Click Check my progress to verify the objective.
It is easy to modify many of the parameters of existing clusters using either the Google Cloud Console or Cloud Shell. In this task, you use the Google Cloud Console to modify the size of GKE clusters.
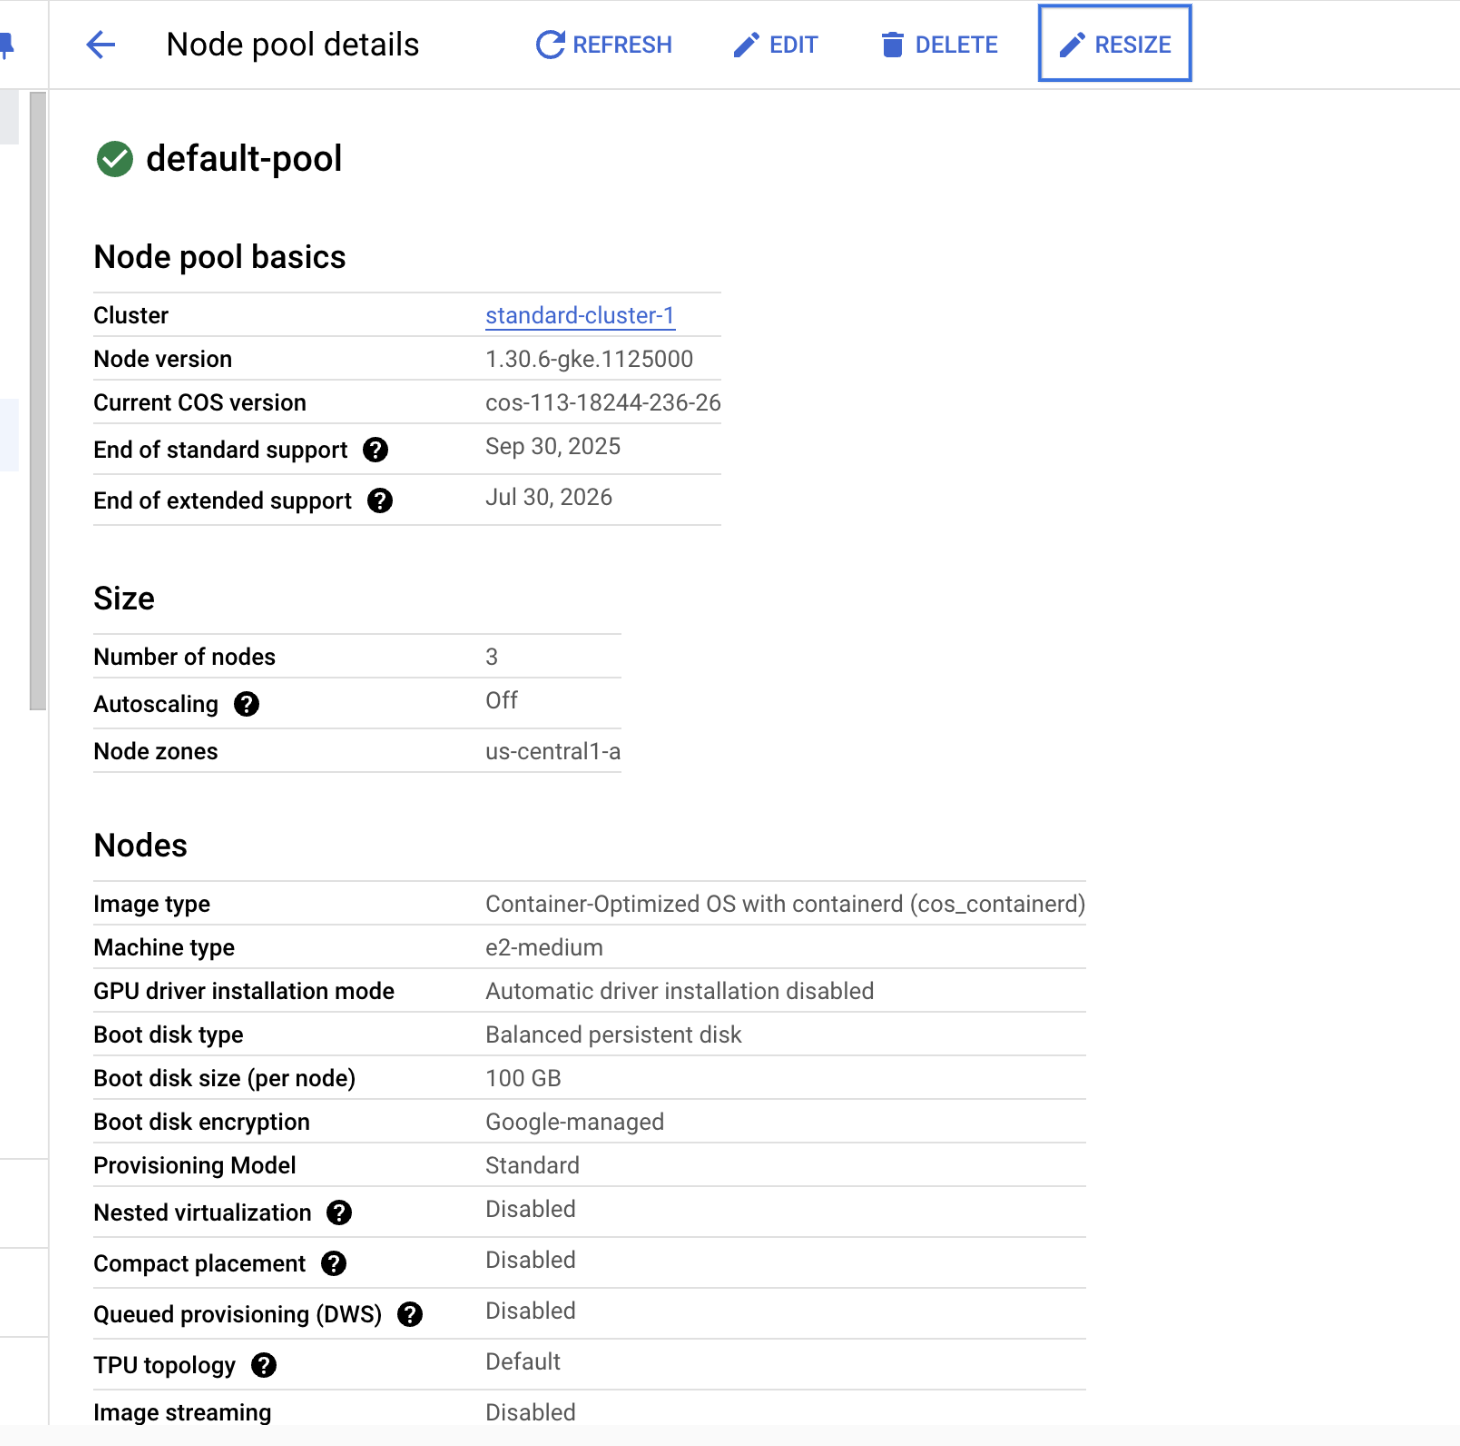
), click Kubernetes Engine > Clusters > standard-cluster-1, click NODES at the top of the details page.), click Kubernetes Engine > Clusters.When the operation completes, the Kubernetes Engine > Clusters page should show that standard-cluster-1 now has four nodes.
Click Check my progress to verify the objective.
In this task, using the Google Cloud console you will deploy a Pod running the nginx web server as a sample workload.
), click Kubernetes Engine > Workloads.Click Check my progress to verify the objective.
In this task, you view details of your GKE workloads directly in the Google Cloud Console.
), click Kubernetes Engine > Workloads.This displays the overview information for the workload showing details like resource utilization charts, links to logs, and details of the Pods associated with this workload.
In the Google Cloud Console, click the Details tab for the nginx-1 workload. The Details tab shows more details about the workload including the Pod specification, number and status of Pod replicas and details about the horizontal Pod autoscaler.
Click the Revision History tab. This displays a list of the revisions that have been made to this workload.
Click the Events tab. This tab lists events associated with this workload.
And then the YAML tab. This tab provides the complete YAML file that defines these components and full configuration of this sample workload.
Still in the Google Cloud Console's Details tab for the nginx-1 workload, click the Overview tab, scroll down to the Managed Pods section and click the name of one of the Pods to view the details page for that Pod.
The Pod details page provides information on the Pod configuration and resource utilization and the node where the Pod is running.
In the Pod details page, you can click the Events and Logs tabs to view event details and links to container logs in Cloud Operations.
Click the YAML tab to view the detailed YAML file for the Pod configuration.
In this lab, you explored the Kubernetes functionality within GKE to create clusters that you can fully configure and manage. Also, you learned how to modify the cluster and deploy a simple workload. Here is a recap of some of the key similarities and differences between GKE and EKS:
Similarities:
Differences:
When you have completed your lab, click End Lab. Google Cloud Skills Boost removes the resources you’ve used and cleans the account for you.
You will be given an opportunity to rate the lab experience. Select the applicable number of stars, type a comment, and then click Submit.
The number of stars indicates the following:
You can close the dialog box if you don't want to provide feedback.
For feedback, suggestions, or corrections, please use the Support tab.
Copyright 2022 Google LLC All rights reserved. Google and the Google logo are trademarks of Google LLC. All other company and product names may be trademarks of the respective companies with which they are associated.


This content is not currently available
We will notify you via email when it becomes available

Great!
We will contact you via email if it becomes available

One lab at a time
Confirm to end all existing labs and start this one