Checkpoints
Initialize the Inventory Manager AppSheet app
/ 30
Test the low inventory bot with the webhook to Google Chat
/ 30
Test the shipping cancellation bot with the webhook to Google Chat
/ 40
AppSheet to Google Chat using Webhooks from Automation Bots
- GSP756
- Overview
- AppSheet and webhooks
- Objectives
- Scenario
- Prerequisites
- Setup
- Task 1. Initialize the Inventory Manager AppSheet app
- Task 2. Establish the Google Chat space with webhook URL
- Task 3. Plan the configuration for an automation in AppSheet
- Task 4. Configure an AppSheet bot for low inventory chat notifications
- Task 5. Test the low inventory bot with the webhook to Google Chat
- Task 6. Create a second automation for shipping cancellations
- Task 7. Test the shipping cancellation bot with the webhook to Google Chat
- Congratulations!
GSP756

Overview
In this lab, you create a webhook and add the ability for your AppSheet app to connect to a Google Chat space. Connecting the two apps allows them to share information using a web service.
AppSheet and webhooks
A webhook is a mechanism for connecting two separate applications so they can share information using a web service. You connect an AppSheet app with external services to perform functions based on conditions in the app's data that are part of regular business operations. For instance, an AppSheet app can automatically send notifications to a Google Chat space. You use a webhook to connect them.
There are two general methodologies for configuring webhooks with AppSheet.
- Bot - You set up automation bots with webhooks to services like Google Chat. For instance, you can call a webhook from a bot in AppSheet, as described in "Call a webhook from a bot" and also explained in this lab.
- API - AppSheet also supports webhooks to the AppSheet REST API.
Another aspect of webhooks in AppSheet is that business operations can be divided into inbound and outbound activities.
- Inbound - when you want the AppSheet app to accept a request from an external app. For instance, a request for the current price on an item in inventory.
- Outbound - when you want the AppSheet app to send notification based on something that happened. For instance, notification to a chat space that an inventory item has fallen below the acceptable minimum.
In this lab, the focus is on bots and outbound activities. Using the AppSheet REST API and inbound activities are covered in a separate lab.
Objectives
In this lab, you learn what webhooks are in Google Chat and how to configure and test them in AppsSheets. By the end of this lab, you'll be able to:
- Describe what is a webhook in AppSheet and its purpose.
- Configure a webhook to integrate your app with a Google Chat service.
- Test your webhook, sending a message when the item in a table is updated (any field) and a basic condition evaluates to true.
Scenario
The scenario for this lab is that you work for an online retailer. You use an AppSheet app that tracks inventory items (price, total in stock, the acceptable minimum, etc). Your colleagues and perhaps even customers may need to be informed of the status on these items. You'll set up a webhook and configure what will happen for two possible status changes. One is sending a notification message to the chat space when inventory is low for an item in inventory. Another is sending a notification when an item slated to be shipped will no longer be shipped.
Prerequisites
This lab is targeted to citizen developers or project team members without formal software development skills. It assumes some basic knowledge of Google Cloud and AppSheet. You can learn the fundamentals of Google Cloud and Google AppSheet on Google Cloud Skills Boost and other popular platforms.
Setup
Before you click the Start Lab button
Read these instructions. Labs are timed and you cannot pause them. The timer, which starts when you click Start Lab, shows how long lab resources will be made available to you.
This hands-on lab lets you do the lab activities yourself in a real cloud environment, not in a simulation or demo environment. It does so by giving you new, temporary credentials that you use to sign in and access AppSheet for the duration of the lab.
What you need
To complete this lab, you need:
- Access to a standard internet browser (Chrome browser recommended).
- Time to complete the lab.
-
Make sure you are signed into Google Cloud Skills Boost using an incognito window.
-
When ready, click
.
A new panel will appear with the temporary credentials that you must use for this lab.
If you need to pay for the lab, a pop-up will open for you to select your payment method.
-
Note your lab credentials. You will use them to sign in to AppSheet for this lab.
Note: If you use other credentials, you will get errors or incur charges. -
Click Open AppSheet.
-
Click to sign in with Google.
-
In the Sign in with Google dialog, enter the Username provided for the lab and click Next.
Note: If you see other accounts listed, click Use another account, enter the credentials provided for this lab, then click Next. -
Enter the password provided for this lab and click Next.
-
Click I Understand to accept the terms.
-
On the AppSheet consent page, click Allow. This allows AppSheet to access the Google Drive folders associated with your Google Cloud Skills Boost account.
-
You are now signed in to AppSheet.
Click on the X in the top right corner of the Tell us about you so we can make better recommendations dialog to view the AppSheet MyApps page.
The MyApps page is empty since you do not yet have any apps.


Task 1. Initialize the Inventory Manager AppSheet app
In this task, you initialize an Inventory Manager app by copying it from a prebuilt AppSheet. This app will be used throughout the rest of the lab.
Copy a template app to the AppSheet account for your lab
-
Enter the following link into a new tab of your browser:
https://www.appsheet.com/Template/AppDef?appName=Lab8-InventoryManager-3856613©=1
Once loaded, you will make a copy of the sample Inventory Manager app to your lab AppSheet account.
-
In the left navigation menu, click Copy app (
).
-
In the Copy app form, for App name, type Inventory Manager.
-
Leave the remaining settings as their defaults, click Copy app.
It may take a minute for the new copy to be created.
Click Check my progress to verify the objective.
Task 2. Establish the Google Chat space with webhook URL
In this task, you create a Google Chat space and enable a webhook. By doing so, an external source (your AppSheet app) can send a message to the chat space when an event is triggered.
Create a Google Chat space
-
In a separate browser tab, open https://chat.google.com.
-
If prompted, use your lab-provided Google Cloud username and password to sign in.
-
Click Get Started.
-
Close any help dialogs.
-
Click Create or find a space in the Spaces section.
-
Select Create a space.
-
In the Create a space dialog, for Space name, type AppSheet Notifications.
-
Leave the remaining settings as their defaults.
-
Click Create.
Configure a Google Chat space webhook
-
Select Apps & integrations from the AppSheet Notifications space drop-down menu.
-
Click Add webhooks.
-
In the Incoming webhooks dialog, for Name, type AppSheet Notifications WH.
-
Click Save.
-
Copy the webhook URL into the clipboard memory by clicking 3 dots next to the URL and click copy icon in the dialog.
You will use this URL to configure a webhook task in the next step. Don't worry if you need to come back to copy it again later - you will see a reminder of where to find it.
-
Dismiss the dialog by clicking anywhere in the chat window.
Task 3. Plan the configuration for an automation in AppSheet
An important part of the planning is gathering the configuration information required. You will likely consult other project team members for some of it. For instance, another team member may have created the endpoint (such as Google Chat space). In any case, you will need the webhook URL to complete your part of the project.
In earlier tasks, you set up two applications (AppSheet and Google Chat) which you want to communicate to each other. To utilize a webhook to connect AppSheet for outbound notifications, you can create an automation bot as illustrated in this diagram:
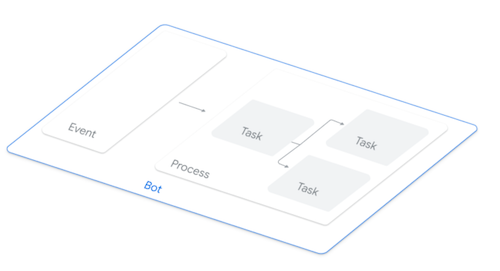
In general, the bot includes the following:
| Automation Component | Description |
|---|---|
| Bot | The overall automation you want AppSheet to handle |
| Event | What has to happen in order to trigger the process to begin |
| Process | A set of one or more tasks and subtasks |
| Task | An activity that should be performed |
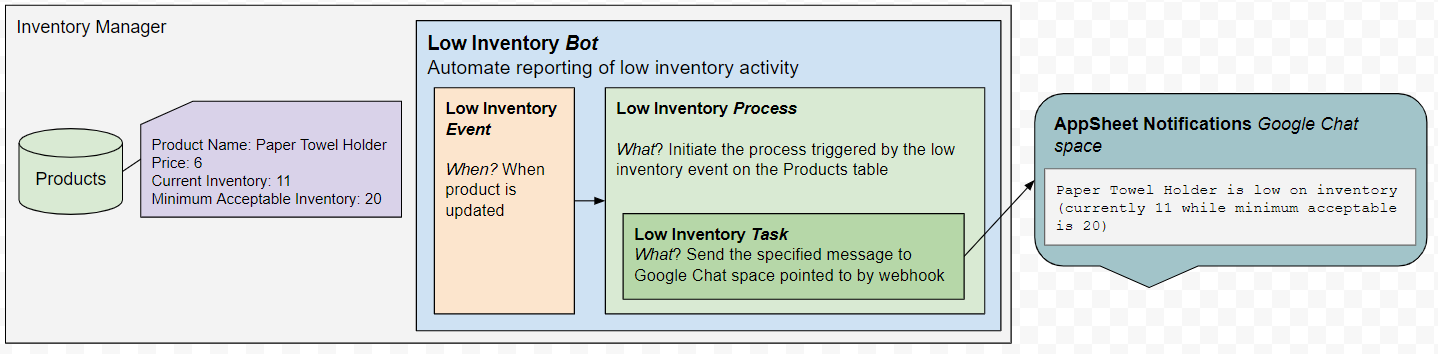
Fast forward to where you finished your planning. You already consulted with project team members to get the configuration information that you need to complete your part of the project. For the low inventory automation bot, more specific descriptions could look like the following:
| Automation Component | Description |
|---|---|
| Bot | Monitor activity for the inventory manager app. |
| Event | The condition when the item's data in the "Products" table was updated AND the item's current inventory is lower than the acceptable minimum. |
| Process | Execute the associated task(s) when the event is triggered. |
| Task | Send a low inventory chat message to the "AppSheet Notifications" chat space when the process dictates. |
Next, you build out the specifics of the automation bot.
Task 4. Configure an AppSheet bot for low inventory chat notifications
In this task, you use the information you gathered. One way to diagram out the setup is the following:
Create an automation bot for low inventory
To run the automation process when an event occurs in your app, you need a bot.
-
Switch to the AppSheet UI Inventory Manager browser tab.
-
In the AppSheet editor, in the left navigation menu, click Automation (
) in the AppSheet editor.
-
Click Create my first automation.
-
In the Add a new bot dialog, click Create a new bot.
-
In the Bots pane, double click on
New Bot, and rename it to Low Inventory Bot.
Configure an automation event for product updates
You are now going to configure an event in your app that will trigger the process when the event occurs.
-
Click Configure Event.
-
Click Create a custom event.
In the Settings pane on the right configure the following:
-
For Event name, type Low Inventory Event
-
If not already set by default, for Event Type, select Data Change.
Events can be triggered on a fixed schedule or based on a change in data in the app's tables. For ease of testing in this lab environment, you use Data Change. -
Click Updates only.
This event will be triggered when a row in the table is updated through the app.
-
For the Table name that the event will observe, select Products.
-
To launch the Expression Assistant, click into the Condition field.
The Expression Assistant form opens.
-
For Condition for event Low Inventory (Yes/No), type:
[Current Inventory]<[Minimum Acceptable Inventory] The event will be triggered whenever a row in the Products table is updated whose current inventory is less than the minimum acceptable inventory. -
In the Expression Assistant, click Save.
Create an automation process for low inventory
In AppSheet, a process is a set of steps that are executed in sequence.
-
Check that you’re still in the AppSheet editor Automation section.
-
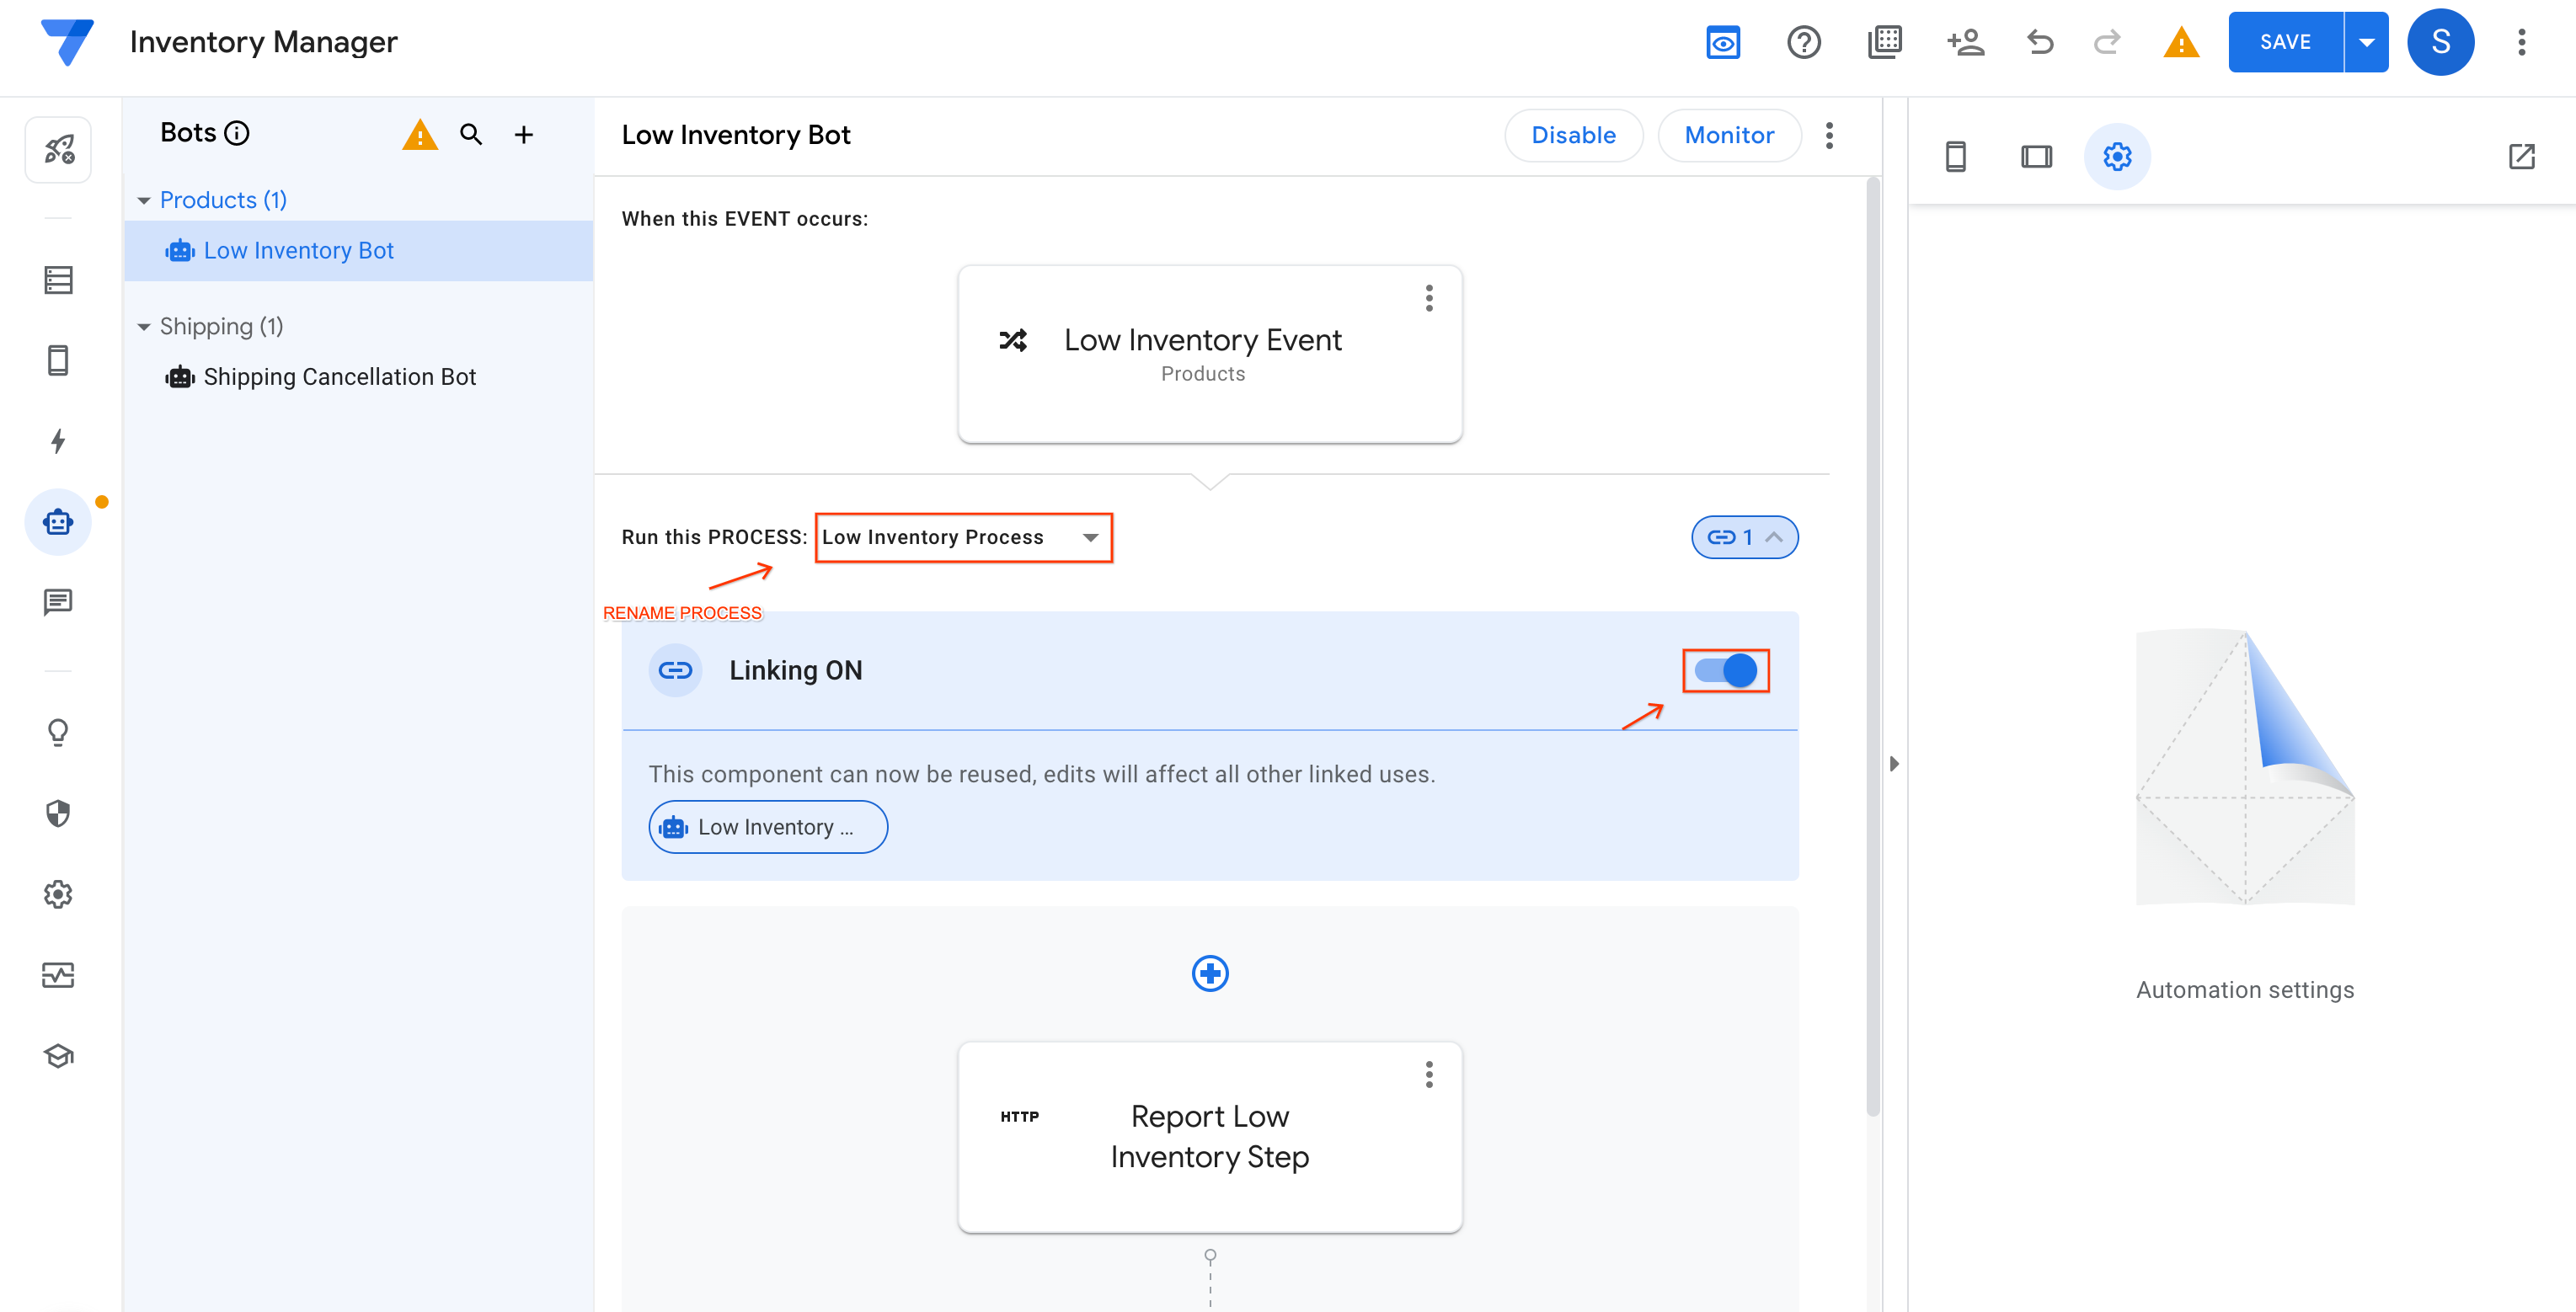
Click the drop-down next to Run this PROCESS, and then click Create new process.
-
To enable the toggle, click Link (
).
-
Once enabled, you will see a field next to Run this PROCESS. Rename the process to Low Inventory Process.
-
To add a step for the process, click Add a step.
-
Select Create a custom step.
-
Click into New step.
-
For the name of the step, type Report Low Inventory Step
Create an automation task to send a message to a Google Chat space
Webhook in AppSheet involves creating a task that is executed by your automation.
-
Check that you’re still in the AppSheet editor Automation section and the Low Inventory Bot is selected.
-
For Run a task, make sure that the Custom task is selected.
-
In the Settings pane on the right, enable the toggle by clicking on Link (
-
For the task configuration, specify the following, and leave the remaining settings as their defaults:
Process name to re-open.| Property | Value (enter or select) |
|---|---|
| Task name | Report Low Inventory Task |
| Task category | Call a webhook |
| Table name | Products |
| Preset | Custom |
| Url | For URL, enter the webhook URL that you copied from the chat space. You can find it again by choosing Manage Webhooks from the "AppSheet Notifications" drop-down menu. It will look something like https://chat.googleapis.com/v1/spaces/xxxyyyzzz (where xxxyyyzzz will be a set of random characters) |
| HTTP Verb | Post |
| HTTP Content Type | JSON |
| Body | {"text": "<<[Product Name]>> is low on inventory (currently <<[Current Inventory]>> while minimum acceptable is <<[Minimum Acceptable Inventory]>>)."} |
AppSheet supports the use of << and >> characters for variable substitution. These delimiting characters are used in the Body element to substitute the value of Product Name and Current Inventory columns in the text message.
Click SAVE.
Ignore any warnings that may be reported.
Now is a good time to review what you created. You now have an automation bot which will be triggered when
- the item in the Products table is updated (this is the event) AND
- the current inventory value is less than the minimum acceptable inventory (this is the condition).
The process you specified is to run a single task - to send a message to your Google Chat space indicating the product is low on inventory. It knows where to send the message because you configured a webhook pointing to the chat space.
The next task is to test your configuration to be sure that everything works as designed.
Task 5. Test the low inventory bot with the webhook to Google Chat
In this task you test the automation you just configured by triggering a relevant event. Because you configured the Low Inventory Bot to trigger whenever there are "Updates Only" AND the inventory on that item is low, you want to test that specific scenario. One easy test is to make an update to the price on an inventory item that meets the condition. One such inventory item is the "Paper Towel Holder".
-
To reload the app definition, click Sync (
) in the app preview. If the app preview is not visible, refresh AppSheet in your browser.
Note: If the app preview doesn't already show the Inventory Manager app, select it from the preview pane menu (three horizontal lines). To see the inventory, click the phone icon. -
In the app preview, click Products to be sure you're looking at items in the Products table.
-
Click the Paper Towel Holder product to view its details. You might need to scroll the list of products.
-
To Edit the product details, click the pencil icon.
-
Update the product's Price in the app to any value.
-
Click Next.
-
Notice the current values of the item:
Minimum Acceptable Inventory Current Inventory 20 11 Does the expression
[Current Inventory]<[Minimum Acceptable Inventory]evaluate to true?Yes, because 11 is less than 20. Good, that means this update will trigger your automation bot.
-
Click Save.
Wait a few seconds for the app to sync the update to the backend.
-
Navigate to the Google Chat space tab.
A chat message from the AppSheet bot reports the product with low inventory.
Paper Towel Holder is low on inventory (currently 11 while minimum acceptable is 20). -
Notice that Paper Towel Holder had been low on inventory before you modified the price. In fact, you could have updated any product details of Paper Towel Holder and still got the low inventory message in your chat space. Why is that? Well, it was when the Products table was updated that your bot was triggered to fire off the message to your chat space. By design, you specified in your automation that you wanted to be notified that the current inventory value was less than the minimum inventory value only when an update to the product data occurs. If desired, you can design the bot differently.
-
Repeat the earlier testing steps making a change to the Placemats product this time.
Did you see a message in the Google Chat space? Why or why not? Hint: did the product meet the condition that the inventory was low?
Click Check my progress to verify the objective.
Task 6. Create a second automation for shipping cancellations
The new bot will report whenever a shipping order (in the Shipping table) has been canceled. It will inform through the Google Chat space the number of items that were returned to inventory (the Products table).

Create an automation bot for shipping cancellations
To run the automation process when an event occurs in your app, you need a bot.
-
Select the Inventory Manager - AppSheet tab if not already on that tab.
-
In the AppSheet editor, in the left navigation menu, click Automation (
-
In the Bots pane, click Crete a new bot (
+). -
In the Add a new bot dialog, click Create a new bot.
-
Under the Bots pane, double click on the
New Bot, and rename it to "Shipping Cancellation Bot".
Configure an automation event when shipping is canceled
You are now going to configure an event in your app that will cause the process to run when the event is triggered.
-
Click Configure Event.
-
Click Create a custom event.
In the Settings pane on the right, configure the following:
-
For Event name, type Shipping Cancellation Event
-
For Event Type, select Data Change.
-
Click Deletes only.
This event will be triggered when a row in the table is deleted through the app (that is, when an order is canceled).
-
For the Table name that the event will observe, select Shipping.
The event will be triggered whenever a row in the Shipping table is deleted. -
Notice that for this automation event you did not enter a condition. It's not always necessary. The important thing is to determine when you want notifications (the condition, if any) and where they should go (the webhook).
Create an automation process for shipping cancellations
In AppSheet, a process is a set of steps that are executed in sequence.
-
Check that you’re still in the AppSheet editor Automation section.
-
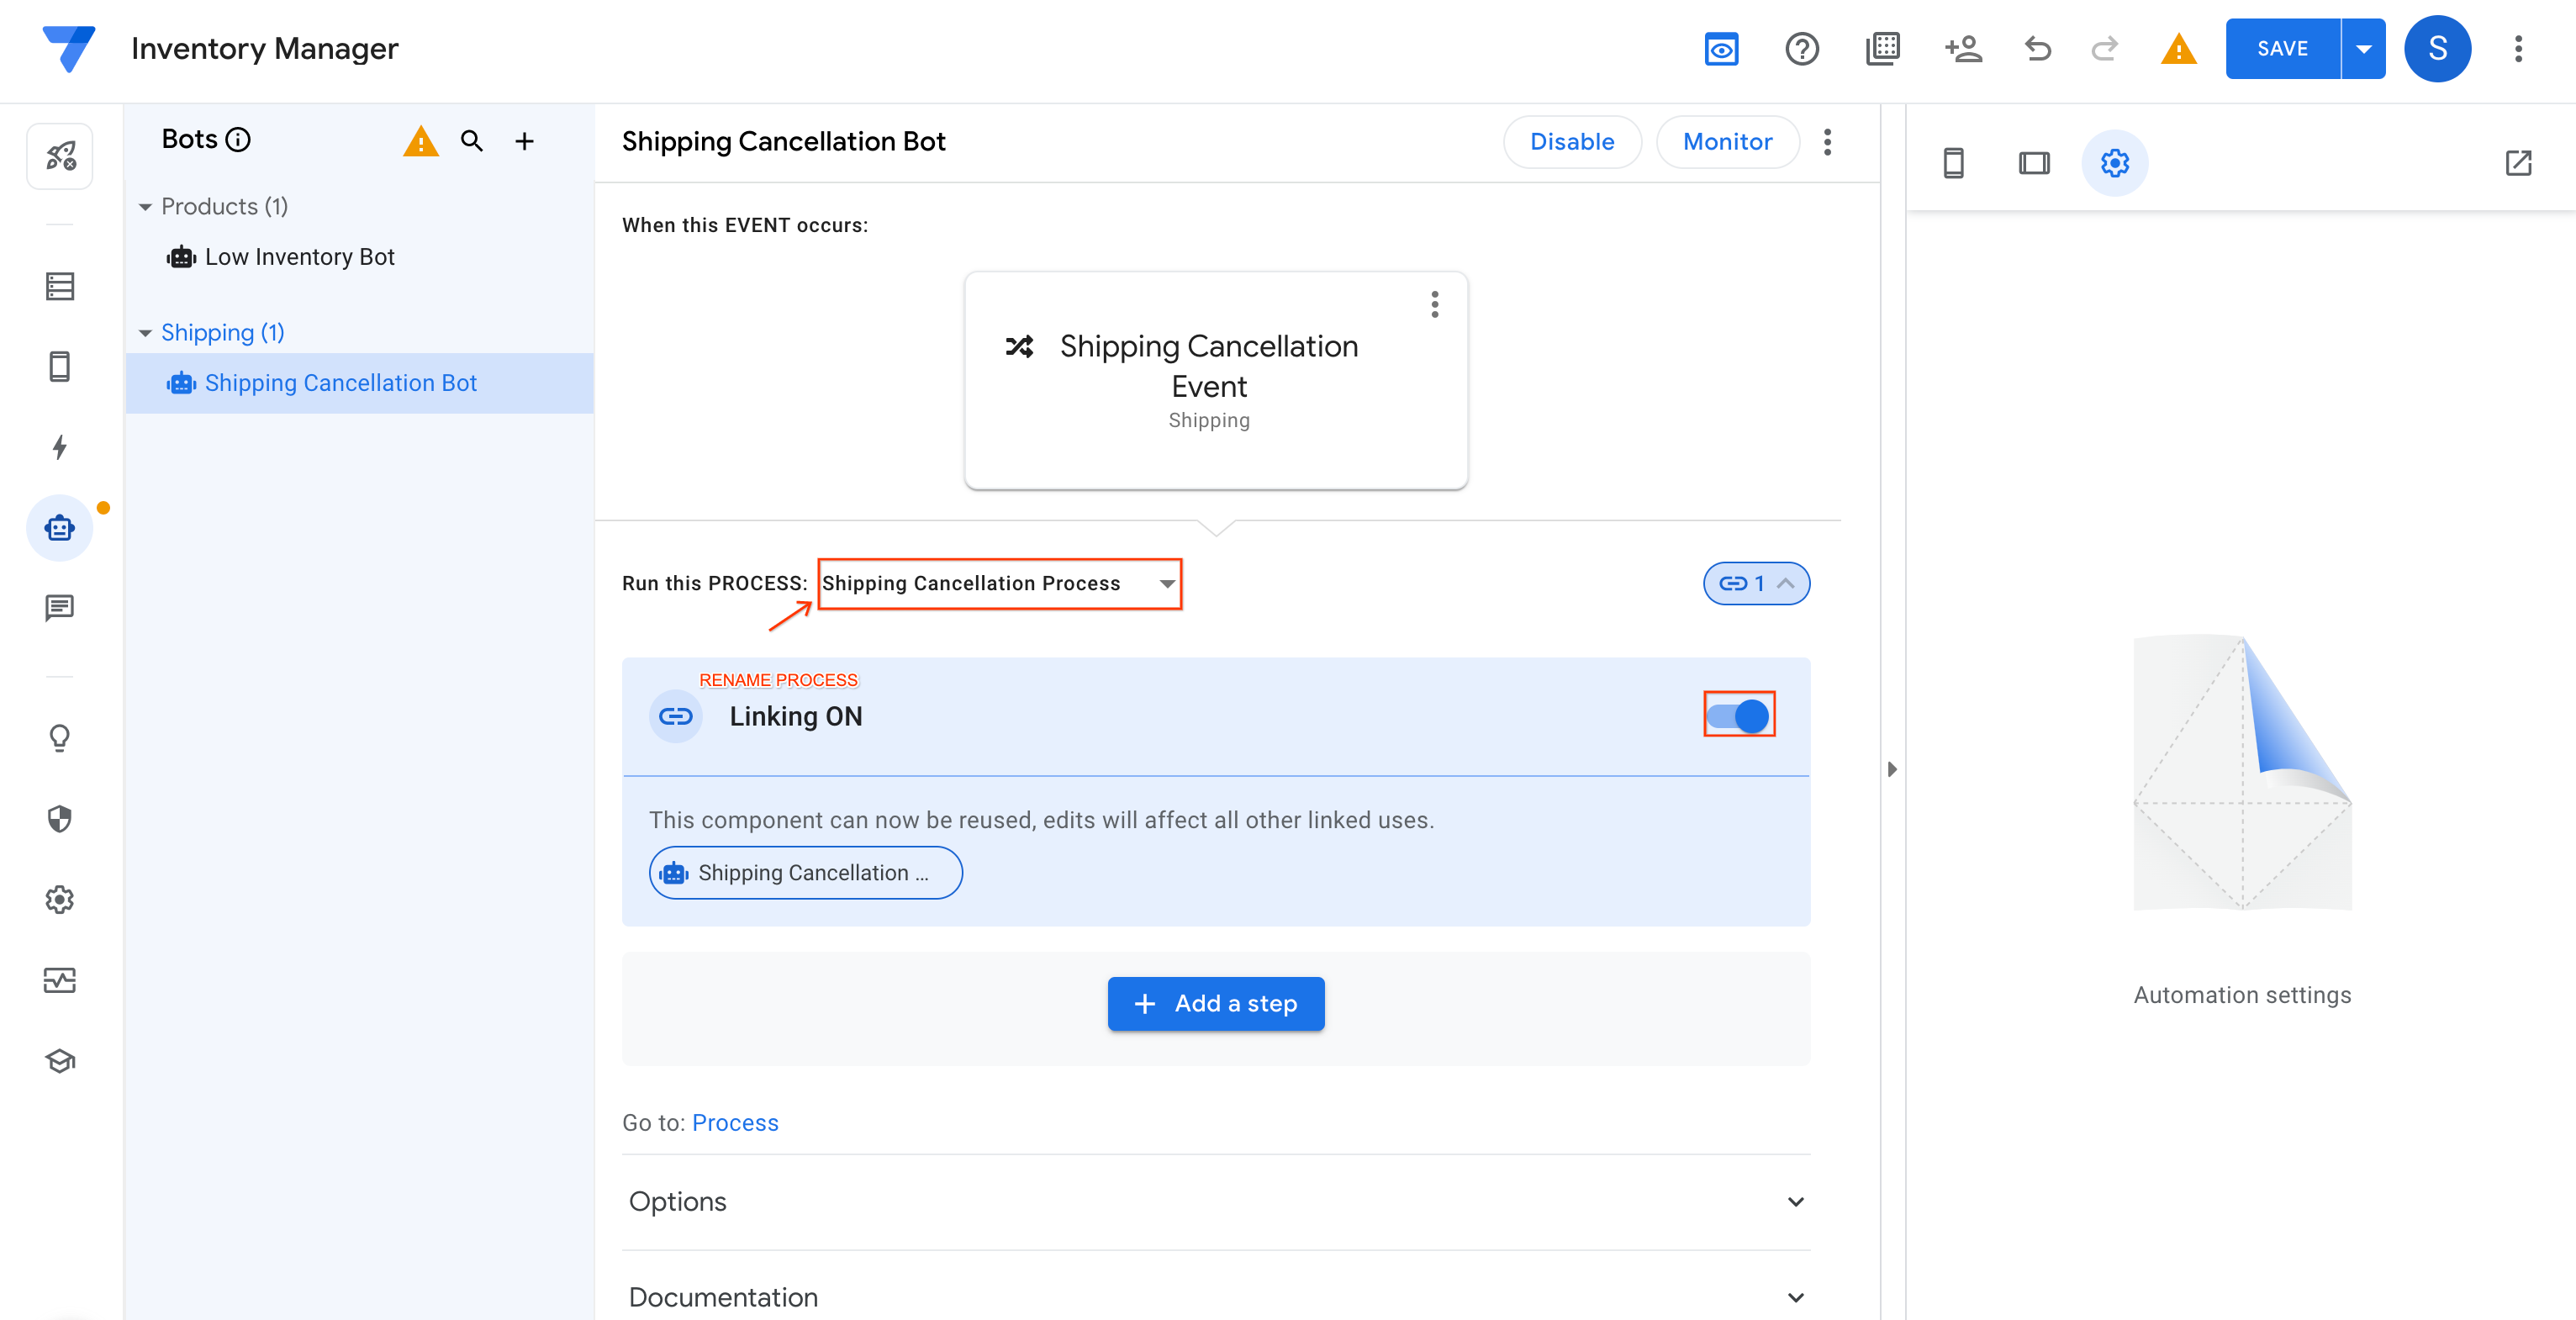
Click the drop-down next to Run this PROCESS, and then click Create new process.
-
Enable the toggle by clicking Link (
-
Once enabled, you will see a field next to Run this PROCESS. Rename the process to Shipping Cancellation Process.
-
To add a step for the process, click Add a step.
-
Select Create a custom step.
-
Click into New step.
-
For the name of the step, type Report Shipping Canceled Step
Create an automation task to send a message to a Google Chat space
Webhook in AppSheet involves creating a task that is executed by your automation.
-
Check that you’re still in the AppSheet editor Automation section and Shipping Cancellation Bot is selected.
-
In Automation section, for Run a task, make sure Custom task is selected.
-
In the Settings pane on the right, enable the toggle by clicking Link (
-
In the settings pane for the task, specify the following, and leave the remaining settings as their defaults:
Process name to re-open.| Property | Value (enter or select) |
|---|---|
| Task name | Report Shipping Canceled Task |
| Task category | Call a webhook |
| Table name | Shipping |
| Preset | Custom |
| Url | For URL, enter the webhook URL for the chat space (you can find it again by choosing Manage Webhooks from the "AppSheet Notifications" drop-down menu). It will look something like https://chat.googleapis.com/v1/spaces/xxxyyyzzz |
| HTTP Verb | Post |
| HTTP Content Type | JSON |
| Body | {"text": "Shipping of <<[Product ID]>> was canceled. <<[Quantity shipped]>> will be returned to inventory."} |
Click SAVE.
Review what you've created. You now have an automation bot which will be triggered when the item in the Shipping table is deleted (that is, the event). This time, you did not specify a condition. The process you specified is to run a single task - to send a message to your Google Chat space indicating the cancellation. It knows where to send the message because you configured a webhook pointing to the chat space.
The next task is to test your configuration to be sure that everything works as designed.
Task 7. Test the shipping cancellation bot with the webhook to Google Chat
You test the automation you just configured by triggering a relevant event. Because you configured the Shipping Cancellation Bot to trigger whenever there are "Deletes", you want to test that specific scenario. This test is fairly straightforward as the event will be triggered in the case that you delete any shipping item in the Shipping table.
-
To reload the app definition, in the app preview, click Sync (
Note: If the app preview doesn't already show the Inventory app, select it from the preview pane menu (three horizontal lines). You may also need to click the phone icon to see the table data. -
Select the Ship/Recv table.
-
Click the Paper Towel Holder product to view its details.
-
Click to delete the item.
-
To confirm that you want to delete the shipping item, click DELETE.
Reminder: you're deleting an item from the Shipping table, not the Products table. -
Wait a few seconds for the app to sync the update to the backend.
-
Navigate to the Google Chat space.
A chat message from the AppSheet bot reports the product shipping was canceled.
Shipping of Paper Towel Holder was cancelled. 11 will be returned to inventory. -
Navigate to the Paper Towel Holder item in the Products table.
-
Note the current values of the item:
Minimum Acceptable Inventory Current Inventory 20 22 The AppSheet app updated the inventory in the products table to reflect the deletion of the shipping item. That behavior was designed into the app previously. You added additional value to the app by also sending this notification to the Google Chat space (through webhook).
-
Repeat the earlier steps, except this time on the Placemats product.
Did you see a message in the Google Chat space? Think about why or why not. That is, were all the conditions met to trigger the automation?
-
Try modifying any other product's details to see what happens. This is your chance to play without fear of messing up anything.
Click Check my progress to verify the objective.
Congratulations!
You have successfully configured your app to integrate with external services using webhooks.
Now that you've completed this lab, you know how to:
- Describe what is a webhook in AppSheet and its purpose.
- Configure a webhook to integrate your app with a Google Chat service.
- Test your webhook, sending a message when the item in a table is updated (any field) and a basic condition evaluates to true.
In this lab, you created a bot automation. If you'd like to go a little deeper into setting up a webhook for the AppSheet REST API, continue your journey with the "Connecting AppSheet API using Webhooks" lab.
Google Cloud training and certification
...helps you make the most of Google Cloud technologies. Our classes include technical skills and best practices to help you get up to speed quickly and continue your learning journey. We offer fundamental to advanced level training, with on-demand, live, and virtual options to suit your busy schedule. Certifications help you validate and prove your skill and expertise in Google Cloud technologies.
Manual Last Updated March 27, 2023
Lab Last tested March 27, 2023
Copyright 2024 Google LLC All rights reserved. Google and the Google logo are trademarks of Google LLC. All other company and product names may be trademarks of the respective companies with which they are associated.