Checkpoints
Create an API Key
/ 30
Upload image to a bucket
/ 30
Analyzing the image's text with the Natural Language API
/ 40
Extract, Analyze, and Translate Text from Images with the Cloud ML APIs
- GSP075
- Overview
- Objectives
- Setup and requirements
- Task 1. Create an API key
- Task 2. Upload an image to a Cloud Storage bucket
- Task 3. Create your Cloud Vision API request
- Task 4. Call the text detection method
- Task 5. Send text from the image to the Translation API
- Task 6. Analyzing the image's text with the Natural Language API
- Congratulations!
GSP075

Overview
In this lab you'll explore the power of machine learning by using multiple machine learning APIs together. Start with Cloud Vision API's text detection method to make use of Optical Character Recognition (OCR) to extract text from images. Then, learn how to translate that text with the Translation API and analyze it with the Natural Language API.
Objectives
In this lab, you will:
- Create a Vision API request and calling the API with curl
- Use the text detection (OCR) method of the Vision API
- Use the Translation API to translate text from your image
- Use the Natural Language API to analyze the text
Setup and requirements
Before you click the Start Lab button
Read these instructions. Labs are timed and you cannot pause them. The timer, which starts when you click Start Lab, shows how long Google Cloud resources will be made available to you.
This hands-on lab lets you do the lab activities yourself in a real cloud environment, not in a simulation or demo environment. It does so by giving you new, temporary credentials that you use to sign in and access Google Cloud for the duration of the lab.
To complete this lab, you need:
- Access to a standard internet browser (Chrome browser recommended).
- Time to complete the lab---remember, once you start, you cannot pause a lab.
How to start your lab and sign in to the Google Cloud console
-
Click the Start Lab button. If you need to pay for the lab, a pop-up opens for you to select your payment method. On the left is the Lab Details panel with the following:
- The Open Google Cloud console button
- Time remaining
- The temporary credentials that you must use for this lab
- Other information, if needed, to step through this lab
-
Click Open Google Cloud console (or right-click and select Open Link in Incognito Window if you are running the Chrome browser).
The lab spins up resources, and then opens another tab that shows the Sign in page.
Tip: Arrange the tabs in separate windows, side-by-side.
Note: If you see the Choose an account dialog, click Use Another Account. -
If necessary, copy the Username below and paste it into the Sign in dialog.
{{{user_0.username | "Username"}}} You can also find the Username in the Lab Details panel.
-
Click Next.
-
Copy the Password below and paste it into the Welcome dialog.
{{{user_0.password | "Password"}}} You can also find the Password in the Lab Details panel.
-
Click Next.
Important: You must use the credentials the lab provides you. Do not use your Google Cloud account credentials. Note: Using your own Google Cloud account for this lab may incur extra charges. -
Click through the subsequent pages:
- Accept the terms and conditions.
- Do not add recovery options or two-factor authentication (because this is a temporary account).
- Do not sign up for free trials.
After a few moments, the Google Cloud console opens in this tab.

Activate Cloud Shell
Cloud Shell is a virtual machine that is loaded with development tools. It offers a persistent 5GB home directory and runs on the Google Cloud. Cloud Shell provides command-line access to your Google Cloud resources.
- Click Activate Cloud Shell
at the top of the Google Cloud console.
When you are connected, you are already authenticated, and the project is set to your Project_ID,
gcloud is the command-line tool for Google Cloud. It comes pre-installed on Cloud Shell and supports tab-completion.
- (Optional) You can list the active account name with this command:
- Click Authorize.
Output:
- (Optional) You can list the project ID with this command:
Output:
gcloud, in Google Cloud, refer to the gcloud CLI overview guide.
Task 1. Create an API key
Since you'll be using curl to send a request to the Vision API, generate an API key to pass in your request URL.
-
To create an API key, navigate to: Navigation Menu > APIs & services > Credentials.
-
Click + Create Credentials.
-
In the drop down menu, select API key.
-
Next, copy the key you just generated and click Close.
-
Now save the API key to an environment variable to avoid having to insert the value of your API key in each request.
-
Run the following in Cloud Shell, replacing
<your_api_key>with the key you just copied:
Click Check my progress to verify your performed task.
Task 2. Upload an image to a Cloud Storage bucket
Create a Cloud Storage bucket
There are two ways to send an image to the Vision API for image detection: by sending the API a base64 encoded image string, or passing it the URL of a file stored in Cloud Storage. For this lab you'll create a Cloud Storage bucket to store your images.
-
Navigate to the Navigation menu > Cloud Storage browser in the Console, then click Create bucket.
-
Give your bucket a unique name:
-bucket. -
After naming your bucket, click Choose how to control access to objects.
-
Uncheck the box for Enforce public access prevention on this bucket.
-
Choose Fine-grained under Access Control and click Create.
Upload an image to your bucket
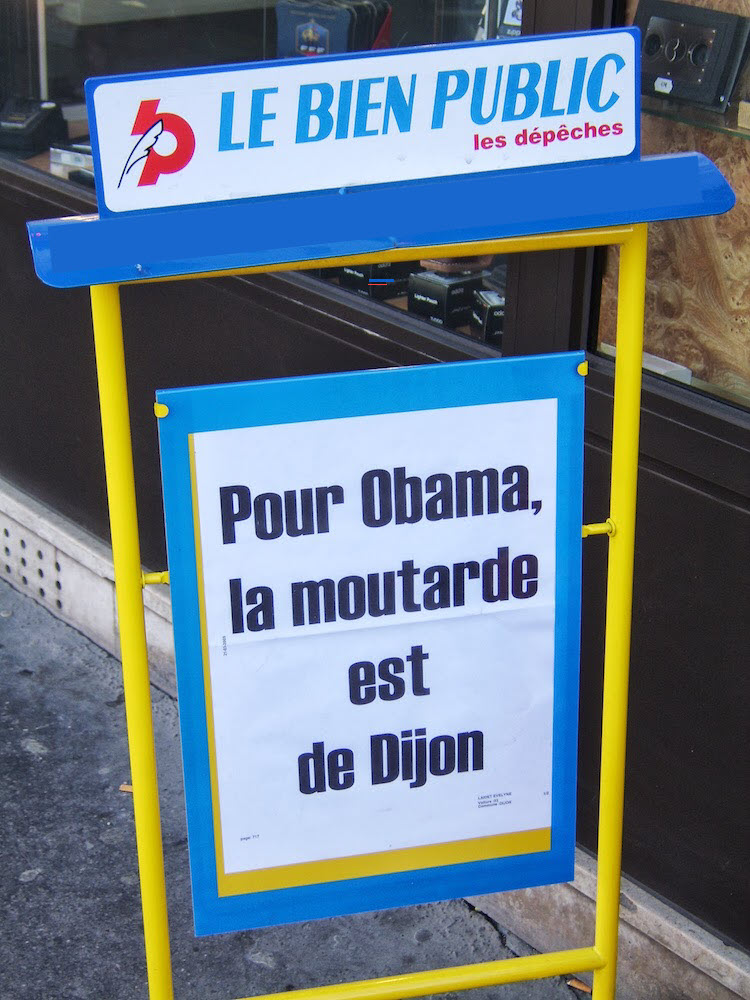
- Right click on the following image of a French sign, then click Save image as and save it to your computer as sign.jpg.
- Navigate to the bucket you just created in the Cloud Storage browser and click Upload files, then select sign.jpg.
Next you'll allow the file to be viewed publicly while keeping the access to the bucket private.
- Click on the 3 dots for the image file:

-
Select Edit access.
-
Click Add Entry and set the following:
- Select Public for the Entity.
- Ensure allUsers is the value for the Name.
- Select Reader for the Access.
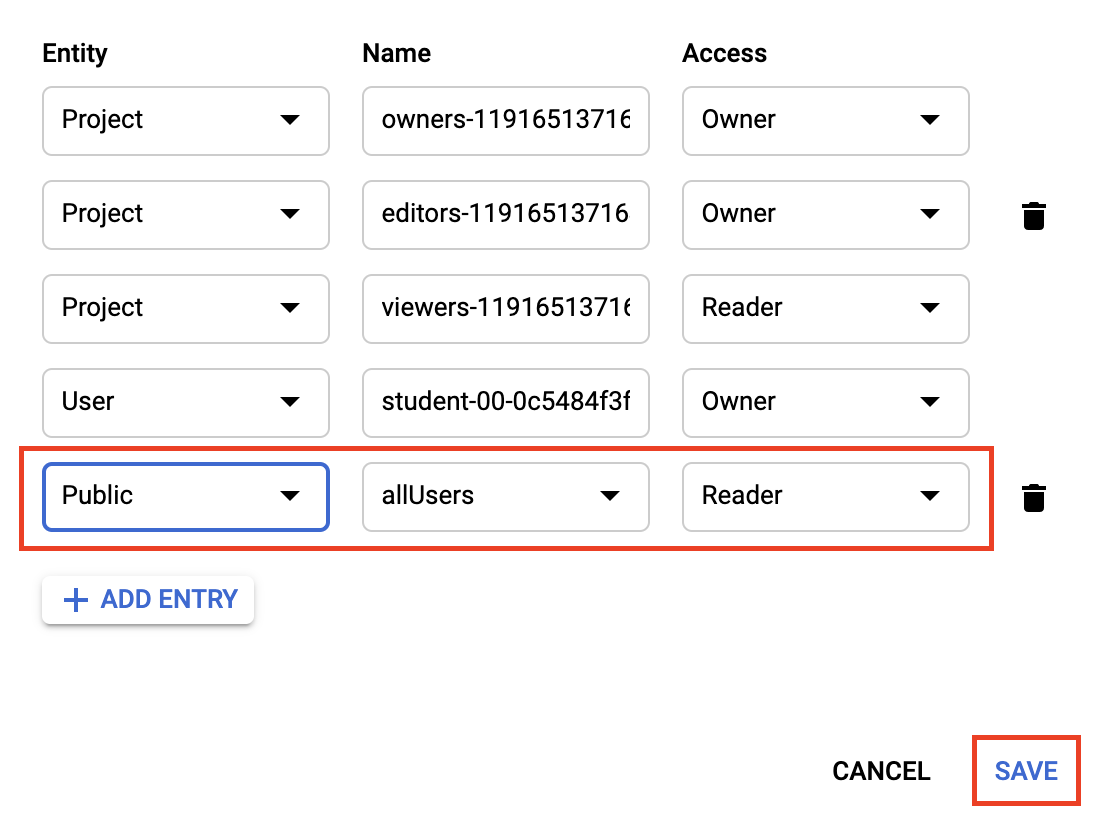
- Click Save.
You'll now see that the file has public access.
Now that you have the file in your bucket, you're ready to create a Vision API request, passing it the URL of this picture.
Click Check my progress to verify your performed task.
Task 3. Create your Cloud Vision API request
- In your Cloud Shell environment, create an
ocr-request.jsonfile, then add the code below to the file, replacing my-bucket-name with the name of the bucket you created. You can create the file using one of your preferred command line editors (nano,vim,emacs) or click the pencil icon to open the code editor in Cloud Shell:

- Add the following to your
ocr-request.jsonfile:
You're going to use the TEXT_DETECTION feature of the Cloud Vision API. This will run optical character recognition (OCR) on the image to extract text.
Task 4. Call the text detection method
- In Cloud Shell, call the Cloud Vision API with
curl:
The first part of your response should look like the following:
The OCR method is able to extract lots of text from the image.
The first piece of data you get back from textAnnotations is the entire block of text the API found in the image. This includes:
- the language code (in this case fr for French)
- a string of the text
- a bounding box indicating where the text was found in the image
Then you get an object for each word found in the text with a bounding box for that specific word.
Unless you speak French you probably don't know what this says. The next step is translation.
- Run the following
curlcommand to save the response to anocr-response.jsonfile so it can be referenced later:
Task 5. Send text from the image to the Translation API
The Translation API can translate text into 100+ languages. It can also detect the language of the input text. To translate the French text into English, pass the text and the language code for the target language (en-US) to the Translation API.
- First, create a
translation-request.jsonfile and add the following to it:
q is where you'll pass the string to translate.
-
Save the file.
-
Run this Bash command in Cloud Shell to extract the image text from the previous step and copy it into a new
translation-request.json(all in one command):
- Now you're ready to call the Translation API. This command will also copy the response into a
translation-response.jsonfile:
- Run this command to inspect the file with the Translation API response:
Now you can understand more of what the sign said!
In the response:
-
translatedTextcontains the resulting translation -
detectedSourceLanguageisfr, the ISO language code for French.
The Translation API supports 100+ languages, all of which are listed in the Language support reference.
In addition to translating the text from our image, you might want to do more analysis on it. That's where the Natural Language API comes in handy. Onward to the next step!
Task 6. Analyzing the image's text with the Natural Language API
The Natural Language API helps you understand text by extracting entities, analyzing sentiment and syntax, and classifying text into categories. Use the analyzeEntities method to see what entities the Natural Language API can find in the text from your image.
- To set up the API request, create a
nl-request.jsonfile with the following:
In the request, you're telling the Natural Language API about the text you're sending:
-
type: supported type values are
PLAIN_TEXTorHTML. -
content: pass the text to send to the Natural Language API for analysis. The Natural Language API also supports sending files stored in Cloud Storage for text processing. To send a file from Cloud Storage, replace
contentwithgcsContentUriand use the value of the text file's uri in Cloud Storage. -
encodingType: tells the API which type of text encoding to use when processing the text. The API will use this to calculate where specific entities appear in the text.
- Run this Bash command in Cloud Shell to copy the translated text into the content block of the Natural Language API request:
The nl-request.json file now contains the translated English text from the original image. Time to analyze it!
- Call the
analyzeEntitiesendpoint of the Natural Language API with thiscurlrequest:
If you scroll through the response you can see the entities the Natural Language API found:
For entities that have a wikipedia page, the API provides metadata including the URL of that page along with the entity's mid. The mid is an ID that maps to this entity in Google's Knowledge Graph. To get more information on it, you could call the Knowledge Graph API, passing it this ID. For all entities, the Natural Language API tells us the places it appeared in the text (mentions), the type of entity, and salience (a [0,1] range indicating how important the entity is to the text as a whole). In addition to English, the Natural Language API also supports the languages listed in the Language Support reference.
Looking at this image it's relatively easy to pick out the important entities, but if you had a library of thousands of images this would be much more difficult. OCR, translation, and natural language processing can help to extract meaning from large datasets of images.
Click Check my progress to verify your performed task.
Congratulations!
You've learned how to combine 3 different machine learning APIs: the Vision API's OCR method extracted text from an image, then the Translation API translated that text to English and the Natural Language API to found entities in that text. You can use these APIs together to extract meaning from large datasets of images.
Next steps / learn more
- Learn more from the tutorials and docs for Vision, Translation, and Natural Language
Google Cloud training and certification
...helps you make the most of Google Cloud technologies. Our classes include technical skills and best practices to help you get up to speed quickly and continue your learning journey. We offer fundamental to advanced level training, with on-demand, live, and virtual options to suit your busy schedule. Certifications help you validate and prove your skill and expertise in Google Cloud technologies.
Manual Last Updated February 14, 2024
Lab Last Tested October 06, 2023
Copyright 2024 Google LLC All rights reserved. Google and the Google logo are trademarks of Google LLC. All other company and product names may be trademarks of the respective companies with which they are associated.